【POP动画引擎教程 01】实现图片折叠效果
来源:互联网 发布:梧桐一叶,天下知秋 编辑:程序博客网 时间:2024/05/05 22:54
直到我看到了POP,我的热情像刚拔开瓶盖的香槟一样喷射出来,心中那份对iOS动画的热爱的火星也被彻底点燃。因为我的终极目标是,成为一名交互动画Master。
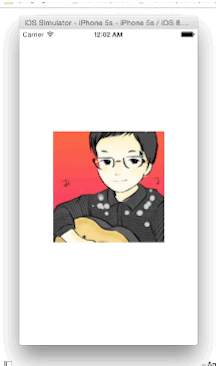
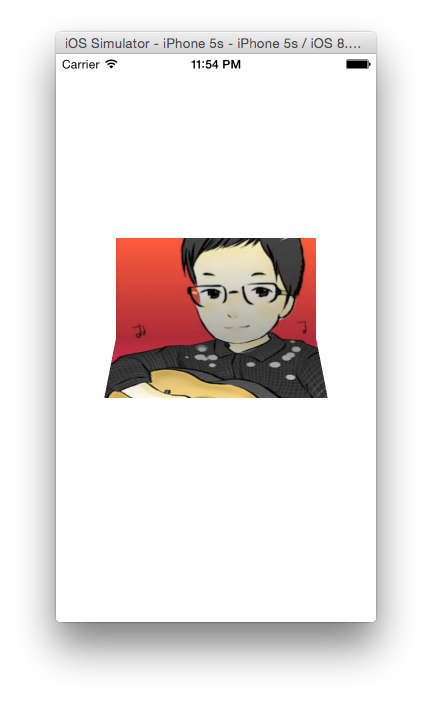
好,吹了那么多牛让我们讲点靠谱的。今天我要手把手教你实现的一个POP动画是这样的:
首先我们来分析一下。
要让一张照片从中间折过来,如果直接是把一张照片折中而且还要让上下部分显示出不同的阴影,这会非常麻烦。所以,我们使用的技巧是,把一张图切成均等的两部分。然后把切割后的两张图分别作为两个独立的view的image。当它们上下紧贴的时候看上去就像一张完整的图片,但其实是两个视图上下合并的。
有了这个思路,我们接着往下走。
怎么让上半部分view绕着水平中轴线旋转?首先中轴线的位置可以通过重写锚点的位置设置; 绕X轴旋转可以使用POPBasicAnimation中的kPOPLayerPositionX; 然后我们会想到,上半视图绕X轴旋转的角度肯定和手指滑动的距离有关。
好了,整体思路就是这样,十分符合情理。唯一需要拐个弯的小技巧就是我们把一张照片割成了两部分。
首先,我们用SB或者xib快速画出界面,之后和 PageView : UIView 绑定。PageView 是一个父视图,我们分割开的两个视图就要粘在这个视图上面。
首先我们创建上半部分视图TopView:
在PageView.m中:
#pragma mark - 上半部分-(void) addTopView{ self.topView = [[UIImageView alloc]initWithFrame:CGRectMake(0, 0, CGRectGetWidth(self.bounds), CGRectGetMidY(self.bounds))]; //把锚点移到上半视图的底部居中 self.topView.layer.anchorPoint = CGPointMake(0.5, 1.0); //把锚点位置固定在【整个PageView的中心】(可以理解为anchorPoint会吸附到position) self.topView.layer.position = CGPointMake(CGRectGetMidX(self.bounds), CGRectGetMidY(self.bounds)); //使得topView具有透视效果 self.topView.layer.transform = [self setTransform3D]; self.topView.image = [self cutImageWithID:@"top"]; self.topView.userInteractionEnabled = YES; self.topView.contentMode = UIViewContentModeScaleAspectFill; [self addSubview:_topView];}之所以要设置 self.bottomView.layer.transform = [self setTransform3D]; 是因为如果不设置Transform的这个属性,就看不到纵深的3D效果,换句话说,你不会感觉到折叠的部分在向屏幕靠近。你可以先这么写着然后注释掉这句比较一下就明白我的意思了。
self.bottomView.image = [self cutImageWithID:@"bottom"];用到了cutImageWithID 这个方法,这个方法是我们自己实现的用来把一张图片分割成两部分。具体如下:
-(UIImage *)cutImageWithID:(NSString *)ID{ CGRect rect = CGRectMake(0.f, 0.f, self.image.size.width, self.image.size.height / 2.f); if ([ID isEqualToString:@"bottom"]){ rect.origin.y = self.image.size.height / 2.f; } CGImageRef imgRef = CGImageCreateWithImageInRect(self.image.CGImage, rect); UIImage *cuttedImage = [UIImage imageWithCGImage:imgRef]; CGImageRelease(imgRef); return cuttedImage;}同样的办法创建BottomView -(void) addBottomView .
再然后就是分别给 topView 和 bottomView 增加一个 UIPanGestureRecognizer .很简单,没什么好说的。
-(void)addGestureRecognizer{ UIPanGestureRecognizer *panGesture = [[UIPanGestureRecognizer alloc]initWithTarget:self action:@selector(pan1:)]; UITapGestureRecognizer *pokeGesture = [[UITapGestureRecognizer alloc]initWithTarget:self action:@selector(poke1:)]; [self.topView addGestureRecognizer:panGesture]; [self.topView addGestureRecognizer:pokeGesture]; UIPanGestureRecognizer *panGesture2 =[[UIPanGestureRecognizer alloc]initWithTarget:self action:@selector(pan2:)]; UITapGestureRecognizer *pokeGesture2 = [[UITapGestureRecognizer alloc]initWithTarget:self action:@selector(poke2:)]; [self.bottomView addGestureRecognizer:panGesture2]; [self.bottomView addGestureRecognizer:pokeGesture2];}接下来实现这个 handlePan 的动作。 先贴代码:
-(void)pan1:(UIPanGestureRecognizer *)recognizer{ CGPoint location = [recognizer locationInView:self]; //获取手指在PageView中的初始坐标 if (recognizer.state == UIGestureRecognizerStateBegan) { self.initialLocation = location.y; [self bringSubviewToFront:self.topView]; } //如果手指在PageView里面,开始使用POPAnimation if([self isLocation:location InView:self]){ //把一个PI平均分成可以下滑的最大距离份 CGFloat percent = -M_PI / (CGRectGetHeight(self.bounds) - self.initialLocation); //POPAnimation的使用 //创建一个Animation,设置为绕着X轴旋转。还记得我们上面设置的锚点吗?设置为(0.5,0.5)。这时什么意思呢?当我们设置kPOPLayerRotationX(绕X轴旋转),那么x就起作用了,绕x所在轴;kPOPLayerRotationY,y就起作用了,绕y所在轴。 POPBasicAnimation *rotationAnimation = [POPBasicAnimation animationWithPropertyNamed:kPOPLayerRotationX]; //给这个animation设值。这个值根据手的滑动而变化,所以值会不断改变。又因为这个方法会实时调用,所以变化的值会实时显示在屏幕上。 rotationAnimation.duration = 0.01;//默认的duration是0.4 rotationAnimation.toValue =@((location.y-self.initialLocation)*percent); //把这个animation加到topView的layer,key只是个识别符。 [self.topView.layer pop_addAnimation:rotationAnimation forKey:@"rotationAnimation"]; //当松手的时候,自动复原 if (recognizer.state == UIGestureRecognizerStateEnded || recognizer.state == UIGestureRecognizerStateCancelled) { POPSpringAnimation *recoverAnimation = [POPSpringAnimation animationWithPropertyNamed:kPOPLayerRotationX]; recoverAnimation.springBounciness = 18.0f; //弹簧反弹力度 recoverAnimation.dynamicsMass = 2.0f; recoverAnimation.dynamicsTension = 200; recoverAnimation.toValue = @(0); [self.topView.layer pop_addAnimation:recoverAnimation forKey:@"recoverAnimation"]; } } //手指超出边界也自动复原 if (location.y < 0 || (location.y - self.initialLocation)>(CGRectGetHeight(self.bounds))-(self.initialLocation)) { recognizer.enabled = NO; POPSpringAnimation *recoverAnimation = [POPSpringAnimation animationWithPropertyNamed:kPOPLayerRotationX]; recoverAnimation.springBounciness = 18.0f; //弹簧反弹力度 recoverAnimation.dynamicsMass = 2.0f; recoverAnimation.dynamicsTension = 200; recoverAnimation.toValue = @(0); [self.topView.layer pop_addAnimation:recoverAnimation forKey:@"recoverAnimation"]; } recognizer.enabled = YES;}[self bringSubviewToFront:self.topView];为了让上半个视图旋转超过90度的时候能看到背面的图案,需要吧 topView 挪到最上面。
kPOPLayerRotationX的作用是让动画绕着 X轴 旋转。
还考虑了 取消触摸 或者 手指超出边界 的情况下,让视图自动复原。
现在运行一下就差不多能出效果的。剩下的事情就是细节优化了。这个需要你凭审美微调了。
最后一步我们将效果更加优化,当折叠的时候,我们给 topView 和 bottomView 添加阴影。
我们创建两个渐变图层:
@property (nonatomic) CAGradientLayer *topShadowLayer;@property (nonatomic) CAGradientLayer *bottomShadowLayer;初始化:
self.topShadowLayer = [CAGradientLayer layer]; self.topShadowLayer.frame = self.topView.bounds; self.topShadowLayer.colors = @[(id)[UIColor clearColor].CGColor, (id)[UIColor blackColor].CGColor]; self.topShadowLayer.opacity = 0; [self.topView.layer addSublayer:self.topShadowLayer];然后,在手势的方法里面,根据滑动的距离/PageView总高度的百分比设置layer的透明度,从而达到阴影随着拖动的距离变大而加深。
//添加阴影 if ([[self.topView.layer valueForKeyPath:@"transform.rotation.x"] floatValue] < -M_PI_2) { [CATransaction begin]; [CATransaction setValue:(id)kCFBooleanTrue forKey:kCATransactionDisableActions]; self.topShadowLayer.opacity = 0.0; self.bottomShadowLayer.opacity = (location.y-self.initialLocation)/(CGRectGetHeight(self.bounds)-self.initialLocation); [CATransaction commit]; } else { [CATransaction begin]; [CATransaction setValue:(id)kCFBooleanTrue forKey:kCATransactionDisableActions]; CGFloat opacity = (location.y-self.initialLocation)/(CGRectGetHeight(self.bounds)-self.initialLocation); self.bottomShadowLayer.opacity = opacity; self.topShadowLayer.opacity = opacity; [CATransaction commit]; }结尾:
这只是这个POP教程的第一篇,代码以可以在这里自取。接下来我会好好学习POP这个动画引擎,然后每次啃完一块骨头就写博客记录,供自己日后学习。
- 【POP动画引擎教程 01】实现图片折叠效果
- ios pop 折叠动画
- 图片折叠效果CSS实现
- IOS 图片折叠效果实现
- 补间动画实现折叠的效果
- 动画引擎pop
- 聊聊动画引擎 pop
- Android学习 图片折叠效果的实现
- iOS - 图片实现多层折叠效果
- iOS - 图片实现多层折叠效果
- pop 阻尼动画效果
- POP弹性动画效果
- iOS 图片折叠效果
- iOS pushViewController 实现push 和pop 默认动画效果
- ios实现图片动画效果
- opencv实现图片动画效果
- TextView的折叠动画效果
- listview删除动画 折叠效果
- C语言中强制转换float为int
- leetcode 137. Single Number II
- U3D启动画面-Splash Image
- 排列组合字符使用封装
- 点云pcd文件的生成
- 【POP动画引擎教程 01】实现图片折叠效果
- 《SQL反模式》笔记
- CocoaPods安装和使用以及常见问题的解答
- Unity动态获取网络代码资源
- c++第五次上机实验
- 算法总结
- 【LeetCode052】N皇后问题,回溯法
- 配置控件背景的xml文件
- 第三方支付平台:银联在线支付