python 装饰器
来源:互联网 发布:string数组去掉空格 编辑:程序博客网 时间:2024/05/07 00:59
“在Python中,函数本身也是对象”这一本质。那不妨慢慢来,从最基本的概念开始,讨论一下这个问题:
1. Python中一切皆对象
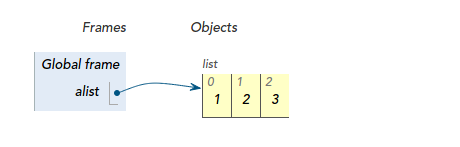
这恐怕是学习Python最有用的一句话。想必你已经知道Python中的list, tuple, dict等内置数据结构,当你执行:
alist = [1, 2, 3]时,你就创建了一个列表对象,并且用alist这个变量引用它:
<img src="https://pic2.zhimg.com/d19b60d824c68780fd863c32fb46226d_b.jpg" data-rawwidth="460" data-rawheight="147" class="origin_image zh-lightbox-thumb" width="460" data-original="https://pic2.zhimg.com/d19b60d824c68780fd863c32fb46226d_r.jpg">当然你也可以自己定义一个类:
 当然你也可以自己定义一个类:
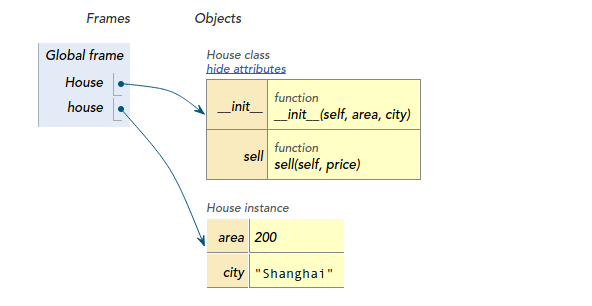
class House(object): def __init__(self, area, city): self.area = area self.city = city def sell(self, price): [...] #other code return price然后创建一个类的对象:
house = House(200, 'Shanghai')OK,你立马就在上海有了一套200平米的房子,它有一些属性(area, city),和一些方法(__init__, self):
<img src="https://pic2.zhimg.com/5f96cfc3c50822c7f838849a27421805_b.jpg" data-rawwidth="592" data-rawheight="306" class="origin_image zh-lightbox-thumb" width="592" data-original="https://pic2.zhimg.com/5f96cfc3c50822c7f838849a27421805_r.jpg">
2. 函数是第一类对象
和list, tuple, dict以及用House创建的对象一样,当你定义一个函数时,函数也是对象:
def func(a, b): return a+b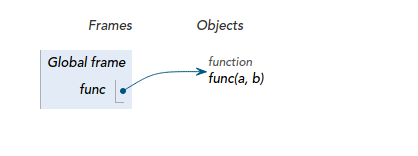 在全局域,函数对象被函数名引用着,它接收两个参数a和b,计算这两个参数的和作为返回值。
所谓第一类对象,意思是可以用标识符给对象命名,并且对象可以被当作数据处理,例如赋值、作为参数传递给函数,或者作为返回值return 等
因此,你完全可以用其他变量名引用这个函数对象:
add = func<img src="https://pic4.zhimg.com/c45b67c3f4394d4296415730eacf186b_b.jpg" data-rawwidth="434" data-rawheight="174" class="origin_image zh-lightbox-thumb" width="434" data-original="https://pic4.zhimg.com/c45b67c3f4394d4296415730eacf186b_r.jpg">这样,你就可以像调用func(1, 2)一样,通过新的引用调用函数了:
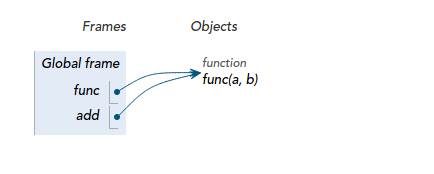 这样,你就可以像调用func(1, 2)一样,通过新的引用调用函数了:
print func(1, 2)print add(1, 2) #the same as func(1, 2)
或者将函数对象作为参数,传递给另一个函数:
def caller_func(f): return f(1, 2)if __name__ == "__main__": print caller_func(func)<img src="https://pic2.zhimg.com/12e1beef560929ed34f1b9f075109e31_b.jpg" data-rawwidth="549" data-rawheight="358" class="origin_image zh-lightbox-thumb" width="549" data-original="https://pic2.zhimg.com/12e1beef560929ed34f1b9f075109e31_r.jpg">
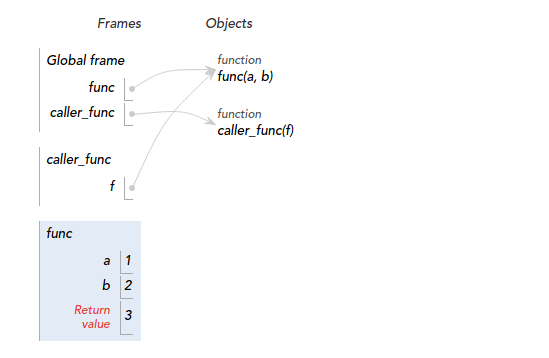
可以看到,
- 函数对象func作为参数传递给caller_func函数,传参过程类似于一个赋值操作f=func;
- 于是func函数对象,被caller_func函数作用域中的局部变量f引用,f实际指向了函数func;cc
- 当执行return f(1, 2)的时候,相当于执行了return func(1, 2);
3. 函数对象 vs 函数调用
无论是把函数赋值给新的标识符,还是作为参数传递给新的函数,针对的都是函数对象本身,而不是函数的调用。
用一个更加简单,但从外观上看,更容易产生混淆的例子来说明这个问题。例如定义了下面这个函数:
def func(): return "hello,world"然后分别执行两次赋值:
ref1 = func #将函数对象赋值给ref1ref2 = func() #调用函数,将函数的返回值("hello,world"字符串)赋值给ref2很多初学者会混淆这两种赋值,通过Python内建的type函数,可以查看一下这两次赋值的结果:
In [4]: type(ref1)Out[4]: functionIn [5]: type(ref2)Out[5]: str可以看到,ref1引用了函数对象本身,而ref2则引用了函数的返回值。通过内建的callable函数,可以进一步验证ref1是可调用的,而ref2是不可调用的:
In [9]: callable(ref1)Out[9]: TrueIn [10]: callable(ref2)Out[10]: False传参的效果与之类似。
4. 闭包&LEGB法则
所谓闭包,就是将组成函数的语句和这些语句的执行环境打包在一起时,得到的对象
听上去的确有些复杂,还是用一个栗子来帮助理解一下。假设我们在foo.py模块中做了如下定义:
#foo.pyfilename = "foo.py"def call_func(f): return f() #如前面介绍的,f引用一个函数对象,然后调用它在另一个func.py模块中,写下了这样的代码:
#func.pyimport foo #导入foo.pyfilename = "func.py"def show_filename(): return "filename: %s" % filenameif __name__ == "__main__": print foo.call_func(show_filename) #注意:实际发生调用的位置,是在foo.call_func函数中当我们用python func.py命令执行func.py时输出结果为:
chiyu@chiyu-PC:~$ python func.py filename:func.py很显然show_filename()函数使用的filename变量的值,是在与它相同环境(func.py模块)中定义的那个。尽管foo.py模块中也定义了同名的filename变量,而且实际调用show_filename的位置也是在foo.py的call_func内部。
而对于嵌套函数,这一机制则会表现的更加明显:闭包将会捕捉内层函数执行所需的整个环境:
#enclosed.pyimport foodef wrapper(): filename = "enclosed.py" def show_filename(): return "filename: %s" % filename print foo.call_func(show_filename) #输出:filename: enclosed.py实际上,每一个函数对象,都有一个指向了该函数定义时所在全局名称空间的__globals__属性:
#show_filename inside wrapper#show_filename.__globals__{'__builtins__': <module '__builtin__' (built-in)>, #内建作用域环境'__file__': 'enclosed.py', 'wrapper': <function wrapper at 0x7f84768b6578>, #直接外围环境'__package__': None, '__name__': '__main__', 'foo': <module 'foo' from '/home/chiyu/foo.pyc'>, #全局环境'__doc__': None }当代码执行到show_filename中的return "filename: %s" % filename语句时,解析器按照下面的顺序查找filename变量:
- Local - 本地函数(show_filename)内部,通过任何方式赋值的,而且没有被global关键字声明为全局变量的filename变量;
- Enclosing - 直接外围空间(上层函数wrapper)的本地作用域,查找filename变量(如果有多层嵌套,则由内而外逐层查找,直至最外层的函数);
- Global - 全局空间(模块enclosed.py),在模块顶层赋值的filename变量;
- Builtin - 内置模块(__builtin__)中预定义的变量名中查找filename变量;
总结:
- 闭包最重要的使用价值在于:封存函数执行的上下文环境;
- 闭包在其捕捉的执行环境(def语句块所在上下文)中,也遵循LEGB规则逐层查找,直至找到符合要求的变量,或者抛出异常。
5. 装饰器&语法糖(syntax sugar)
那么闭包和装饰器又有什么关系呢?
上文提到闭包的重要特性:封存上下文,这一特性可以巧妙的被用于现有函数的包装,从而为现有函数更加功能。而这就是装饰器。
还是举个例子,代码如下:
#alist = [1, 2, 3, ..., 100] --> 1+2+3+...+100 = 5050def lazy_sum(): return reduce(lambda x, y: x+y, alist)我们定义了一个函数lazy_sum,作用是对alist中的所有元素求和后返回。alist假设为1到100的整数列表:
alist = range(1, 101)但是出于某种原因,我并不想马上返回计算结果,而是在之后的某个地方,通过显示的调用输出结果。于是我用一个wrapper函数对其进行包装:
def wrapper(): alist = range(1, 101) def lazy_sum(): return reduce(lambda x, y: x+y, alist) return lazy_sumlazy_sum = wrapper() #wrapper() 返回的是lazy_sum函数对象if __name__ == "__main__": lazy_sum() #5050这是一个典型的Lazy Evaluation的例子。我们知道,一般情况下,局部变量在函数返回时,就会被垃圾回收器回收,而不能再被使用。但是这里的alist却没有,它随着lazy_sum函数对象的返回被一并返回了(这个说法不准确,实际是包含在了lazy_sum的执行环境中,通过__globals__),从而延长了生命周期。
当在if语句块中调用lazy_sum()的时候,解析器会从上下文中(这里是Enclosing层的wrapper函数的局部作用域中)找到alist列表,计算结果,返回5050。
当你需要动态的给已定义的函数增加功能时,比如:参数检查,类似的原理就变得很有用:
def add(a, b): return a+b这是很简单的一个函数:计算a+b的和返回,但我们知道Python是 动态类型+强类型 的语言,你并不能保证用户传入的参数a和b一定是两个整型,他有可能传入了一个整型和一个字符串类型的值:
In [2]: add(1, 2)Out[2]: 3In [3]: add(1.2, 3.45)Out[3]: 4.65In [4]: add(5, 'hello')---------------------------------------------------------------------------TypeError Traceback (most recent call last)/home/chiyu/<ipython-input-4-f2f9e8aa5eae> in <module>()----> 1 add(5, 'hello')/home/chiyu/<ipython-input-1-02b3d3d6caec> in add(a, b) 1 def add(a, b):----> 2 return a+bTypeError: unsupported operand type(s) for +: 'int' and 'str'于是,解析器无情的抛出了一个TypeError异常。
动态类型:在运行期间确定变量的类型,python确定一个变量的类型是在你第一次给他赋值的时候;
强类型:有强制的类型定义,你有一个整数,除非显示的类型转换,否则绝不能将它当作一个字符串(例如直接尝试将一个整型和一个字符串做+运算);
因此,为了更加优雅的使用add函数,我们需要在执行+运算前,对a和b进行参数检查。这时候装饰器就显得非常有用:
import logginglogging.basicConfig(level = logging.INFO)def add(a, b): return a + bdef checkParams(fn): def wrapper(a, b): if isinstance(a, (int, float)) and isinstance(b, (int, float)): #检查参数a和b是否都为整型或浮点型 return fn(a, b) #是则调用fn(a, b)返回计算结果 #否则通过logging记录错误信息,并友好退出 logging.warning("variable 'a' and 'b' cannot be added") return return wrapper #fn引用add,被封存在闭包的执行环境中返回if __name__ == "__main__": #将add函数对象传入,fn指向add #等号左侧的add,指向checkParams的返回值wrapper add = checkParams(add) add(3, 'hello') #经过类型检查,不会计算结果,而是记录日志并退出注意checkParams函数:
- 首先看参数fn,当我们调用checkParams(add)的时候,它将成为函数对象add的一个本地(Local)引用;
- 在checkParams内部,我们定义了一个wrapper函数,添加了参数类型检查的功能,然后调用了fn(a, b),根据LEGB法则,解释器将搜索几个作用域,并最终在(Enclosing层)checkParams函数的本地作用域中找到fn;
- 注意最后的return wrapper,这将创建一个闭包,fn变量(add函数对象的一个引用)将会封存在闭包的执行环境中,不会随着checkParams的返回而被回收;
因此调用add(3, 'hello')将不会返回计算结果,而是打印出日志:
chiyu@chiyu-PC:~$ python func.py WARNING:root:variable 'a' and 'b' cannot be added有人觉得add = checkParams(add)这样的写法未免太过麻烦,于是python提供了一种更优雅的写法,被称为语法糖:
@checkParamsdef add(a, b): return a + b这只是一种写法上的优化,解释器仍然会将它转化为add = checkParams(add)来执行。
6. 回归问题
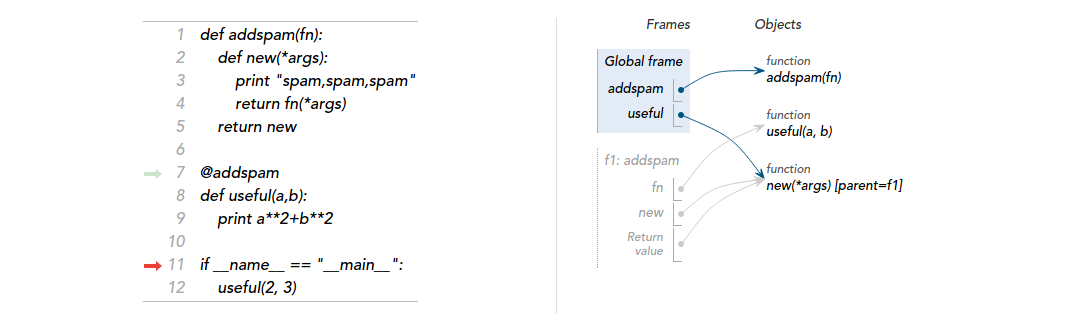
def addspam(fn): def new(*args): print "spam,spam,spam" return fn(*args) return new@addspamdef useful(a,b): print a**2+b**2首先看第二段代码:
- @addspam装饰器,相当于执行了useful = addspam(useful)。在这里题主有一个理解误区:传递给addspam的参数,是useful这个函数对象本身,而不是它的一个调用结果;
再回到addspam函数体:
- return new 返回一个闭包,fn被封存在闭包的执行环境中,不会随着addspam函数的返回被回收;
- 而fn此时是useful的一个引用,当执行return fn(*args)时,实际相当于执行了return useful(*args);
最后附上一张代码执行过程中的引用关系图,希望能帮助你理解:
&lt;img src="https://pic1.zhimg.com/b5674ca16f72af11d7a1c70602fbfe10_b.jpg" data-rawwidth="1087" data-rawheight="314" class="origin_image zh-lightbox-thumb" width="1087" data-original="https://pic1.zhimg.com/b5674ca16f72af11d7a1c70602fbfe10_r.jpg"&gt;
0 0
- python装饰器装饰类
- [python]python装饰器
- Python装饰器学习
- Python装饰器
- python 装饰器
- Python装饰器
- python 装饰器 应用
- python 装饰器2
- Python装饰器学习
- python装饰器
- python装饰器
- python 装饰器入门
- python装饰器
- python装饰器
- python 装饰器'@'
- python装饰器
- Python装饰器详解
- python 装饰器
- CSS字体中英文名称对照表
- 两个浮点数的比较:bccomp
- 【LaTeX】E喵的LaTeX新手入门教程(1)准备篇
- Maven错误日志记录(不定期更新)
- 49. Group Anagrams
- python 装饰器
- 从0开始学习 GitHub 系列之「加入 GitHub」
- 请教数据库如何建立多对多关系
- git使用详细介绍
- Android中判断当前API的版本号
- MFC,halcon混合编程 遍历目录文件夹下的图像并显示在对话框上
- ACM 数据结构 线段数 HDU 1166 敌兵布阵
- 【LaTeX】E喵的LaTeX新手入门教程(2)基础排版
- MVC框架