IOS Dev Intro - Advanced iPhone Camera Controls
来源:互联网 发布:淘宝售后客服问答 编辑:程序博客网 时间:2024/06/01 20:31
http://iphonephotographyschool.com/iphone-camera-controls/
7 Advanced iPhone Camera Controls For DSLR Photographers
Do you enjoy the creative photography options you get with your DSLR, but find that you often miss out on great shots because you don’t have your camera with you? What if we told you that you could achieve the same level of camera control that your DSLR provides, but with nothing more than your iPhone? In this tutorial you’ll discover just how easy it is to use the advanced iPhone camera controls so that you can start taking incredible photos with the camera that’s always with you.
1. Focus
No matter what type of camera you’re using, getting your subject in sharp focus is essential for high quality photos with superb detail. And the iPhone makes it incredibly quick and easy to get the perfect focus every time.
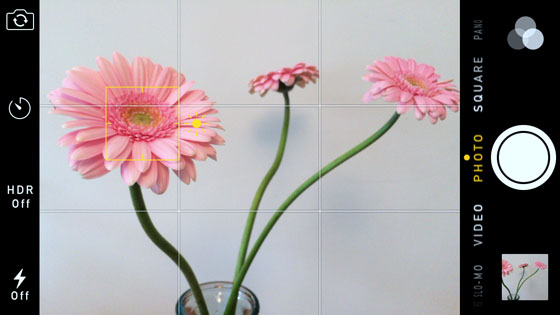
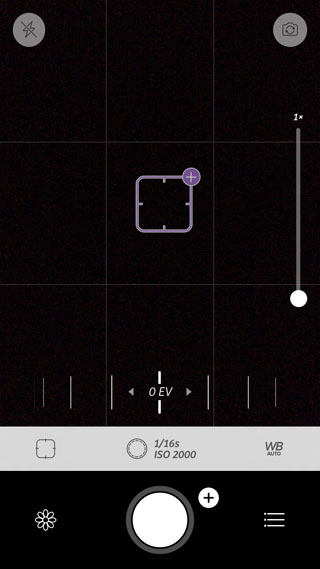
The iPhone’s native camera app makes use of the touch screen with the standard approach of tap-to-focus.
Simply tap the screen where you want to set focus, and a yellow square will appear to indicate your focus point.
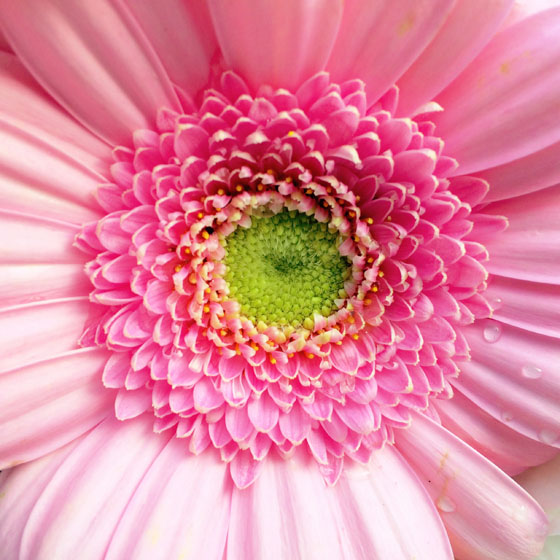
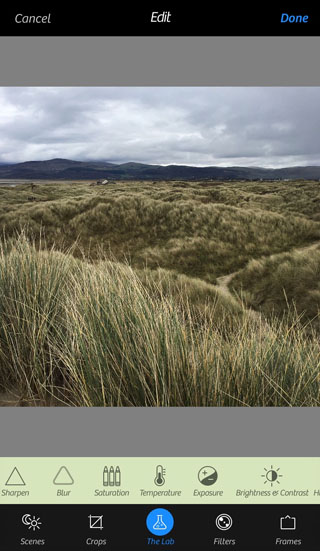
Sometimes you might want to lock the focus point, especially if there’s movement in the scene. For example, if someone walks through the background of your scene, the camera’s autofocus might readjust the focus onto that person.
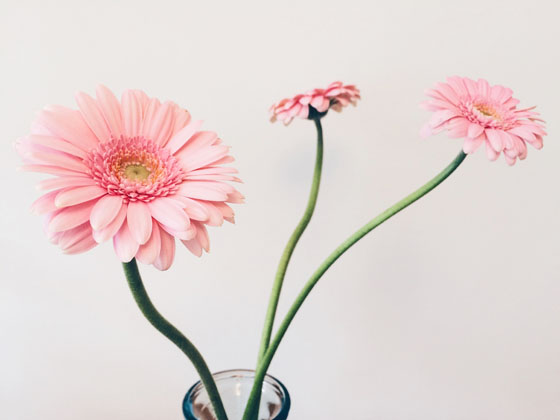
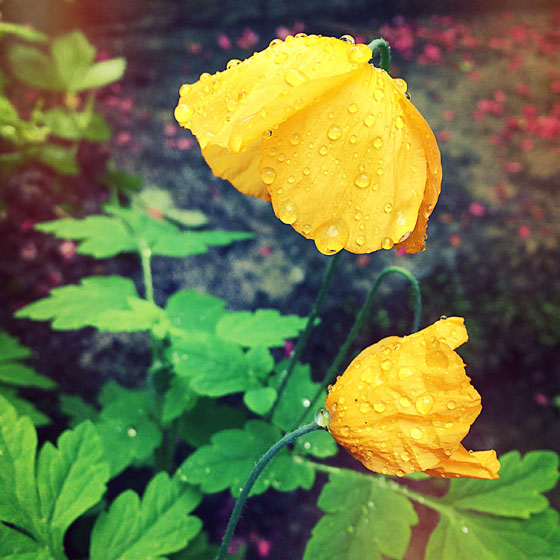
Or with this flower scene, if you moved the position of one the background flowers, the camera might readjust focus onto that flower.
To prevent the camera from adjusting focus and exposure, you need to lock focus on your subject, effectively disabling the autofocus feature.
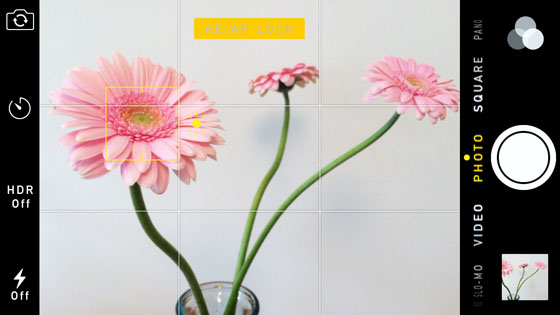
To lock focus, just tap and hold for a couple of seconds on the main subject until you see AE/AF LOCK in a yellow box at the top of the screen. To unlock the focus point, tap anywhere on the screen.
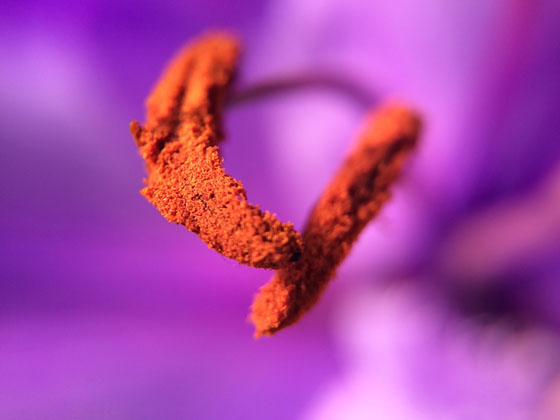
In certain shooting situations, the tap-to-focus method might not give you enough control over your point of focus. For example, if you’re doingmacro or other close-up photography, sometimes it can be tricky to get the focus point really accurate.
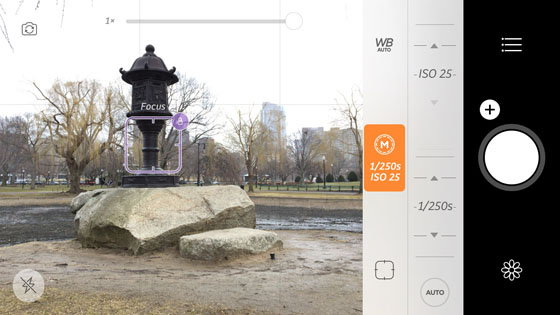
In such cases you can use a third-party camera app that has a manual focus feature. Camera+ is a popular camera and editing app that takes full advantage of the manual focus abilities of the iPhone.
Ensure you’re in the camera section of the app (rather than the editing section), then tap on the little box that has the word “Auto” inside it. This will open up the manual focus control slider with a purple bar.
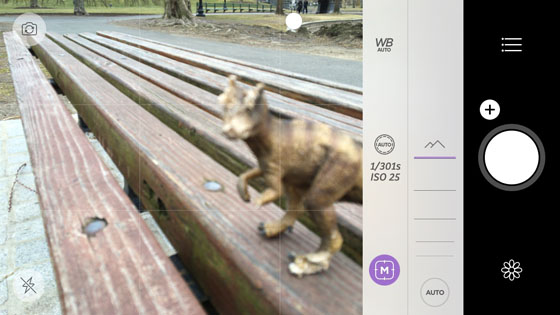
Simply drag the slider to manually control the focus of the camera (the “Auto” box will change to an “M” to indicate that you’re in manual focus mode).
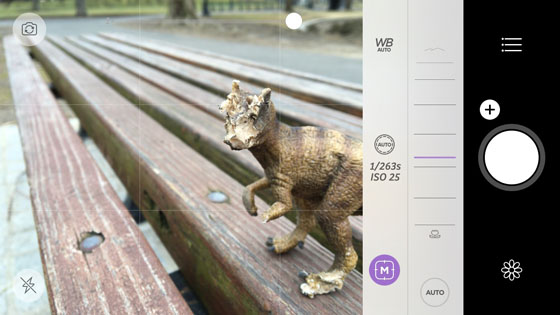
As you drag the focus slider, the focus point will gradually change, allowing you to focus on close-up objects, distant objects, or anywhere in between. This is a great way to fine tune the focus when your subject is very close to the camera.
In summary, the standard tap-to-focus method offered by nearly all iPhone camera apps will suit your needs 90% of the time, and this is no different than using the autofocus setting of a DSLR.
However, as with all cameras, there are times when having manual focus control can make all the difference in getting the shot just right. And in such cases, an app like Camera+ will give you full manual control of your focusing.
2. Exposure
After you set focus, it’s important that you get the exposure right to ensure your image doesn’t appear under or over-exposed.
Both the native camera app and Camera+ allow you to easily adjust the image exposure before you take the shot. The method you use for setting exposure is different in these two apps, so we’ll explore both apps in this section.
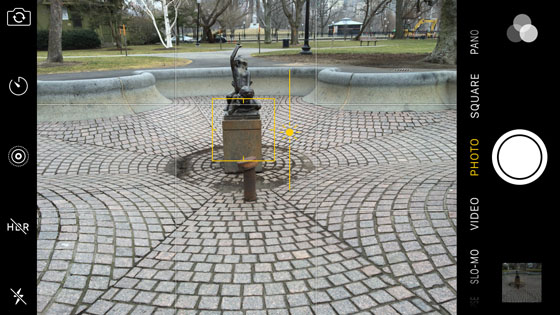
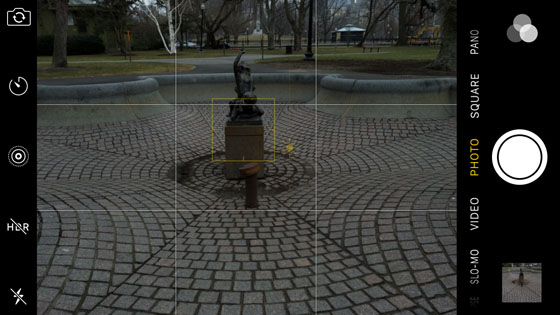
In the native camera app, when you tap on the screen to set your focus point, you’re also setting the point from which the camera analyzes the scene and sets the basic exposure level.
The yellow square in the screenshot below shows where the camera is setting its focus point, and also where it’s taking its exposure reading from. So whatever appears inside the yellow square should be correctly exposed.
This works fine in many cases, as the point of focus is also likely to be the area of your image that you want exposed correctly – such as the face of your subject in a portrait photo.
However, there are plenty of times that this approach doesn’t work. Inlandscape photography you’ll often want to focus on a darker object in the foreground but expose for the brighter sky.
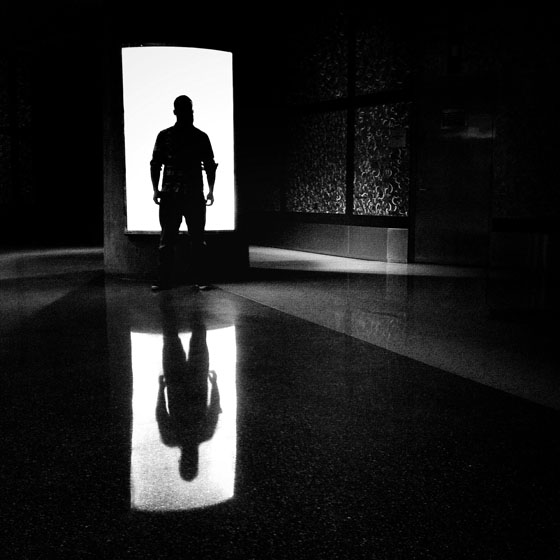
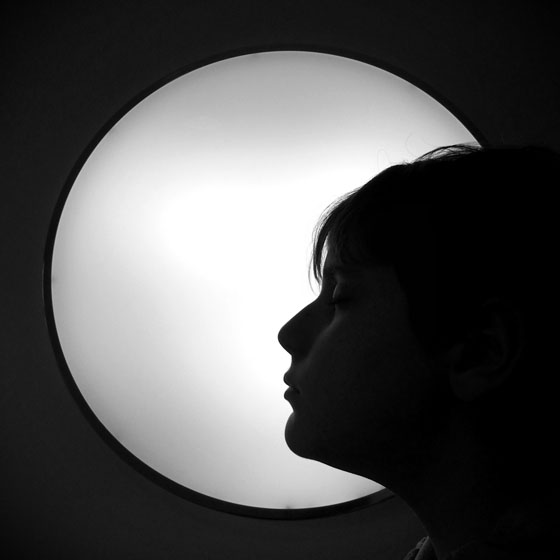
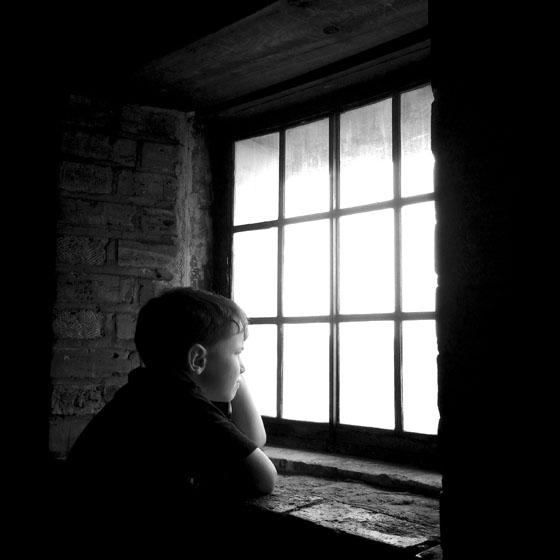
If you want to create a silhouette, you’ll need to reduce exposure to darken the subject. Or maybe you’ll just want to tweak the exposure slightly to brighten or darken the entire scene.
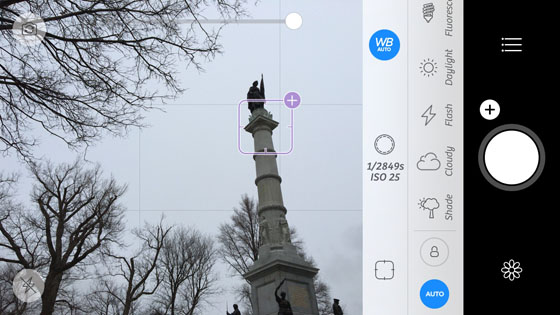
In such situations you can easily adjust the exposure in the native camera app. After you’ve tapped to set your focus point, you’ll see a small yellow sun icon next to the focus square. This indicates that you can now adjust exposure.
Simply swipe up on the screen to increase exposure and make the image brighter, or swipe down to decrease exposure and make the image darker.
If you’re shooting with the Camera+ app, when you tap to set focus, you’re also setting the exposure point. However, this app gives you even more options for taking control of the exposure setting.
First, you can tap on the little plus sign “+” in the upper-right corner of the purple focus square. This will bring up a separate orange circle which allows you to control the exposure point.
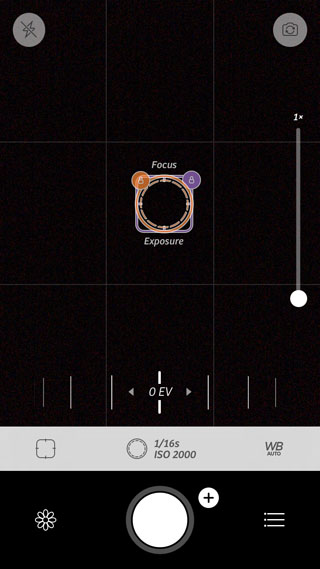
Simply drag the orange exposure circle to another area of your image to set a separate exposure point from the focus point. Note that you can also tap the screen with two fingers to bring up the separate focus and exposure tools.
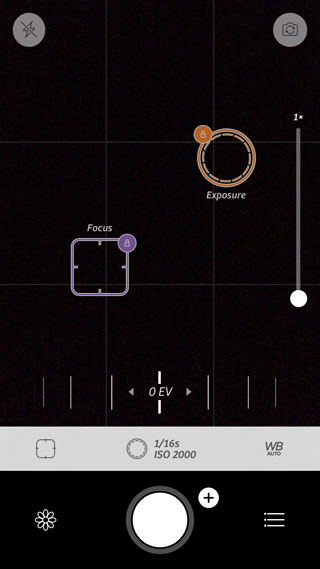
When you activate the second exposure tool, you’ll also notice the appearance of a slider along the bottom of the screen.
This is an exposure compensation tool that allows you to further refine the overall exposure setting, much like the sliding sun icon found with the native camera.
The difference is that you can use this slider on its own or in conjunction with the separate “tap-to-set” exposure point to fine tune the setting.
Now that we’ve covered the first few steps of going beyond automatic exposure settings, let’s dive a bit deeper and learn to take full manual control over exposure and creative options with your iPhone camera.
3. Shutter Speed
If you’re a DSLR photographer, you may have used the shutter speed settings on your camera to help you control exposure and determine how any movement appears in the scene – from freeze-framing to creating beautiful motion blur.
While you might not immediately associate the iPhone with the ability to control shutter speed, it’s perfectly possible to create amazing results in both fast and slow shutter photography.
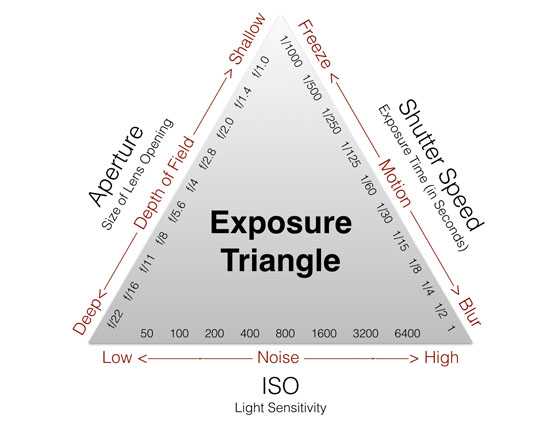
Before we go any further, it should quickly be explained that exposure in all forms of photography is determined by three factors: ISO, shutter speed and aperture.
Each of these settings will affect your image in a different way, so the key is to determine what’s most important to you for your image and then balance all three of the settings accordingly.
The following chart provides you with the classic exposure triangle, showing you how shutter speed, aperture and ISO will affect your image.
Now let’s start by learning more about shutter speed. The camera’s shutter speed determines the length of time that your camera’s sensor is exposed to light.
The shorter the shutter speed, the less light reaches the sensor, and vice versa. Where creative use of shutter speed comes in handy is controlling how motion appears in your photos.
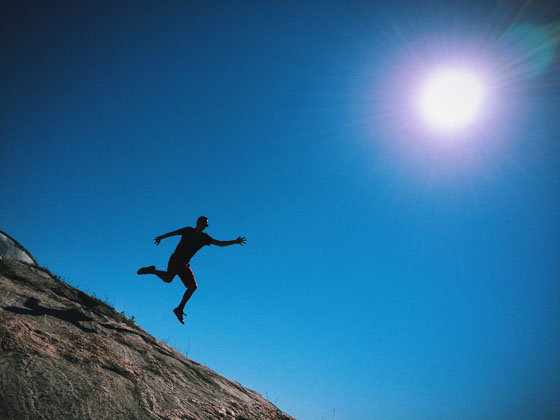
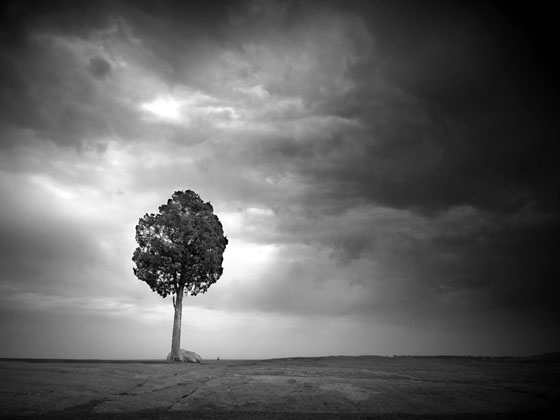
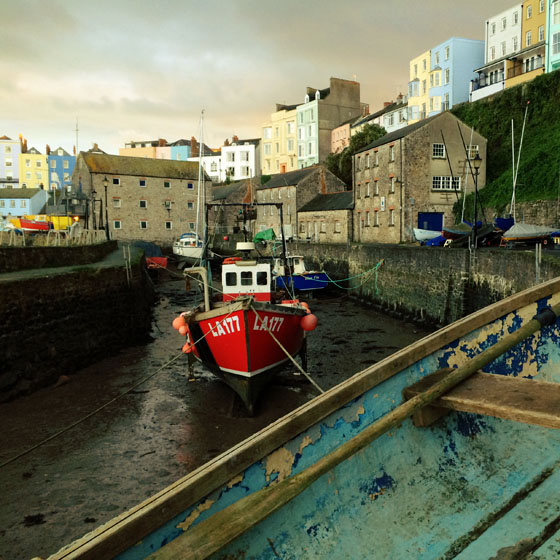
Using a fast shutter speed helps you create crisp images of moving subjectsbecause it freezes any movement in the scene. This photo is a great example of using a very fast shutter speed to capture the person in mid-jump.
Fast shutter speeds also help you avoid blurry photos that result from camera shake. So if you’re hand-holding the camera, especially in low light, a faster shutter speed might eliminate the camera shake.
The shutter speed can’t be adjusted in the native camera app, but you can easily adjust it using an app like Camera+.
Just tap the middle icon above the shutter release button (or to the left if you’re holding your phone horizontally) to access the manual shutter speed and ISO control sliders.
Shutter speed is measured in seconds, and most speeds are expressed as a fraction of a second (e.g. 1/60, 1/500).
If you’re not familiar with shutter speed measurements, the exposure triangle diagram above will help you quickly understand which numbers are faster and which are slower.
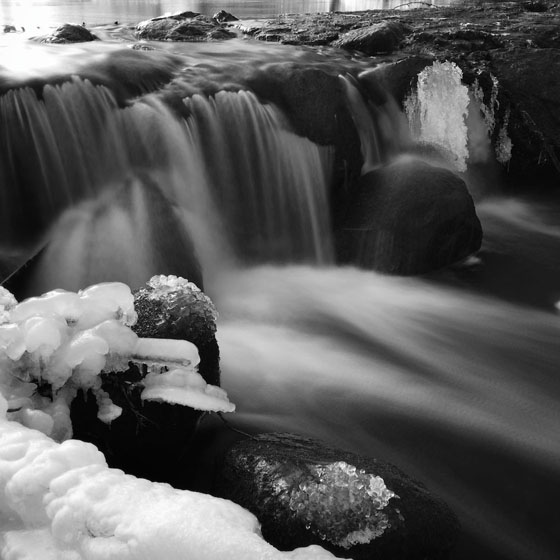
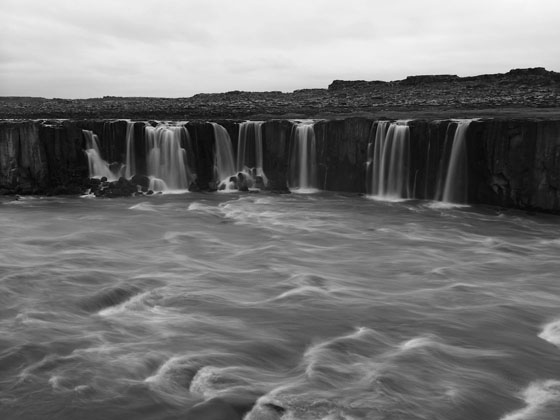
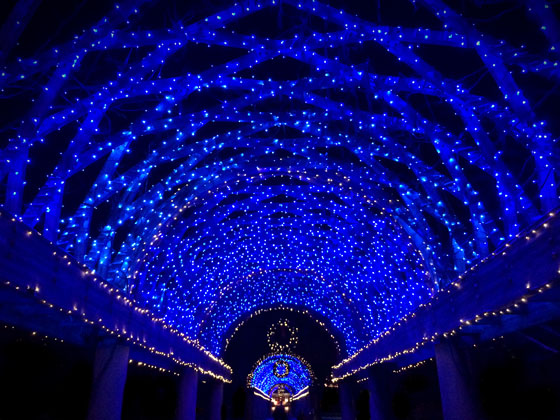
Using a slower shutter speed (typically with a tripod to avoid camera shake) allows you to do long exposure photography at night and blur moving subjects such as flowing water.
This can be done, to a point, with Camera+, but only for very minimal blur effects. This is because the slowest shutter speed on Camera+ is ¼ of a second, and for true long exposure photography you need even slower shutter speeds.
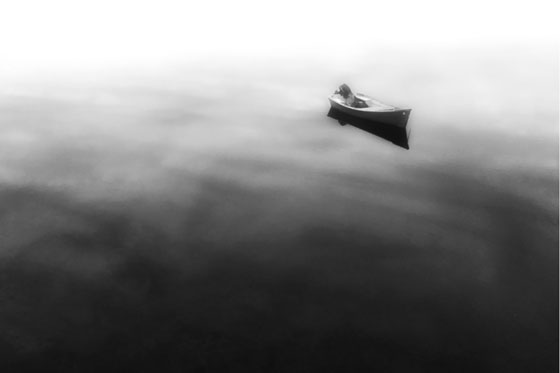
In the photo above, the shutter speed was just slow enough to blur the surface of the water, erasing the subtle ripples that were present when the image was taken.
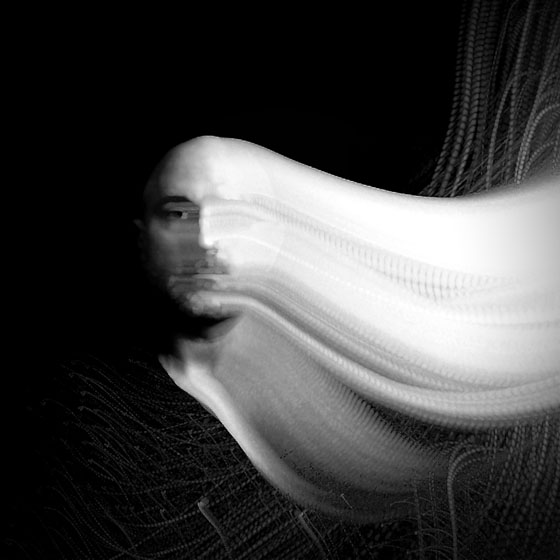
The next example used a slightly longer (slower) shutter speed with a studio light to create a motion trail as I moved my head up and out of the frame.
This is a great example of how you can push the limits of photography using nothing more than the manual iPhone camera controls.
If you want to do proper long exposure photography, such as long exposure water shots or light trail photos, you’ll want to consider an app such asSlow Shutter Cam.
The Slow Shutter Cam app allows you to really slow things down and take photos with a shutter speed of up to 60 seconds long.
Additionally, it features a “bulb” setting which allows the shutter to remain open until you tap on the shutter release button a second time.
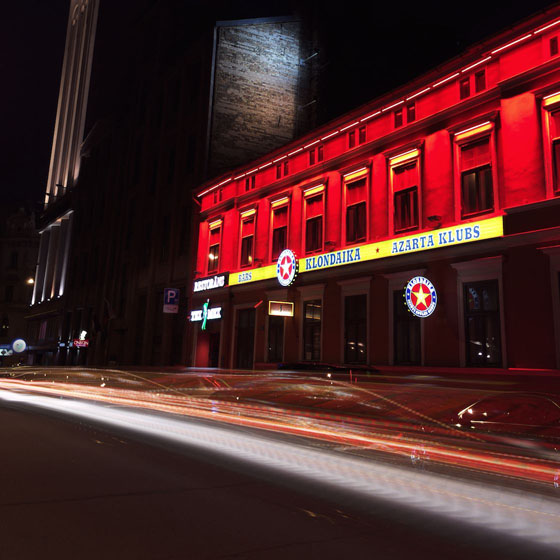
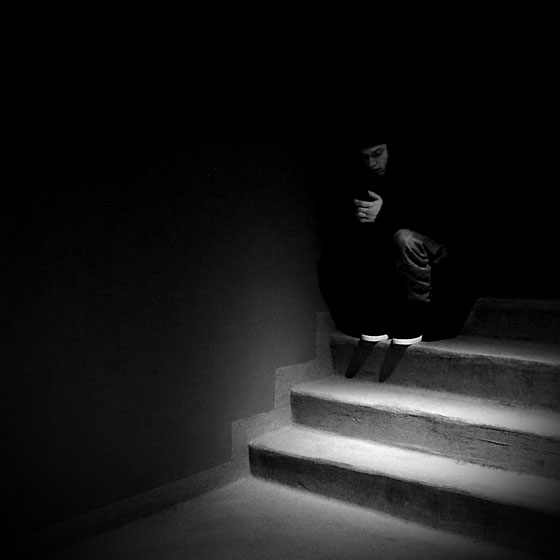
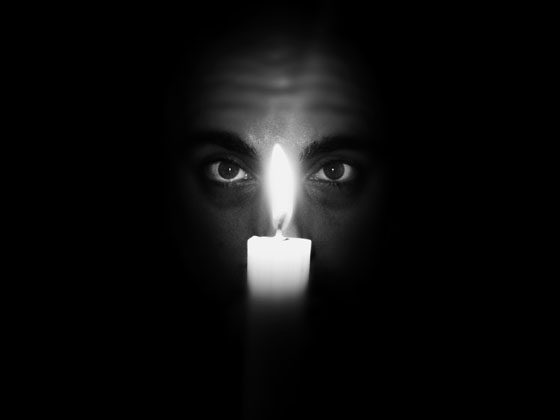
This can be very effective for extremely long exposures and allows for many creative options including what’s known as “light painting.”
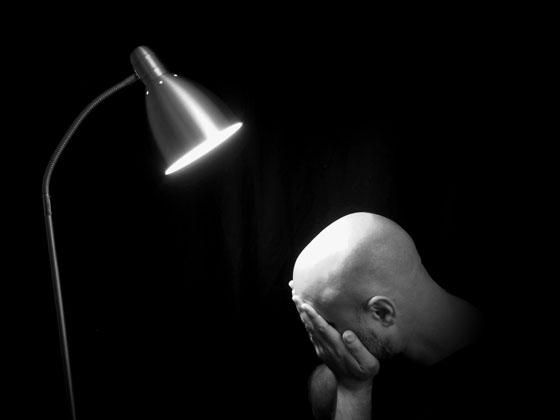
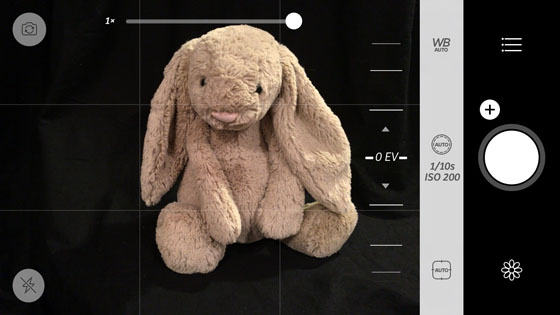
Light painting is where you set up your camera in a very dark (if not pitch black) location, use the bulb setting, and then “paint” your subject with a flashlight or other controlled light source to great effect.
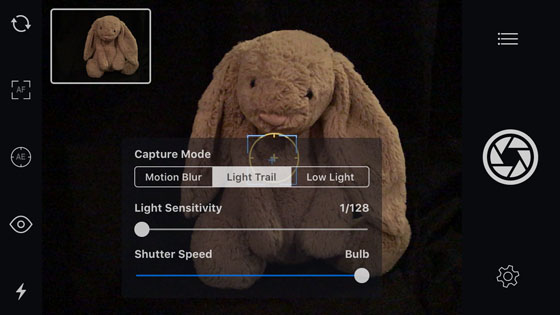
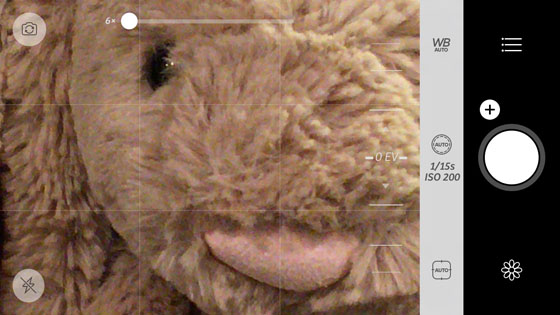
In this example, I set up a toy rabbit in a pitch black room and mounted my iPhone on a tripod. In the Slow Shutter Cam app, I set the Capture Mode to Light Trail, and then set the Shutter Speed slider to Bulb.
After tapping the shutter button, I “painted” the rabbit with a small LED flashlight from behind. After about 15 seconds I tapped the shutter button to end the exposure, and the result was this ghostly silhouette.

The Slow Shutter app offers a number of easy-to-use settings that specialize in different types of image capture including Motion, Light Trails, and general Low Light photography.
Each of them is worth experimenting with in different situations, and the results will vary considerably depending on the effect you’re going for.
4. ISO
ISO affects how sensitive your camera’s sensor is to light. The higher the ISO setting, the more sensitive your camera is to light.
The main benefit of this is that you can use faster shutter speeds in low light conditions which helps to avoid camera shake when hand-holding the camera.
However, one thing to keep in mind is that higher ISO settings can result in images with more digital “noise.” Noise makes your photos appear grainy which can reduce the overall image quality.
Conversely, the lower the ISO setting, the lower the light sensitivity will be. This means that the camera needs to use a slower shutter speed to let enough light in to expose the image correctly, but you’ll also experience less noise resulting in a “cleaner” image.
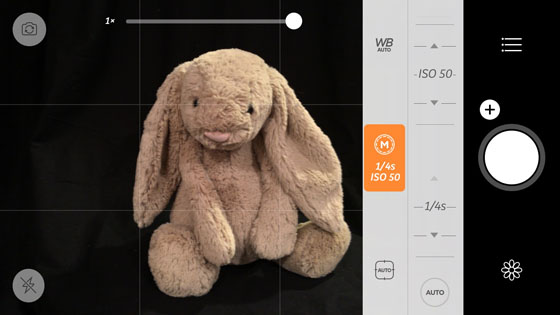
In Camera+, the ISO setting can be accessed via the same button as the shutter speed control just above or to the side of the shutter release button (highlighted in orange in the screenshot below).
This side-by-side placement of shutter speed and ISO is very convenient as the two need to be balanced in order to capture a well-exposed image.
For example, if you want to use a very fast shutter speed, you’ll likely need to use a higher ISO setting to capture more light and balance the faster shutter setting.
On the other hand, if you’re using a tripod, you can use a longer shutter speed so that you can make the ISO as low as possible to reduce noise.
Compare the following two images. One features a low ISO (50) and one features a high ISO (1600):
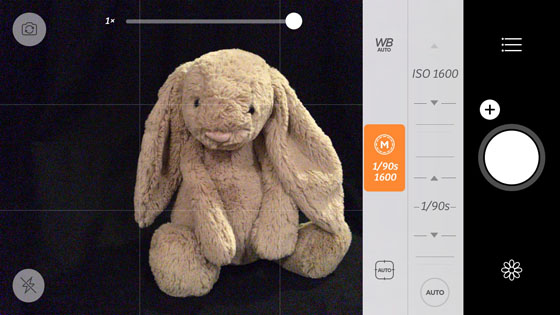
If you look closely, you can see that the image with the higher ISO is quite a bit “noisier” (more grainy). This is especially noticeable in the darker regions of the photo.
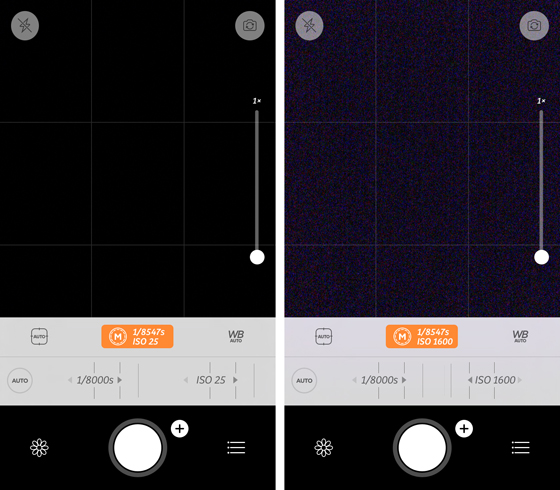
To help demonstrate this difference, I shot two additional images in pitch black using the highest and lowest ISO settings. This clearly shows how much noise or grain is introduced into higher ISO images:
There’s no right or wrong ISO setting, so it’s your own personal preference and how much noise you’re willing to accept that will determine how high you go with the ISO.
It’s all about getting the right balance of shutter speed and ISO to get the highest quality image possible. Just remember that the lower the ISO, the less grainy it will appear.
But the trade-off is that the camera will need to use a slower shutter speed so you may get camera shake if you’re hand-holding your iPhone.
5. Depth Of Field
The third element in the exposure triangle is the aperture of the lens, which equates to the size of the lens opening. As you can likely imagine, the bigger the opening, the more light reaches the camera’s sensor.
The other thing that aperture affects is depth of field. This is the range of focus/sharpness in front of and behind your subject.
The smaller the aperture, the deeper your depth of field, which results in more of your photo being in focus.
A large aperture creates a very shallow depth of field, where only a small portion of the image is in focus.
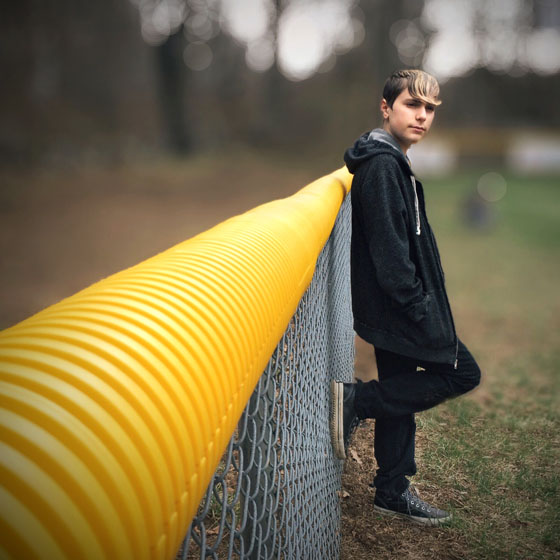
Shallow depth of field is often used to great effect by portrait photographers to isolate the main subject and blur the background, but it’s great for isolating any kind of subject, especially against a busy background.
The one drawback to the iPhone camera is that the aperture of the lens is fixed. This means that unlike a DSLR camera, you can’t manually change the aperture setting to control the depth of field.
However, there are certainly other ways that you can manipulate the depth of field in your iPhone photos.
If you’re familiar with aperture settings from using a DSLR, you may be interested to know that the aperture on the latest iPhone 6s models is f/2.2.
While this is a fairly wide aperture, we also have to be aware that when combined with a very small, wide angle lens like that on the iPhone, it still provides relatively deep depth of field in most photos.
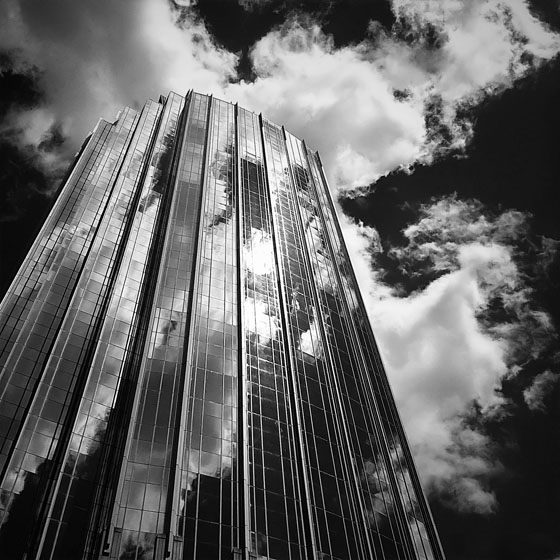
This deep depth of field is great for casual photography, and it’s especially good for landscape and architectural photography where you want every element to be in sharp focus.
But what if you want a really shallow depth of field to isolate your subject against a lovely blurred background? Well, it’s actually very easy!
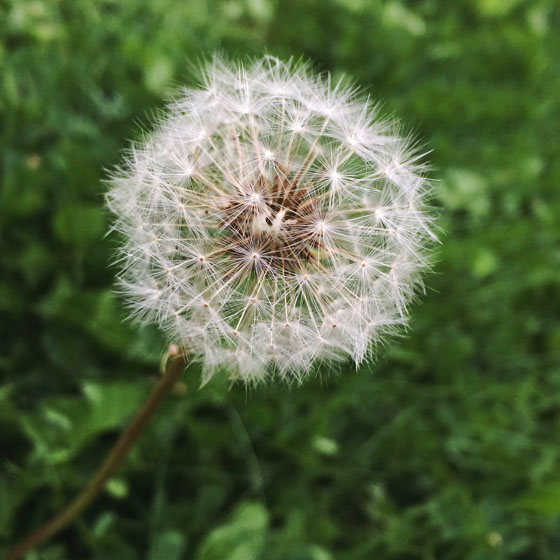
While aperture is important for controlling depth of field, the other factor that affects it is the distance between the camera’s lens and the subject.
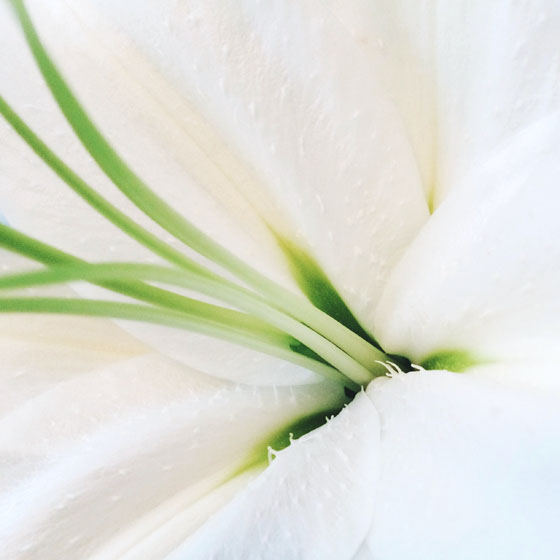
The closer the lens is to the subject, the shallower the depth of field will be. So to create a shallow depth of field with the iPhone, just get nice and close to your subject, and make sure you set the focus point on the subject.
You can either tap to set focus, or use the manual focus slider in Camera+ to fine tune the focus to get it exactly where you want.
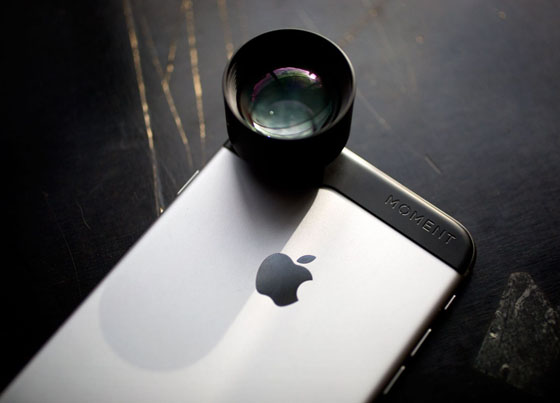
This shallow depth of field will be even more pronounced if you use an add-on macro lens designed specifically for shooting extreme close-ups.
Popular macro lenses include those from Moment, olloclip and Inmacus, and they allow you to shoot at very close distances to the subject.
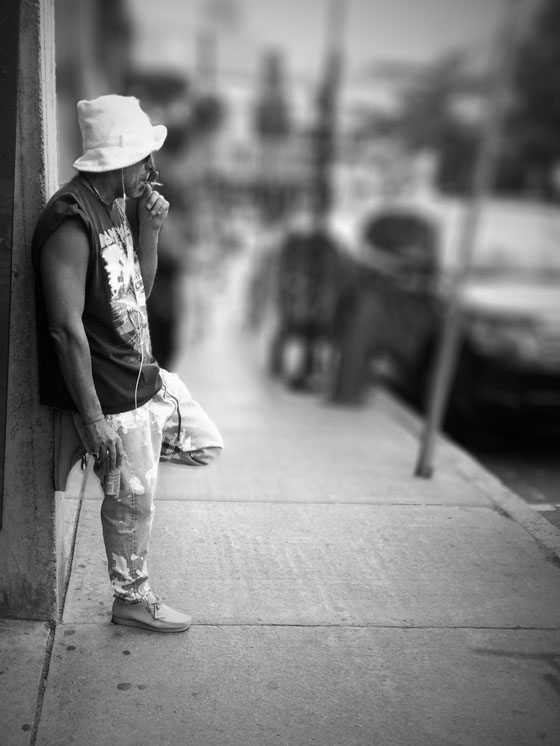
The other option for creating a shallow depth of field is to do it post-processing using an editing app such as AfterFocus.
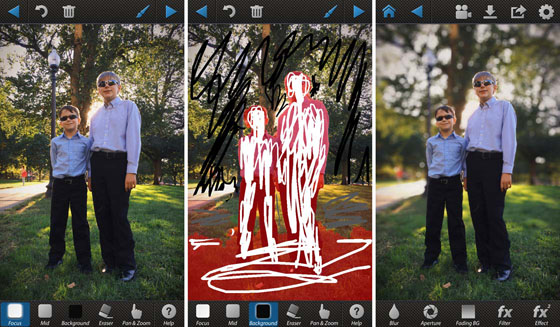
This app allows you to selectively blur the background of your image. You just use your finger to select which areas to blur and which to keep in focus.
The app is very easy to use, but you do need to take your time when making your selections in order to achieve a natural blur effect.
The photos above and below were both edited in AfterFocus to selectively blur the background.
6. White Balance
Achieving proper color balance is another important aspect to consider in photography, and if you’ve been shooting with a DSLR you might already be familiar with the white balance setting.
A camera’s white balance setting allows you to control the color temperature in your photos by cooling down or warming up the colors.
The idea is that you select the appropriate white balance setting for the type of light that you’re shooting in, and then your camera automatically adjusts the colors to eliminate any warm or cool color casts from your light source.
When the white balance is set correctly, the whites in your photo should appear white and all other colors will appear accurate.
In most cases, the iPhone’s native camera app (or any third-party camera app) does a great job of automatically adjusting the white balance to remove any unsightly color casts.
However, in situations where you might have a mix of lighting conditions, such as an office with fluorescent lighting as well as bright sunlight from the windows, the camera can have a hard time settling on one white balance setting over another.
In these cases, it is best to take manual control of the situation and set the white balance yourself. You can also use white balance for creative effect by deliberately warming up or cooling down the colors in a photo.
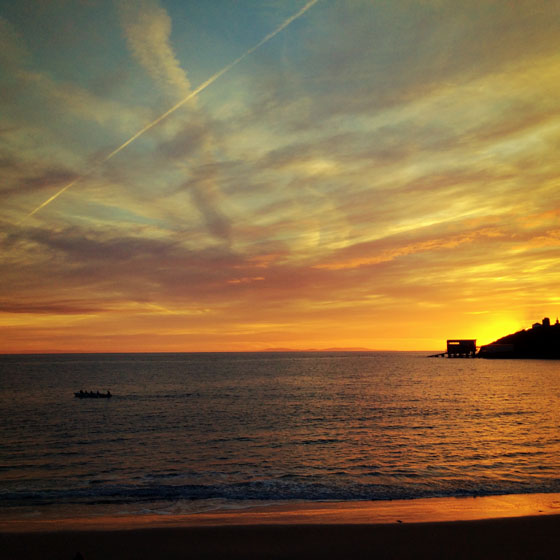
For example, you might want to warm up the colors of a sunset scene. Or maybe you want to cool down the colors of a winter landscape phototo emphasize the coldness of the scene.
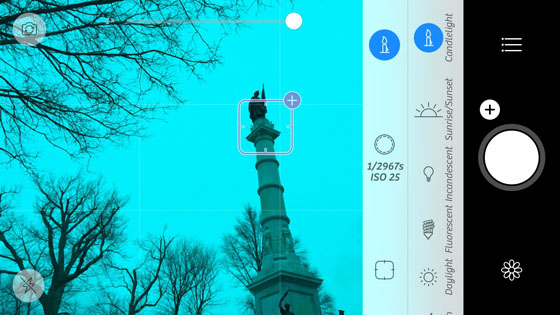
The native camera doesn’t allow you to alter white balance manually, but you can easily do it in Camera+. Just tap the WB button and a list of white balance settings will appear, e.g. Shade, Cloudy, Flash, Daylight, etc.
To eliminated any color casts in your photo, simply select the white balance setting that best matches the type of light you’re shooting in.
As you tap each white balance option, the colors in the live view on your iPhone screen will change. This allows you to easily compare them to the actual scene before taking a photo.

Look how the different white balance settings in these images alters the basic color palette of the same scene.
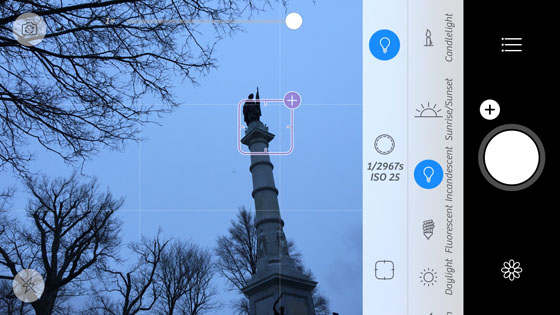
Settings like Cloudy and Shade warm up the colors, whereas the Incandescent and Candlelight settings cool down the colors.
Of course, you can always use the Auto setting if you’d rather let the camera decide.
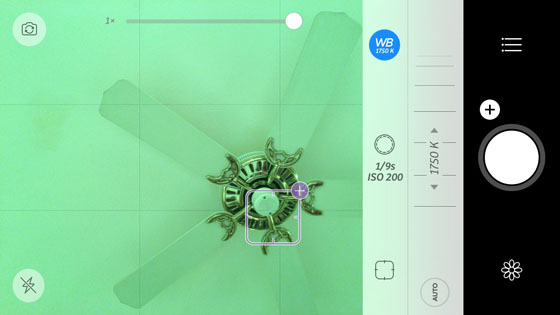
Camera+ even allows you to go beyond the preset controls and manually set the color temperature of the image.
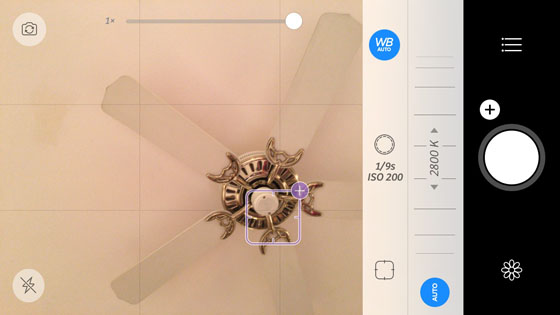
While in the manual white balance tool, simply tap on the large plus sign “+” to the right of all the presets, and you’ll be able to adjust the color temperature of the image using the slider.
While it’s best to get the white balance right at the time of shooting, you can also adjust the color temperature of your photos using editing apps such as Snapseed, VSCO and the editing section in Camera+.
In the Camera+ editor, tap Lab at the bottom of the screen, then select the Temperature option.
You can now use the Temperature slider to cool down the colors making them more blue, or warm up the colors making them more orange.
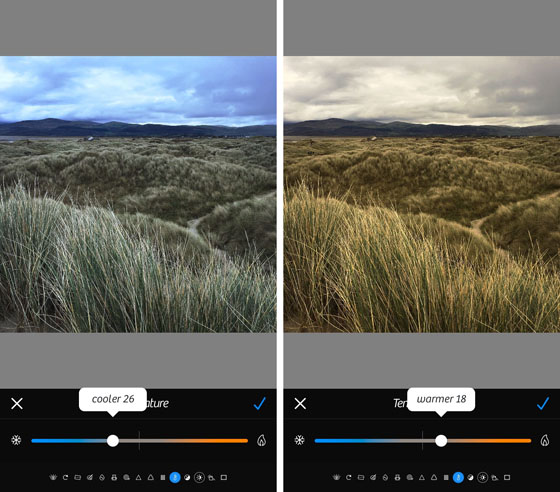
As you can see from these examples, changing color temperature in post-processing can have a dramatic effect on the overall mood of the photo.
7. Zoom
While most iOS camera apps offer some form of zoom control, I strongly advise against using it at all.
The lens of the iPhone camera is a fixed focal length. This means that it doesn’t move and therefore can’t serve as an optical zoom lens.
The zoom feature offered on the iPhone is what’s referred to as a digital zoom. Basically, what this control does is essentially crop the live view of your camera and then only capture that cropped view.
I emphasize the term “crop” as that is what’s happening. Using a digital zoom is no different than taking the same image at full frame and then cropping it afterward to focus on one smaller part of the image.
Either way, you end up with a lower resolution image due to all of the pixels you lose in the cropping/zoom process.
To demonstrate this, compare the following examples using the digital zoom feature in Camera+:
In the image above I didn’t zoom in at all, but in the one below I used the zoom slider shown at the top of the screen to zoom in to the maximum amount.
The close-up zoomed image is clearly grainy and lower quality than the full frame image.
For this reason, most photographers (including myself) will recommend that you never use the zoom control on your iPhone camera.
It’s better to take the full frame image and then crop it later in editing. That way, you always have the full image to revert back to if you don’t like the lower resolution image that results from the cropping.

Of course, the best “zoom” for the iPhone camera is simply to get closer to your subject. In other words, zoom with your feet!
However, this isn’t always possible depending on the situation. So if you do need to frame your subject more tightly, but the situation doesn’t allow you to get physically closer, you may want to consider one of many add-on telephoto lenses for your iPhone.
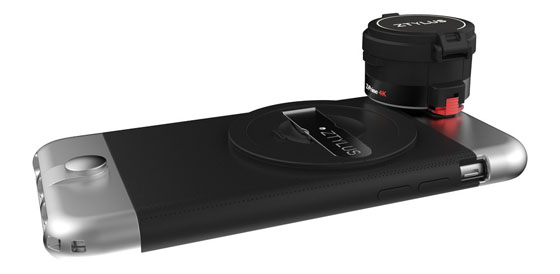
Two of the best lenses that I’ve used are the Moment Telephoto and theZtylus Telephoto. Both options are considered 2x telephoto lenses because they both bring you twice as close to your subject as the native camera lens.
The Moment Telephoto is available on its own for $99, while the Ztylus Telephoto is available as part of a kit along with a wide angle lens and other accessories for $199.
If you think a telephoto lens would be useful, be sure to research the different lens options available to determine what best suits your needs and budget before making a purchase.
iPhone Camera Controls – Final Thoughts
Taking manual control of your iPhone camera opens up a world of creative options that many people think are only possible with a DSLR.
From setting focus and exposure, to more advanced camera controls such as ISO, shutter speed and white balance, you really can do it all with the camera on your iPhone.
And even though the iPhone has a fixed aperture, you can easily achieve a shallow depth of field by getting close to your subject or by creating a blurry background in post-processing.
The manual controls of your iPhone camera are far easier to use than those on a DSLR, yet they give you almost the same level of control and creativity.
And the best thing about the iPhone camera is that it’s always with you, so you’ll never miss out on great photos when you’re not carrying your bulky DSLR.
Once you master the manual camera settings on your iPhone, you’ll soon discover that your iPhone camera is the only camera you need.

Free Video Reveals... 7 Little-Known Tricks For Taking Incredible Photos With Your iPhone
- IOS Dev Intro - Advanced iPhone Camera Controls
- IOS Dev Intro - Camera Capture
- IOS Dev Intro - Camera Parameters
- Windows Dev Intro - Subclassing Controls
- Android Dev Intro - Camera addCallbackBuffer
- IOS Dev Intro - UIControlEvent
- IOS Dev Intro - UIButton
- IOS Dev Intro - UILabel
- IOS Dev Intro - String
- IOS Dev Intro - FBO
- IOS Dev Intro - NSDictionary
- IOS Dev Intro - NSArray
- IOS Dev Intro - NSInteger
- IOS Dev Intro - NSString
- IOS Dev Intro - UISwitch
- IOS Dev Intro - Sandbox
- IOS Dev Intro - NSFileManager
- IOS Dev Intro - NSBundle
- 单点登录原理
- 使用反射机制实现菜单Icon的显示
- 复习内容
- gitlab使用
- ADB 连接
- IOS Dev Intro - Advanced iPhone Camera Controls
- java HashMap 和HashTable
- Android6.0权限系统
- File中mkdir()和mkdirs()的区别
- 关于onNewIntent的使用
- ScrollView嵌套ListView
- openstack on centos 7.1(image)
- Akka学习笔记:ActorSystem(配置)
- iOS开发 - 滚动选择器