lsd-slam源码解读第五篇:DepthEstimation
来源:互联网 发布:遥感大数据 编辑:程序博客网 时间:2024/06/11 21:21
lsd-slam源码解读第五篇:DepthEstimation
标签 : lsd-slam
同样的,我希望在看这篇之前,读者已经对算法有了一定的了解,否则我估计这篇博客看起来会很吃力,如果还不太了解算法,建议先看第三篇:lsd-slam源码解读第三篇:算法解析 深度估计是整个lsd-slam最核心的部分,它和orb-slam在对深度的处理上有极大的不同,主要体现在:
orb-slam直接使用了三角化,计算得到深度,之后再进行校准
lsd-slam的方案是,初始化一个很不精确的深度(由于假设深度服从了高斯分布,因此可以选定一个均值,然后初始化一个极大的方差),当然,如果有些先验信息,这个分布可以选的比较好,可以注意到论文的深度传播部分,实际上就是根据先验知识初始化一个深度分布,之后根据观测帧,对深度分布进行修正的一个方法
DepthMapPixelHypothesis
我想一个科学的研究方式应该是先阅读这个类,从名字上来看,这个类是对于深度图上每个像素的一个深度估计,它只有公有成员,成员变量分别表达了
- 该像素是否有效
- 该像素是否列入黑名单
- 要逃过的最小帧数
- 有效的观测次数
- 深度均值
- 深度方差
- 平滑后的深度均值
- 平滑后的深度方差
接下来是3个构造函数,最后为了可视化,设置了一个返回rgb三个值的向量
DepthMap
这是一个很核心的类,首先我们来看构造函数DepthMap::DepthMap(int w, int h, const Eigen::Matrix3f& K)
构造函数需要传入图像的宽度以及高度,还有相机的内参,首先显然是分配内存,并且本地化相机参数
width = w;height = h;activeKeyFrame = 0;activeKeyFrameIsReactivated = false;otherDepthMap = new DepthMapPixelHypothesis[width*height];currentDepthMap = new DepthMapPixelHypothesis[width*height];validityIntegralBuffer = (int*)Eigen::internal::aligned_malloc(width*height*sizeof(int));debugImageHypothesisHandling = cv::Mat(h,w, CV_8UC3);debugImageHypothesisPropagation = cv::Mat(h,w, CV_8UC3);debugImageStereoLines = cv::Mat(h,w, CV_8UC3);debugImageDepth = cv::Mat(h,w, CV_8UC3);this->K = K;fx = K(0,0);fy = K(1,1);cx = K(0,2);cy = K(1,2);KInv = K.inverse();fxi = KInv(0,0);fyi = KInv(1,1);cxi = KInv(0,2);cyi = KInv(1,2);然后调用reset()函数,将该像素的深度估计初始化为无效
void DepthMap::reset(){ for(DepthMapPixelHypothesis* pt = otherDepthMap+width*height-1; pt >= otherDepthMap; pt--) pt->isValid = false; for(DepthMapPixelHypothesis* pt = currentDepthMap+width*height-1; pt >= currentDepthMap; pt--) pt->isValid = false;}最后初始化一些其他参数,比如与计时相关的,计数相关的参数等
msUpdate = msCreate = msFinalize = 0;msObserve = msRegularize = msPropagate = msFillHoles = msSetDepth = 0;gettimeofday(&lastHzUpdate, NULL);nUpdate = nCreate = nFinalize = 0;nObserve = nRegularize = nPropagate = nFillHoles = nSetDepth = 0;nAvgUpdate = nAvgCreate = nAvgFinalize = 0;nAvgObserve = nAvgRegularize = nAvgPropagate = nAvgFillHoles = nAvgSetDepth = 0;void DepthMap::updateKeyframe
这个函数需要传入参考帧的指针队列,根据参考帧更新当前关键帧,是尤其重要的一个函数
首先记录最”年轻”的参考帧与最”老”的参考帧,对应算法的这个部分 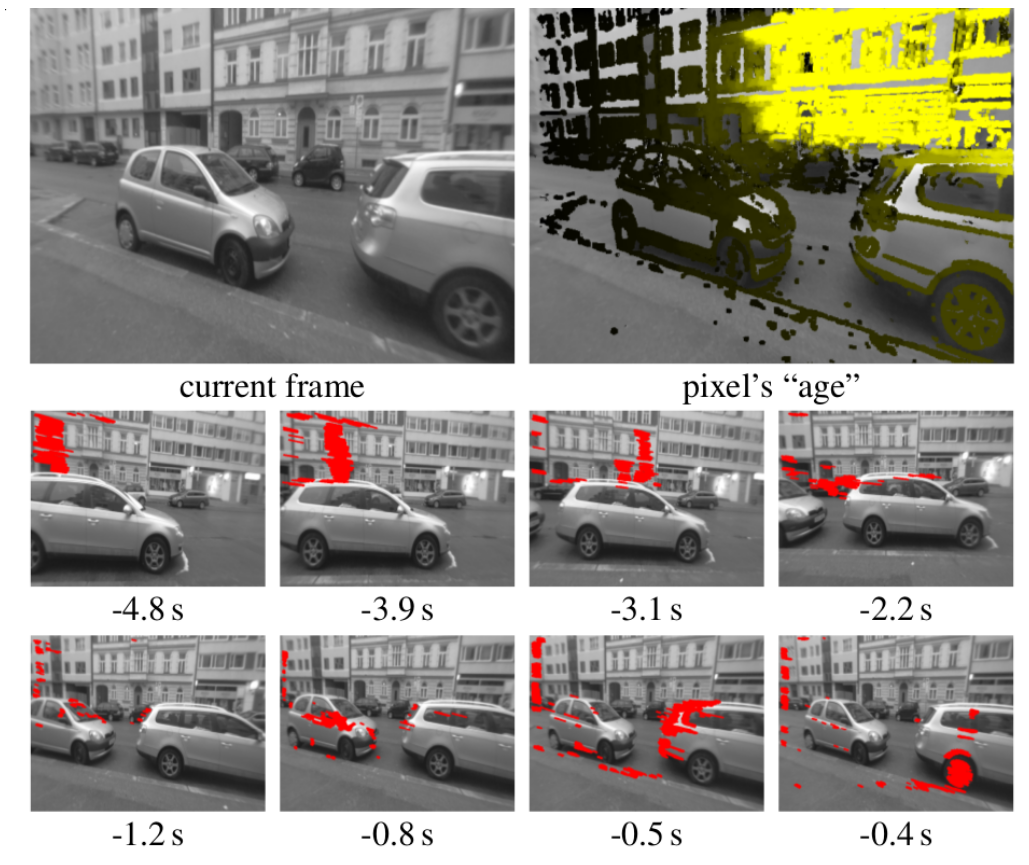
oldest_referenceFrame = referenceFrames.front().get(); newest_referenceFrame = referenceFrames.back().get(); referenceFrameByID.clear(); referenceFrameByID_offset = oldest_referenceFrame->id();然后遍历所有帧,判断参考帧是不是当前关键帧,如果不是,就转换到当前关键帧,并且调用帧里面的prepareForStereoWith函数,算出需要用的投影矩阵,之后把帧这些准备好的帧压入参考帧队列,并初始化计数器
for(std::shared_ptr<Frame> frame : referenceFrames) { assert(frame->hasTrackingParent()); if(frame->getTrackingParent() != activeKeyFrame) { printf("WARNING: updating frame %d with %d, which was tracked on a different frame (%d).\nWhile this should work, it is not recommended.", activeKeyFrame->id(), frame->id(), frame->getTrackingParent()->id()); } Sim3 refToKf; if(frame->pose->trackingParent->frameID == activeKeyFrame->id()) refToKf = frame->pose->thisToParent_raw; else refToKf = activeKeyFrame->getScaledCamToWorld().inverse() * frame->getScaledCamToWorld(); frame->prepareForStereoWith(activeKeyFrame, refToKf, K, 0); while((int)referenceFrameByID.size() + referenceFrameByID_offset <= frame->id()) referenceFrameByID.push_back(frame.get()); } resetCounters();之后是调用观测函数,这个函数实际上要向下调用threadReducer对象的reduce,然后通过boost的bind调用到了observeDepthRow函数,这无疑是一段很飘逸的代码,让我们来好好看下是如何实现的i
首先是记录时间并调用observeDepth(),完成之后记录消耗时间,并记录下本次观测
gettimeofday(&tv_start, NULL); observeDepth(); gettimeofday(&tv_end, NULL); msObserve = 0.9*msObserve + 0.1*((tv_end.tv_sec-tv_start.tv_sec)*1000.0f + (tv_end.tv_usec-tv_start.tv_usec)/1000.0f); nObserve++;observeDepth()函数实际上就一行有效代码,即
threadReducer.reduce(boost::bind(&DepthMap::observeDepthRow, this, _1, _2, _3), 3, height-3, 10);这个函数是通过IndexThreadReduce的对象threadReducer,调用方法reduce,传入了一个函数对象(或者叫做仿函数)
this->observeDepthRow(int, int, RunningStats* ), 以及三个参数3, height-3,10
IndexThreadReduce::reduce
这个函数要求的传入参数是一个函数对象,三个int类型的整数,这个函数对象需要三个参数,分别是int,int,RunningStats*,返回值为void,这四个参数正好对应了this->observeDepthRow(int, int, RunningStats* ),3, height-3,10,
我想你读到这里,应该能够深刻体会到bind的强大之处,函数指针void()(int,int,RunningStats)和函数指针void DepthMap::observeDepthRow(int yMin, int yMax, RunningStats* stats)类型是不同的,实际如果只是简单使用一下函数指针传递,编译是无法通过的,但是bind内部维护了这个转化,让你能够轻松地使用类里面的函数
由于slam肯定使用多线程,传入的stepSize==10,所以我们可以直接跳过前面几行,进入到互斥锁,之后的操作是本地化参数
this->callPerIndex = callPerIndex; nextIndex = first; maxIndex = end; this->stepSize = stepSize;之后开始工作线程
// go worker threads! for(int i=0;i<MAPPING_THREADS;i++) isDone[i] = false; // let them start! todo_signal.notify_all();然后运行线程,等待结束
//printf("reduce waiting for threads to finish\n"); // wait for all worker threads to signal they are done. while(true) { // wait for at least one to finish done_signal.wait(lock); //printf("thread finished!\n"); // check if actually all are finished. bool allDone = true; for(int i=0;i<MAPPING_THREADS;i++) allDone = allDone && isDone[i]; // all are finished! exit. if(allDone) break; }最后再还原线程相关参数
nextIndex = 0; maxIndex = 0; this->callPerIndex = boost::bind(&IndexThreadReduce::callPerIndexDefault, this, _1, _2, _3);至于这个调用是咋调用的呢,看到这里,你应该说我晕啊,这个该死的程序咋嵌套这么麻烦。。。实际上是在下面这个地方,把他做成并行计算了
void workerLoop(int idx) { boost::unique_lock<boost::mutex> lock(exMutex); while(running) { // try to get something to do. int todo = 0; bool gotSomething = false; if(nextIndex < maxIndex) { // got something! todo = nextIndex; nextIndex+=stepSize; gotSomething = true; } // if got something: do it (unlock in the meantime) if(gotSomething) { lock.unlock(); assert(callPerIndex != 0); RunningStats s; callPerIndex(todo, std::min(todo+stepSize, maxIndex), &s); lock.lock(); runningStats.add(&s); } // otherwise wait on signal, releasing lock in the meantime. else { isDone[idx] = true; //printf("worker %d waiting..\n", idx); done_signal.notify_all(); todo_signal.wait(lock); } } }DepthMap::observeDepthRow
现在在让我们来看线程中实际运行的函数void DepthMap::observeDepthRow(int yMin, int yMax, RunningStats* stats),首先得到关键帧最大的梯度,然后开始循环
const float* keyFrameMaxGradBuf = activeKeyFrame->maxGradients(0);首先还是本地化参数,之后测试是否可用,不可用(梯度太小,无效点,列入黑名单)就继续下一次
int idx = x+y*width; DepthMapPixelHypothesis* target = currentDepthMap+idx; bool hasHypothesis = target->isValid; // ======== 1. check absolute grad ========= if(hasHypothesis && keyFrameMaxGradBuf[idx] < MIN_ABS_GRAD_DECREASE) { target->isValid = false; continue; } if(keyFrameMaxGradBuf[idx] < MIN_ABS_GRAD_CREATE || target->blacklisted < MIN_BLACKLIST) continue;然后计算深度(如果没有深度就创建,有深度就更新)
if(!hasHypothesis) success = observeDepthCreate(x, y, idx, stats);else success = observeDepthUpdate(x, y, idx, keyFrameMaxGradBuf, stats);bool DepthMap::observeDepthCreate
老样子,首先是本地化参数,然后检测是不是可用,我就不细说了,之后是对极线的计算
调用makeAndCheckEPL函数
首先计算epl
float epx = - fx * ref->thisToOther_t[0] + ref->thisToOther_t[2]*(x - cx); float epy = - fy * ref->thisToOther_t[1] + ref->thisToOther_t[2]*(y - cy);这里相当于是把相对于点(每个点都算了一次,可以注意到,前面分了很多线程,凑起来正好每个点都计算了一次)的平移投影做了拉伸,投影到了图像上,然后加上了点的坐标,但是都必须投影到同一个平面上,所以乘以了深度值,得到了表达那个点的”向量线段”,由于假设了旋转影响小,所以只有平移的投影,应该是对应了论文这个部分 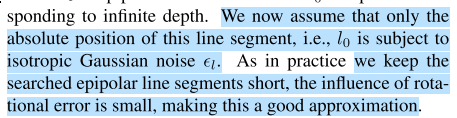
然后是想判断这个极线的角度和梯度的角度是不是足够小(当然在这之前还检测了一下长度达不到达标),如果足够小,那么就返回极限的归一化向量
// ======== check epl length ========= float eplLengthSquared = epx*epx+epy*epy; if(eplLengthSquared < MIN_EPL_LENGTH_SQUARED) { if(enablePrintDebugInfo) stats->num_observe_skipped_small_epl++; return false; } // ===== check epl-grad magnitude ====== float gx = activeKeyFrameImageData[idx+1] - activeKeyFrameImageData[idx-1]; float gy = activeKeyFrameImageData[idx+width] - activeKeyFrameImageData[idx-width]; float eplGradSquared = gx * epx + gy * epy; eplGradSquared = eplGradSquared*eplGradSquared / eplLengthSquared; // square and norm with epl-length if(eplGradSquared < MIN_EPL_GRAD_SQUARED) { if(enablePrintDebugInfo) stats->num_observe_skipped_small_epl_grad++; return false; } // ===== check epl-grad angle ====== if(eplGradSquared / (gx*gx+gy*gy) < MIN_EPL_ANGLE_SQUARED) { if(enablePrintDebugInfo) stats->num_observe_skipped_small_epl_angle++; return false; } // ===== DONE - return "normalized" epl ===== float fac = GRADIENT_SAMPLE_DIST / sqrt(eplLengthSquared); *pepx = epx * fac; *pepy = epy * fac;之后的工作是调用了一个极度复杂的函数DepthMap::doLineStereo,为了看懂这个函数,把我折磨地死去活来,现在让我们来看下这个函数是如何工作的
float DepthMap::doLineStereo
float error = doLineStereo( new_u,new_v,epx,epy, 0.0f, 1.0f, 1.0f/MIN_DEPTH, refFrame, refFrame->image(0), result_idepth, result_var, result_eplLength, stats);首先这是调用,从调用上来看,传入了当前点的坐标,极线的单位向量,最小深度(0.0),当前深度(1.0),最大深度(1/MIN_DEPTH,当前参考帧,当前参考帧的最底层图像,然后传入3个数据记录结果,最后是运行状态
进入函数之后,首先计算的是当前点在参考帧上的投影极线信息,先从图像投影到空间,然后从这一帧的相机坐标向参考帧转换,最后加上平移
Eigen::Vector3f KinvP = Eigen::Vector3f(fxi*u+cxi,fyi*v+cyi,1.0f); Eigen::Vector3f pInf = referenceFrame->K_otherToThis_R * KinvP; Eigen::Vector3f pReal = pInf / prior_idepth + referenceFrame->K_otherToThis_t;之后确定极线起点和终点,我估计这里计算这个的目的是想要判断最大搜索范围是不是在图像梯度可算范围内
float rescaleFactor = pReal[2] * prior_idepth; float firstX = u - 2*epxn*rescaleFactor; float firstY = v - 2*epyn*rescaleFactor; float lastX = u + 2*epxn*rescaleFactor; float lastY = v + 2*epyn*rescaleFactor;后面很明显有判断范围,以及判断了缩放范围,再下来调用了getInterpolatedElement函数,计算了下图像在该点的值,实际上就是插值,函数体如下
inline float getInterpolatedElement(const float* const mat, const float x, const float y, const int width){ //stats.num_pixelInterpolations++; int ix = (int)x; int iy = (int)y; float dx = x - ix; float dy = y - iy; float dxdy = dx*dy; const float* bp = mat +ix+iy*width; float res = dxdy * bp[1+width] + (dy-dxdy) * bp[width] + (dx-dxdy) * bp[1] + (1-dx-dy+dxdy) * bp[0]; return res;}然后计算最”近”的点
Eigen::Vector3f pClose = pInf + referenceFrame->K_otherToThis_t*max_idepth; // if the assumed close-point lies behind the // image, have to change that. if(pClose[2] < 0.001f) { max_idepth = (0.001f-pInf[2]) / referenceFrame->K_otherToThis_t[2]; pClose = pInf + referenceFrame->K_otherToThis_t*max_idepth; } pClose = pClose / pClose[2]; // pos in new image of point (xy), assuming max_idepth之后计算最”远”的点
Eigen::Vector3f pFar = pInf + referenceFrame->K_otherToThis_t*min_idepth; // if the assumed far-point lies behind the image or closter than the near-point, // we moved past the Point it and should stop. if(pFar[2] < 0.001f || max_idepth < min_idepth) { if(enablePrintDebugInfo) stats->num_stereo_inf_oob++; return -1; } pFar = pFar / pFar[2]; // pos in new image of point (xy), assuming min_idepth得到极线线段,并归一化
// calculate increments in which we will step through the epipolar line. // they are sampleDist (or half sample dist) long float incx = pClose[0] - pFar[0]; float incy = pClose[1] - pFar[1]; float eplLength = sqrt(incx*incx+incy*incy); if(!eplLength > 0 || std::isinf(eplLength)) return -4; incx *= GRADIENT_SAMPLE_DIST/eplLength; incy *= GRADIENT_SAMPLE_DIST/eplLength;然后拓展长度,以及搜索宽度,确保这两个点都在图像内部
// extend one sample_dist to left & right. pFar[0] -= incx; pFar[1] -= incy; pClose[0] += incx; pClose[1] += incy; // make epl long enough (pad a little bit). if(eplLength < MIN_EPL_LENGTH_CROP) { float pad = (MIN_EPL_LENGTH_CROP - (eplLength)) / 2.0f; pFar[0] -= incx*pad; pFar[1] -= incy*pad; pClose[0] += incx*pad; pClose[1] += incy*pad; } // if inf point is outside of image: skip pixel. if( pFar[0] <= SAMPLE_POINT_TO_BORDER || pFar[0] >= width-SAMPLE_POINT_TO_BORDER || pFar[1] <= SAMPLE_POINT_TO_BORDER || pFar[1] >= height-SAMPLE_POINT_TO_BORDER) { if(enablePrintDebugInfo) stats->num_stereo_inf_oob++; return -1; } // if near point is outside: move inside, and test length again. if( pClose[0] <= SAMPLE_POINT_TO_BORDER || pClose[0] >= width-SAMPLE_POINT_TO_BORDER || pClose[1] <= SAMPLE_POINT_TO_BORDER || pClose[1] >= height-SAMPLE_POINT_TO_BORDER) { if(pClose[0] <= SAMPLE_POINT_TO_BORDER) { float toAdd = (SAMPLE_POINT_TO_BORDER - pClose[0]) / incx; pClose[0] += toAdd * incx; pClose[1] += toAdd * incy; } else if(pClose[0] >= width-SAMPLE_POINT_TO_BORDER) { float toAdd = (width-SAMPLE_POINT_TO_BORDER - pClose[0]) / incx; pClose[0] += toAdd * incx; pClose[1] += toAdd * incy; } if(pClose[1] <= SAMPLE_POINT_TO_BORDER) { float toAdd = (SAMPLE_POINT_TO_BORDER - pClose[1]) / incy; pClose[0] += toAdd * incx; pClose[1] += toAdd * incy; } else if(pClose[1] >= height-SAMPLE_POINT_TO_BORDER) { float toAdd = (height-SAMPLE_POINT_TO_BORDER - pClose[1]) / incy; pClose[0] += toAdd * incx; pClose[1] += toAdd * incy; } // get new epl length float fincx = pClose[0] - pFar[0]; float fincy = pClose[1] - pFar[1]; float newEplLength = sqrt(fincx*fincx+fincy*fincy); // test again if( pClose[0] <= SAMPLE_POINT_TO_BORDER || pClose[0] >= width-SAMPLE_POINT_TO_BORDER || pClose[1] <= SAMPLE_POINT_TO_BORDER || pClose[1] >= height-SAMPLE_POINT_TO_BORDER || newEplLength < 8.0f ) { if(enablePrintDebugInfo) stats->num_stereo_near_oob++; return -1; } }得到远点的图像信息
float cpx = pFar[0];float cpy = pFar[1];float val_cp_m2 = getInterpolatedElement(referenceFrameImage,cpx-2.0f*incx, cpy-2.0f*incy, width);float val_cp_m1 = getInterpolatedElement(referenceFrameImage,cpx-incx, cpy-incy, width);float val_cp = getInterpolatedElement(referenceFrameImage,cpx, cpy, width);float val_cp_p1 = getInterpolatedElement(referenceFrameImage,cpx+incx, cpy+incy, width);float val_cp_p2;然后开始搜索,初始化计数信息
int loopCounter = 0; float best_match_x = -1; float best_match_y = -1; float best_match_err = 1e50; float second_best_match_err = 1e50; // best pre and post errors. float best_match_errPre=NAN, best_match_errPost=NAN, best_match_DiffErrPre=NAN, best_match_DiffErrPost=NAN; bool bestWasLastLoop = false; float eeLast = -1; // final error of last comp. // alternating intermediate vars float e1A=NAN, e1B=NAN, e2A=NAN, e2B=NAN, e3A=NAN, e3B=NAN, e4A=NAN, e4B=NAN, e5A=NAN, e5B=NAN; int loopCBest=-1, loopCSecond =-1;之后开始循环搜索,只要没有走到终点pClose或者loopCounter == 0就不断循环,以搜索误差最小的那个匹配点,我们把通过几何计算然后插值得到的那个点的信息作为标准信息,进行搜索,并计算误差
// interpolate one new pointval_cp_p2 = getInterpolatedElement(referenceFrameImage,cpx+2*incx, cpy+2*incy, width);// hacky but fast way to get error and differential error: switch buffer variables for last loop.float ee = 0;if(loopCounter%2==0){ // calc error and accumulate sums. e1A = val_cp_p2 - realVal_p2;ee += e1A*e1A; e2A = val_cp_p1 - realVal_p1;ee += e2A*e2A; e3A = val_cp - realVal; ee += e3A*e3A; e4A = val_cp_m1 - realVal_m1;ee += e4A*e4A; e5A = val_cp_m2 - realVal_m2;ee += e5A*e5A;}else{ // calc error and accumulate sums. e1B = val_cp_p2 - realVal_p2;ee += e1B*e1B; e2B = val_cp_p1 - realVal_p1;ee += e2B*e2B; e3B = val_cp - realVal; ee += e3B*e3B; e4B = val_cp_m1 - realVal_m1;ee += e4B*e4B; e5B = val_cp_m2 - realVal_m2;ee += e5B*e5B;}然后判断是否误差更小,如果是,那么设置新的信息
if(ee < best_match_err){ // put to second-best second_best_match_err=best_match_err; loopCSecond = loopCBest; // set best. best_match_err = ee; loopCBest = loopCounter; best_match_errPre = eeLast; best_match_DiffErrPre = e1A*e1B + e2A*e2B + e3A*e3B + e4A*e4B + e5A*e5B; best_match_errPost = -1; best_match_DiffErrPost = -1; best_match_x = cpx; best_match_y = cpy; bestWasLastLoop = true;}否则,如果上次循环是”好”的匹配循环,那么设置上次匹配的”好”参数
if(bestWasLastLoop){ best_match_errPost = ee; best_match_DiffErrPost = e1A*e1B + e2A*e2B + e3A*e3B + e4A*e4B + e5A*e5B; bestWasLastLoop = false;}如果上次匹配不好,再判断它的误差是不是比次一个等级的匹配好,如果好,就设置,不好就算了
if(ee < second_best_match_err){ second_best_match_err=ee; loopCSecond = loopCounter;}然后更新参数,进行下次循环
eeLast = ee;val_cp_m2 = val_cp_m1; val_cp_m1 = val_cp; val_cp = val_cp_p1; val_cp_p1 = val_cp_p2;if(enablePrintDebugInfo) stats->num_stereo_comparisons++;cpx += incx;cpy += incy;loopCounter++;循环完毕之后,自然找到了极线上匹配的最好的点,然后自然要判断和不合法,不合法就别继续了
这个判断分两部分,第一部分是判断误差是不是够小了,第二部分是判断匹配上的是不是够多
// if error too big, will return -3, otherwise -2.if(best_match_err > 4.0f*(float)MAX_ERROR_STEREO){ if(enablePrintDebugInfo) stats->num_stereo_invalid_bigErr++; return -3;}// check if clear enough winnerif(abs(loopCBest - loopCSecond) > 1.0f && MIN_DISTANCE_ERROR_STEREO * best_match_err > second_best_match_err){ if(enablePrintDebugInfo) stats->num_stereo_invalid_unclear_winner++; return -2;}之后自然是计算准确的匹配(使用亚像素)
首先计算梯度(计算了一半),然后判断各种各样的不合法情况
只有两种情况是可用的,即
1. gradPre_pre和gradPre_this不同号且gradPost_post和gradPost_this同号。认为前插可用
2. 上一种条件不满足情况下gradPost_post和gradPost_this不同号,认为后插值可用
然后这里就在做插值工作,得到亚像素的匹配误差
if(interpPre){ float d = gradPre_this / (gradPre_this - gradPre_pre); best_match_x -= d*incx; best_match_y -= d*incy; best_match_err = best_match_err - 2*d*gradPre_this - (gradPre_pre - gradPre_this)*d*d; if(enablePrintDebugInfo) stats->num_stereo_interpPre++; didSubpixel = true;}else if(interpPost){ float d = gradPost_this / (gradPost_this - gradPost_post); best_match_x += d*incx; best_match_y += d*incy; best_match_err = best_match_err + 2*d*gradPost_this + (gradPost_post - gradPost_this)*d*d; if(enablePrintDebugInfo) stats->num_stereo_interpPost++; didSubpixel = true;}于是就要做采样准备了,5个点,就论文这里 
// sampleDist is the distance in pixel at which the realVal's were sampled float sampleDist = GRADIENT_SAMPLE_DIST*rescaleFactor; float gradAlongLine = 0; float tmp = realVal_p2 - realVal_p1; gradAlongLine+=tmp*tmp; tmp = realVal_p1 - realVal; gradAlongLine+=tmp*tmp; tmp = realVal - realVal_m1; gradAlongLine+=tmp*tmp; tmp = realVal_m1 - realVal_m2; gradAlongLine+=tmp*tmp; gradAlongLine /= sampleDist*sampleDist; // check if interpolated error is OK. use evil hack to allow more error if there is a lot of gradient. if(best_match_err > (float)MAX_ERROR_STEREO + sqrtf( gradAlongLine)*20) { if(enablePrintDebugInfo) stats->num_stereo_invalid_bigErr++; return -3; }之后总算开始计算深度了,当然还有一会儿要用到的alpha 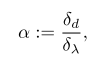
这个计算公式是用了向量的分量进行计算,首先的比较是看哪个分量比较精确用哪个(长点好,视差大)
float oldX = fxi*best_match_x+cxi;float nominator = (oldX*referenceFrame->otherToThis_t[2] - referenceFrame->otherToThis_t[0]);float dot0 = KinvP.dot(referenceFrame->otherToThis_R_row0);float dot2 = KinvP.dot(referenceFrame->otherToThis_R_row2);idnew_best_match = (dot0 - oldX*dot2) / nominator;alpha = incx*fxi*(dot0*referenceFrame->otherToThis_t[2] - dot2*referenceFrame->otherToThis_t[0]) / (nominator*nominator);其实这个公式我是一下没看懂的,看了下大神做的公式推导,才明白过来,直接上截图 
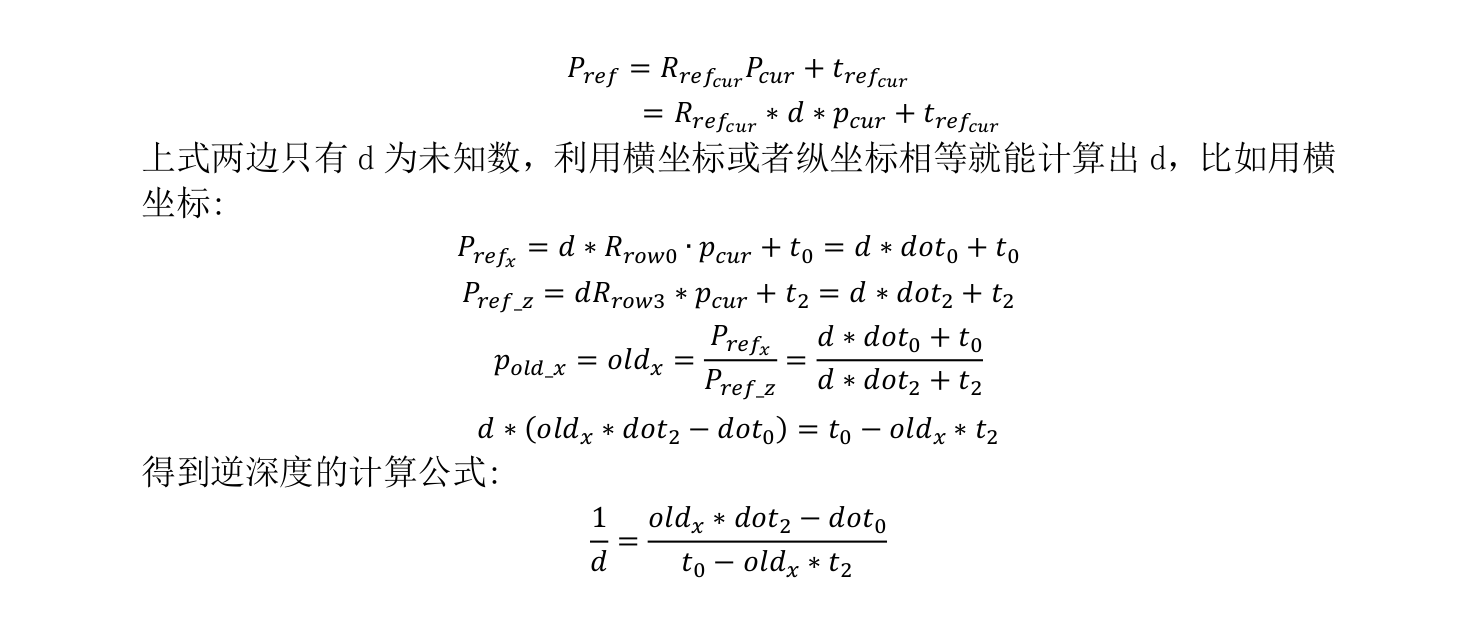
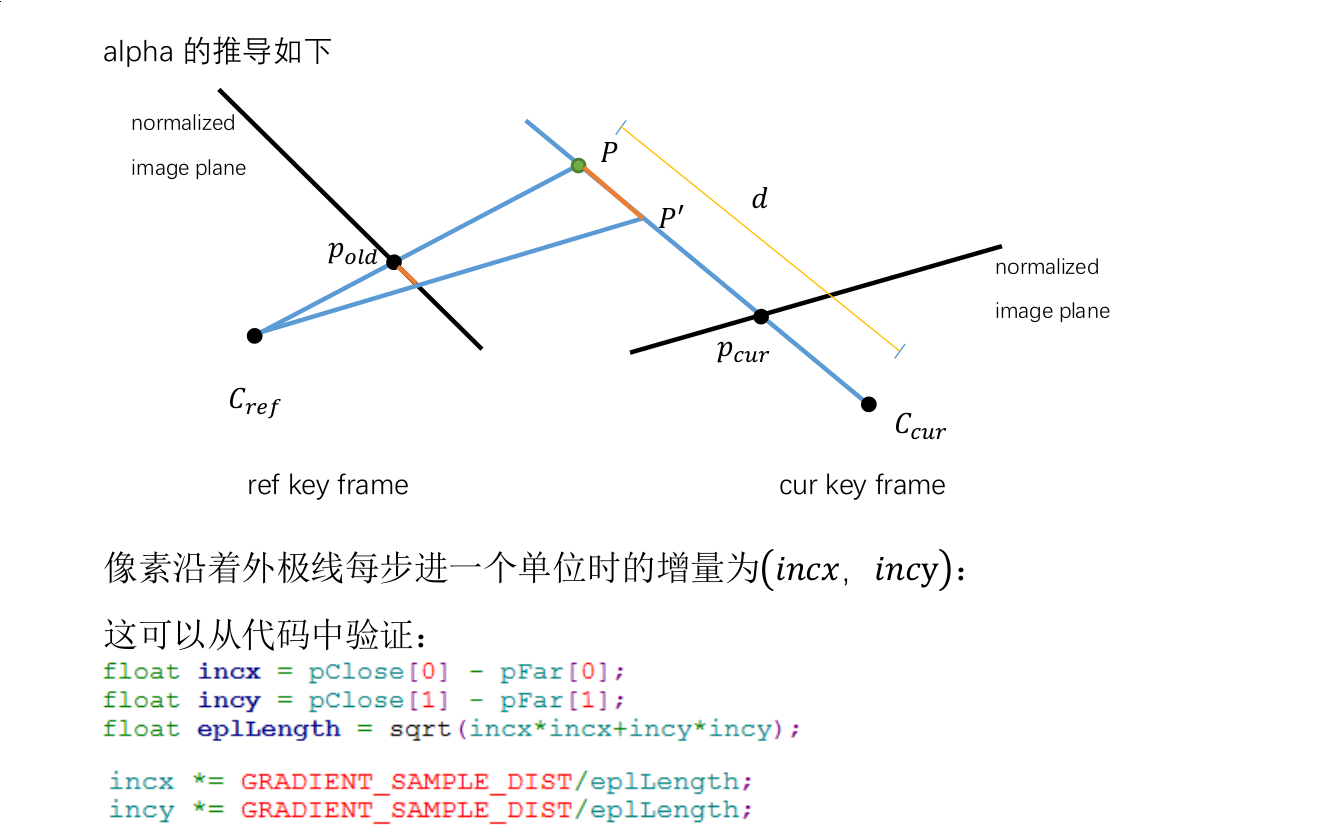

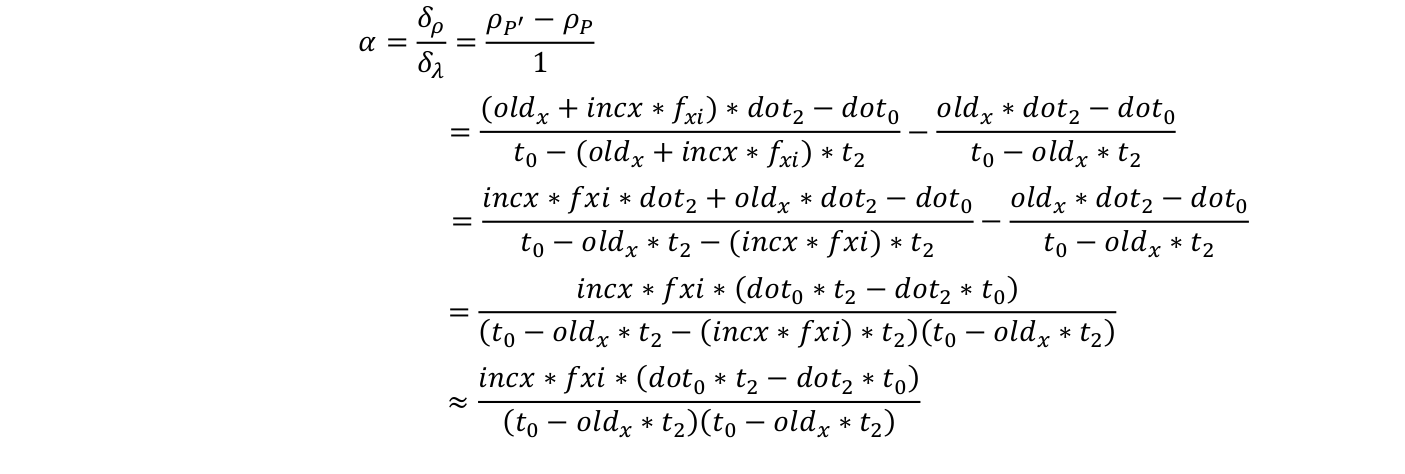
后面部分在算协方差了,公式就在论文上,都比较简单,就略过了,请读者自行研究,之后就可以回到updateKeyFrame了
实际上上面那个部分结束之后,你发现整个DepthMap的函数已经差不多了。接下来我们来看下面的调用regularizeDepthMap
//if(rand()%10==0) { gettimeofday(&tv_start, NULL); regularizeDepthMapFillHoles(); gettimeofday(&tv_end, NULL); msFillHoles = 0.9*msFillHoles + 0.1*((tv_end.tv_sec-tv_start.tv_sec)*1000.0f + (tv_end.tv_usec-tv_start.tv_usec)/1000.0f); nFillHoles++; } gettimeofday(&tv_start, NULL); regularizeDepthMap(false, VAL_SUM_MIN_FOR_KEEP); gettimeofday(&tv_end, NULL); msRegularize = 0.9*msRegularize + 0.1*((tv_end.tv_sec-tv_start.tv_sec)*1000.0f + (tv_end.tv_usec-tv_start.tv_usec)/1000.0f); nRegularize++;这里主要是调用了两个函数regularizeDepthMapFillHoles和regularizeDepthMap,就按照调用顺序依次介绍吧
DepthMap::regularizeDepthMapFillHoles
这个函数又是bind映射机制,前面已经讲过了如何进行的,这里我们就直接进入函数regularizeDepthMapFillHolesRow
const float* keyFrameMaxGradBuf = activeKeyFrame->maxGradients(0);本地化梯度参数,进入循环
int idx = x+y*width;DepthMapPixelHypothesis* dest = otherDepthMap + idx;if(dest->isValid) continue;if(keyFrameMaxGradBuf[idx]<MIN_ABS_GRAD_DECREASE) continue;然后判断那块区域有效点的数据是否足够多
int* io = validityIntegralBuffer + idx;int val = io[2+2*width] - io[2-3*width] - io[-3+2*width] + io[-3-3*width];我估计这里看起来又是一段莫名其妙理解不能的代码,我在这里讲解一下
首先我们来看这个东西是在哪里初始化的,请看DepthMap::buildRegIntegralBufferRow1函数
void DepthMap::buildRegIntegralBufferRow1(int yMin, int yMax, RunningStats* stats){ // ============ build inegral buffers int* validityIntegralBufferPT = validityIntegralBuffer+yMin*width; DepthMapPixelHypothesis* ptSrc = currentDepthMap+yMin*width; for(int y=yMin;y<yMax;y++) { int validityIntegralBufferSUM = 0; for(int x=0;x<width;x++) { if(ptSrc->isValid) validityIntegralBufferSUM += ptSrc->validity_counter; *(validityIntegralBufferPT++) = validityIntegralBufferSUM; ptSrc++; } }}你会发现,validityIntegralBuffer实际上记录了到当前位置所有的有效点的和,那么上面那一段加加减减(int val = io[2+2*width] - io[2-3*width] - io[-3+2*width] + io[-3-3*width])是干嘛呢,请看下图 
首先是那个大区域,减去红色的,减去蓝色的,再加上绿色的,是不是就只剩下的未填色部分了呢?
因此这里实际上统计了未填色部分的有效点的总数,然后下面在判断满不满足要求,满足之后进行接下来的操作
然后是这段代码:
DepthMapPixelHypothesis* s1max = otherDepthMap + (x-2) + (y+3)*width;for (DepthMapPixelHypothesis* s1 = otherDepthMap + (x-2) + (y-2)*width; s1 < s1max; s1+=width) for(DepthMapPixelHypothesis* source = s1; source < s1+5; source++) { if(!source->isValid) continue; sumIdepthObs += source->idepth /source->idepth_var; sumIVarObs += 1.0f/source->idepth_var; num++; }float idepthObs = sumIdepthObs / sumIVarObs;idepthObs = UNZERO(idepthObs);currentDepthMap[idx] = DepthMapPixelHypothesis( idepthObs, VAR_RANDOM_INIT_INITIAL, 0);实际上这里就是算了一下加权平均,没啥特别的,然后把估计更新了进去,实际上就是预测了一些未知区域(洞)的深度,注意这个预测是要在周围都比较好的基础上才进行
DepthMap::regularizeDepthMap
多的废话我已经不想说了,既然能看到这个部分,足见读者编程水平已经不低,多的废话我就不说了,这个函数用和之前一样的线程机制调用了DepthMap::regularizeDepthMapRow,这个函数使用了模板技术,它有是否要移除遮挡的两个版本,在预编译期已经生成,函数本身蛮简单的,其实就是算一个加权平均,关键代码如下:
for(int y=yMin;y<yMax;y++){ for(int x=regularize_radius;x<width-regularize_radius;x++) { DepthMapPixelHypothesis* dest = currentDepthMap + x + y*width; DepthMapPixelHypothesis* destRead = otherDepthMap + x + y*width; float sum=0, val_sum=0, sumIvar=0;//, min_varObs = 1e20; int numOccluding = 0, numNotOccluding = 0; for(int dx=-regularize_radius; dx<=regularize_radius;dx++) for(int dy=-regularize_radius; dy<=regularize_radius;dy++) { DepthMapPixelHypothesis* source = destRead + dx + dy*width; if(!source->isValid) continue; float diff =source->idepth - destRead->idepth; if(DIFF_FAC_SMOOTHING*diff*diff > source->idepth_var + destRead->idepth_var) continue; val_sum += source->validity_counter; float distFac = (float)(dx*dx+dy*dy)*regDistVar; float ivar = 1.0f/(source->idepth_var + distFac); sum += source->idepth * ivar; sumIvar += ivar; } if(val_sum < validityTH) { dest->isValid = false; continue; } sum = sum / sumIvar; sum = UNZERO(sum); // update! dest->idepth_smoothed = sum; dest->idepth_var_smoothed = 1.0f/sumIvar; }}调用完这个函数后,实际上DepthMap::updateKeyframe中干活的部分就都结束了,剩下都是一些记录工作和调试选项的工作,请读者自行阅读
void DepthMap::propagateDepth
实际上到了这里,我应该讲清楚的是createKeyFrame函数,但是这个函数和上面那个函数重叠部分太多,之后一个关键函数,就是DepthMap::propagateDepth了,我就简单说下这个深度传播的函数,省的和前面的部分重复
for(DepthMapPixelHypothesis* pt = otherDepthMap+width*height-1; pt >= otherDepthMap; pt--){ pt->isValid = false; pt->blacklisted = 0;}首先当然是初始化工作,代码如上,然后是本地化参数
SE3 oldToNew_SE3 = se3FromSim3(new_keyframe->pose->thisToParent_raw).inverse();Eigen::Vector3f trafoInv_t = oldToNew_SE3.translation().cast<float>();Eigen::Matrix3f trafoInv_R = oldToNew_SE3.rotationMatrix().matrix().cast<float>();const bool* trackingWasGood = new_keyframe->getTrackingParent() == activeKeyFrame ? new_keyframe->refPixelWasGoodNoCreate() : 0;const float* activeKFImageData = activeKeyFrame->image(0);const float* newKFMaxGrad = new_keyframe->maxGradients(0);const float* newKFImageData = new_keyframe->image(0);首先的到新坐标下的当前点,同时算出深度和图像上的位置
Eigen::Vector3f pn = (trafoInv_R * Eigen::Vector3f(x*fxi + cxi,y*fyi + cyi,1.0f)) / source->idepth_smoothed + trafoInv_t;float new_idepth = 1.0f / pn[2];float u_new = pn[0]*new_idepth*fx + cx;float v_new = pn[1]*new_idepth*fy + cy;然后得到最大梯度,以及最好的估计目标
int newIDX = (int)(u_new+0.5f) + ((int)(v_new+0.5f))*width;float destAbsGrad = newKFMaxGrad[newIDX];...DepthMapPixelHypothesis* targetBest = otherDepthMap + newIDX;之后计算新的方差 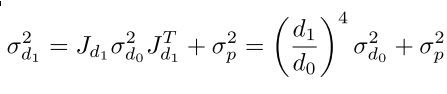
float idepth_ratio_4 = new_idepth / source->idepth_smoothed;idepth_ratio_4 *= idepth_ratio_4;idepth_ratio_4 *= idepth_ratio_4;然后去除遮挡,策略是如果之前那个bestTarget是有效的,如果一下子变化特别大,那么认为是被遮挡了
// check for occlusionif(targetBest->isValid){ // if they occlude one another, one gets removed. float diff = targetBest->idepth - new_idepth; if(DIFF_FAC_PROP_MERGE*diff*diff > new_var + targetBest->idepth_var) { if(new_idepth < targetBest->idepth) { if(enablePrintDebugInfo) runningStats.num_prop_occluded++; continue; } else { if(enablePrintDebugInfo) runningStats.num_prop_occluded++; targetBest->isValid = false; } }}之后是更新深度信息,如果bestTarget是无效的,那么创建一个新的估计
*targetBest = DepthMapPixelHypothesis( new_idepth, new_var, source->validity_counter);如果是有效的,需要先merge,再更新,实际上就是使用了扩散卡尔曼滤波,最后再更新到当前深度,实际上就是对应论文这个部分 
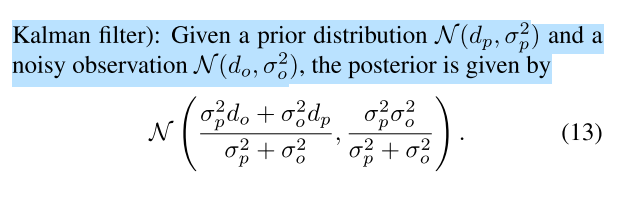
// merge idepth ekf-stylefloat w = new_var / (targetBest->idepth_var + new_var);float merged_new_idepth = w*targetBest->idepth + (1.0f-w)*new_idepth;// merge validityint merged_validity = source->validity_counter + targetBest->validity_counter;if(merged_validity > VALIDITY_COUNTER_MAX+(VALIDITY_COUNTER_MAX_VARIABLE)) merged_validity = VALIDITY_COUNTER_MAX+(VALIDITY_COUNTER_MAX_VARIABLE);*targetBest = DepthMapPixelHypothesis( merged_new_idepth, 1.0f/(1.0f/targetBest->idepth_var + 1.0f/new_var), merged_validity);...// swap!std::swap(currentDepthMap, otherDepthMap);深度部分的代码就写到这里,这部分难度特别大,几乎不能做朋友,想要真正了解他,还需要反复阅读,反复和论文对照,才能真正理解
- lsd-slam源码解读第五篇:DepthEstimation
- lsd-slam源码解读第二篇:DataStructures
- lsd-slam源码解读第四篇:tracking
- lsd-slam源码解读第三篇:算法解析
- lsd-slam源码解读第一篇:Sophus/sophus
- lsd-slam源码解读第一篇:Sophus/sophus
- sd-slam源码解读第六篇:GlobalMapping
- LSD-SLAM使用教程
- LSD-SLAM使用教程
- LSD-SLAM使用方法
- LSD-SLAM 安装运行
- LSD-SLAM jade 安装 catkin_make
- LSD-SLAM笔记之SE3Tracking
- LSD-SLAM笔记之DepthMap
- Ubuntu16.04 install lsd-slam
- Ubuntu14.04安装LSD-SLAM
- Ubuntu16.04安装LSD-SLAM
- Ubuntu 14.04+ROS Indigo+LSD-SLAM
- shellz中算数运算归纳
- NodeJS 文件系统
- nrf52832之添加自己的service
- spark学习资料
- java知识巩固
- lsd-slam源码解读第五篇:DepthEstimation
- Android之ProgressBar及其子类SeekBar和RatingBar的使用(二)
- 数据结构中常见的树(BST二叉搜索树、AVL平衡二叉树、RBT红黑树、B-树、B+树、B*树)
- [原创]SPINNER 改变字体,颜色等...
- C++ 编译器生成默认构造函数的四种情况
- 序列化与反序列化
- imageview的自定义圆形图片
- HDU 3336-Count the string
- Java基础Math函数使用