跟Google 学代码:Building Apps with Graphics & Animation
来源:互联网 发布:具体营销数据分析 编辑:程序博客网 时间:2024/05/17 22:19
引言
可以右键保存我做的思维导图:
Google这一章的课程共分为四大部分:
我做的思维导图:
高效展示篇
OpenGl使用篇
View动画
使用动画集
考虑文章篇幅和博客内容连续性,本篇仅仅涉及Building Apps with Graphics & Animation 第一节 Displaying Bitmaps Efficientlty,第二节请移步至这里
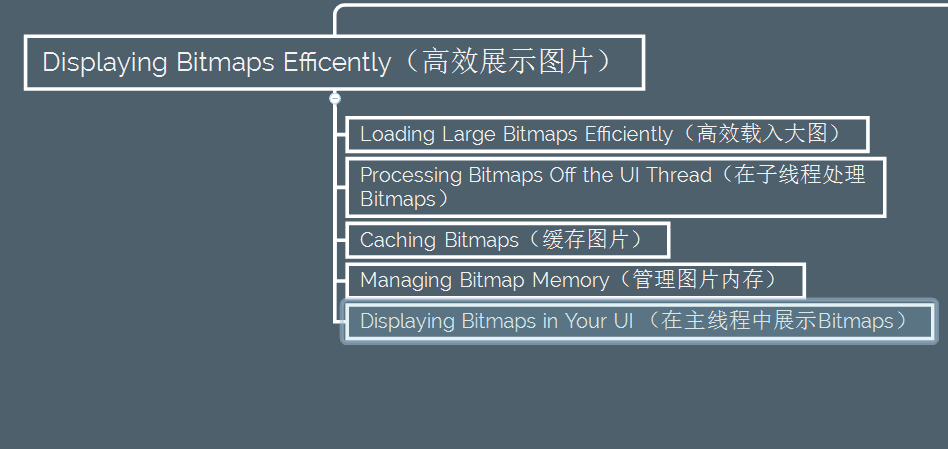
Displaying Bitmaps Efficientlty (高效展示图片)
加载大图
图片有各种各样的形状和尺寸,很多情况下,一款热门的App需要展示很多大尺寸的图片.例如,系统的相册App,就需要展示很多图片,包含从相机拍摄的图片,要知道,相机拍摄的图片很有可能超出当前手机的分辨率,这些超出的部分,如果也要加载进内存的话,会申请过多的内存,势必造成了资源浪费。
所以加载一张图片的时候要限制内存,如何限制呢?加载一张低分辨率的图片申请的内存比高分辨率的图片所申请的内存 要少得多,所以我们要想办法降低图片的分辨率。
接下来,在 加载大图这一课将学习如何限制图片的内存,以使得加载大图片的时候,降低App占用的系统内存
关注源图片的尺寸和图片类型
首先如果是一张18*18的小图,我们就没必要关注它的内存了,而应该去考虑复用对象等等其他的优化方案,当加载一张大图2560*1920的图时,这个时候我们才应该考虑如何节省内存?
那么第一个问题来了,如何读取图片的尺寸和图片类型呢?
请往下看
BitmapFactory 类提供很多解析图片的方法,比如(decodeByteArray(), decodeFile(), decodeResource(), etc.),这些解析方法会根据源图片来构造Bitmap对象,从而为Bitmap对象分配内存,因此很容易造成OutOfMemory异常
好在Google给我们提供了解决办法:
请注意BitmapFactory所提供的所有的解析方法,无论是decodeByteArray(), decodeFile(), 还是decodeResource()
都包含了一个参数BitmapFactory.Options,这个参数可是大有来头:
通过这个Options对象,可以在不创建Bitmap对象的情况下,读取到图片源文件的信息,包括图片宽高,图片类型等
想想都有点激动,有木有,Google提供了代码来读取图片信息:
BitmapFactory.Options options = new BitmapFactory.Options();options.inJustDecodeBounds = true;BitmapFactory.decodeResource(getResources(), R.id.myimage, options);int imageHeight = options.outHeight;int imageWidth = options.outWidth;String imageType = options.outMimeType;最为关键的是options.inJustDecodeBounds = true;在句话的作用下,系统将不回去创建Bitmap对象,而仅仅只是解析源图片的信息,options.outHeight和options.outWidth返回值就是我们想要的
Ok,现在我们得到了源图片信息后,需要压缩图片宽高来节省内存
载入一个低分辨率的图片
在压缩图片之前,Google告诫我们需要关注以下四点:
- 计算加载整张图片所占用的内存
- App能分配给这张Bitmap多大的内存,从而保证不崩溃
- 一般用Imageview展示图片,所以需要知道Imageview的宽高,来保证图片不会变形
- 屏幕的尺寸和屏幕的分辨率(通常我们使用更多的是屏幕密度)
又回到文章开头的那个问题,当加载图片所占用的内存过大的时候才会去考虑压缩它,比如1024*768的图片,显示在128*96大小的ImageView上,这个时候我们才需要压缩,
你如果一定要在96*96的Imageview显示一张24*24大小的图片时,还想着把图片压缩一下,少年,你挺有才的!
Ok,有了压缩的概念后,我们现在就要想着如何压缩Bitmap了:
Google告诉我们,关注点还是在 BitmapFactory.Options 这个类中
BitmapFactory.Options 提供了inSampleSize参数来设置压缩比例
inSampleSzie真的那么有用?
请看Google官网的原文:To tell the decoder to subsample the image, loading a smaller version into memory, set inSampleSize to true in your BitmapFactory.Options object. For example, an image with resolution 2048x1536 that is decoded with an inSampleSize of 4 produces a bitmap of approximately 512x384. Loading this into memory uses 0.75MB rather than 12MB for the full image (assuming a bitmap configuration of ARGB_8888).
ok我们知道inSampleSize可以控制图片压缩了,内心好激动,那么这个值我们可以随便设置了吗?
Google又发话了:Here’s a method to calculate a sample size value that is a power of two based on a target width and height
少年,还是老实点,接着看如下代码:
public static int calculateInSampleSize( BitmapFactory.Options options, int reqWidth, int reqHeight) { // Raw height and width of image final int height = options.outHeight; final int width = options.outWidth; int inSampleSize = 1; if (height > reqHeight || width > reqWidth) { final int halfHeight = height / 2; final int halfWidth = width / 2; // Calculate the largest inSampleSize value that is a power of 2 and keeps both // height and width larger than the requested height and width. while ((halfHeight / inSampleSize) >= reqHeight && (halfWidth / inSampleSize) >= reqWidth) { inSampleSize *= 2; } } return inSampleSize;}ok当我们根据Imageview宽高和原图宽高计算出inSampleSize的时候,接下来我们就可以压缩图片了:
public static Bitmap decodeSampledBitmapFromResource(Resources res, int resId, int reqWidth, int reqHeight) { // First decode with inJustDecodeBounds=true to check dimensions final BitmapFactory.Options options = new BitmapFactory.Options(); options.inJustDecodeBounds = true; BitmapFactory.decodeResource(res, resId, options); // Calculate inSampleSize options.inSampleSize = calculateInSampleSize(options, reqWidth, reqHeight); // Decode bitmap with inSampleSize set options.inJustDecodeBounds = false; return BitmapFactory.decodeResource(res, resId, options);}其实最为关键的是 options.inJustDecodeBounds = true 这句代码,通过它,我们可以在不为Bitmap分配内存的情况下,预先读取到图片的信息,接着设置Options的属性, options.inJustDecodeBounds = false;允许系统为Bitmap分配内存,最后将options传递给decodeResource()函数就好了
嗯,现在可以在Imageview展示压缩后的图片了:
mImageView.setImageBitmap( decodeSampledBitmapFromResource(getResources(), R.id.myimage, 100, 100));在子线程处理图片
这一节将学会
- 使用AsyncTask
- 处理并发
当我们了解“BitmapFactory.decode这一系列解析函数后,需要关注另外一个点:(图片)数据源本身
有时候,源文件(图片)是来自手机硬盘,或者外置存储卡,也有可能是网络下载,这时,加载源文件的时候,就不仅仅要考虑内存的问了,还需要考虑手机CPU的性能,网络连接的强弱等等,
假如用户所用的手机设备比较糟糕,比如2g网络的情况下,加载显示一张图片, 这个时候UI线程有可能被锁住,并且不会响应用户任何操作,”无响应“这种情况无疑是最糟糕的,接下来我们将讨论如何避免
使用AsyncTask
AsyncTask的作用是启动后台线程去执行一些操作,执行结束之后会向UI线程返回结果。接下来的例子展示了如何使用AsyncTask解析图片:
class BitmapWorkerTask extends AsyncTask<Integer, Void, Bitmap> { private final WeakReference<ImageView> imageViewReference; private int data = 0; public BitmapWorkerTask(ImageView imageView) { // Use a WeakReference to ensure the ImageView can be garbage collected imageViewReference = new WeakReference<ImageView>(imageView); } // Decode image in background. @Override protected Bitmap doInBackground(Integer... params) { data = params[0]; return decodeSampledBitmapFromResource(getResources(), data, 100, 100)); } // Once complete, see if ImageView is still around and set bitmap. @Override protected void onPostExecute(Bitmap bitmap) { if (imageViewReference != null && bitmap != null) { final ImageView imageView = imageViewReference.get(); if (imageView != null) { imageView.setImageBitmap(bitmap); } } }}总结:
- donInBackground 用来执行任务
- onPostExecute 表示一旦完成,通知UI主线程执行的操作
- 亮点一: 弱引用处理的Imageview,值得学习
- 亮点二:双层判断,先判断弱引用是否为空,接着判断imageview是否为空,反之被回收引发空指针异常
接着我们在主线程中启动这个AsyncTask即可:
public void loadBitmap(int resId, ImageView imageView) { BitmapWorkerTask task = new BitmapWorkerTask(imageView); task.execute(resId);}处理并发
诸如ListView和GridView这些View的组件,在使用AsyncTask会遇到一些棘手的问题
会遇到什么问题?
ListView和GridView滑动加载视图的时候会回收子view对象,以此节省内存的,如果每一个子view都使用AsyncTask加载,有个非常严重的问题是:你不能保证这个Task任务可以执行完成,而此时子view有可能已经被回收了
这里有篇文章讨论多线程性能的问题
http://android-developers.blogspot.com/2010/07/multithreading-for-performance.html
进一步的讨论解决并发问题,并且提供了解决方法:
Imageview存储在弱引用中,最近执行的AsyncTask将会被检查任务是否完成,
创建一个 Drawable子类AsyncDrawable,在子类中存储一个BitmapWorkerTask弱引用
static class AsyncDrawable extends BitmapDrawable { private final WeakReference<BitmapWorkerTask> bitmapWorkerTaskReference; public AsyncDrawable(Resources res, Bitmap bitmap, BitmapWorkerTask bitmapWorkerTask) { super(res, bitmap); bitmapWorkerTaskReference = new WeakReference<BitmapWorkerTask>(bitmapWorkerTask); } public BitmapWorkerTask getBitmapWorkerTask() { return bitmapWorkerTaskReference.get(); }}在执行BitmapWokrerTask之前,你需要创建这个Drawable,绑定目标ImageView
public void loadBitmap(int resId, ImageView imageView) { if (cancelPotentialWork(resId, imageView)) { final BitmapWorkerTask task = new BitmapWorkerTask(imageView); final AsyncDrawable asyncDrawable = new AsyncDrawable(getResources(), mPlaceHolderBitmap, task); imageView.setImageDrawable(asyncDrawable); task.execute(resId); }}重点就在cancelPotenttialWork()函数的示例代码,用来检查正在运行的task任务是否已经绑定了ImageView,如果任务和ImageView已经绑定了,它将会取消上一个任务。
在小量的情况下,新的任务代替已存在的任务,而不需要继续执行存在的任务,
我们来关注cancelPntenttialWork()的具体实现:
public static boolean cancelPotentialWork(int data, ImageView imageView) { final BitmapWorkerTask bitmapWorkerTask = getBitmapWorkerTask(imageView); if (bitmapWorkerTask != null) { final int bitmapData = bitmapWorkerTask.data; // If bitmapData is not yet set or it differs from the new data if (bitmapData == 0 || bitmapData != data) { // Cancel previous task bitmapWorkerTask.cancel(true); } else { // The same work is already in progress return false; } } // No task associated with the ImageView, or an existing task was cancelled return true;}一个有帮助的方法,getBitmapWorkerTask(),将被用来取回ImageView
private static BitmapWorkerTask getBitmapWorkerTask(ImageView imageView) { if (imageView != null) { final Drawable drawable = imageView.getDrawable(); if (drawable instanceof AsyncDrawable) { final AsyncDrawable asyncDrawable = (AsyncDrawable) drawable; return asyncDrawable.getBitmapWorkerTask(); } } return null;}最后一步就是更新BitmapWorkerTask的onPostExecute()函数 ,以此来检查与ImageView所绑定的Tsk任务是否被取消,
class BitmapWorkerTask extends AsyncTask<Integer, Void, Bitmap> { ... @Override protected void onPostExecute(Bitmap bitmap) { if (isCancelled()) { bitmap = null; } if (imageViewReference != null && bitmap != null) { final ImageView imageView = imageViewReference.get(); final BitmapWorkerTask bitmapWorkerTask = getBitmapWorkerTask(imageView); if (this == bitmapWorkerTask && imageView != null) { imageView.setImageBitmap(bitmap); } } }}缓存图片
我之前 翻译 过Google Caching Bitmaps章节详情可以点击 史诗巨著内存优化
管理图片内存Android 3.0以上的版本
3.0版本以上引入了一个新变量:BitmapFactory.Options.inBitmap,如果该参数被设置,那么解析方法加息图片的时候将会去复用已经存在的Bitmap。
这意味着Bitmap的内存可以复用,不用再去额外申请内存也不用调用垃圾回收器去清理,从而提升性能,
接下来的问题就是如何使用参数inBitmap
在Android 4.4 API 19 之前,inBitmap只支持相同size的Bitmap
有关这些细节,请看inBitmap文档
存储Bitmap为之后使用
接下来一小段代码展示了已经存在的Bitmap是如何被复用的,当App 运行在Android 3.0或更高的版本时,bitmap会被LruCache回收,一个弱引用的bimap将被放置在HashSet中,使用inBitmap有可能复用
Set<SoftReference<Bitmap>> mReusableBitmaps;private LruCache<String, BitmapDrawable> mMemoryCache;// If you're running on Honeycomb or newer, create a// synchronized HashSet of references to reusable bitmaps.if (Utils.hasHoneycomb()) { mReusableBitmaps = Collections.synchronizedSet(new HashSet<SoftReference<Bitmap>>());}mMemoryCache = new LruCache<String, BitmapDrawable>(mCacheParams.memCacheSize) { // Notify the removed entry that is no longer being cached. @Override protected void entryRemoved(boolean evicted, String key, BitmapDrawable oldValue, BitmapDrawable newValue) { if (RecyclingBitmapDrawable.class.isInstance(oldValue)) { // The removed entry is a recycling drawable, so notify it // that it has been removed from the memory cache. ((RecyclingBitmapDrawable) oldValue).setIsCached(false); } else { // The removed entry is a standard BitmapDrawable. if (Utils.hasHoneycomb()) { // We're running on Honeycomb or later, so add the bitmap // to a SoftReference set for possible use with inBitmap later. mReusableBitmaps.add (new SoftReference<Bitmap>(oldValue.getBitmap())); } } }....}Use an existing bitmap
1. 在运行中的app,解析方法将会检查是否已经有bitmap可以被复用:
看看Google示例是如何检查的:
public static Bitmap decodeSampledBitmapFromFile(String filename, int reqWidth, int reqHeight, ImageCache cache) { final BitmapFactory.Options options = new BitmapFactory.Options(); ... BitmapFactory.decodeFile(filename, options); ... // If we're running on Honeycomb or newer, try to use inBitmap. if (Utils.hasHoneycomb()) { addInBitmapOptions(options, cache); } ... return BitmapFactory.decodeFile(filename, options); }2. 接下来 的片段展示 addInBitmapOptions()方法,它被上面的实例代码所回调。寻找一个已存在的bitmap去设置inBitmap的值,注意到这个方法仅仅设置inBitmap的值,如果它找到匹配的。
private static void addInBitmapOptions(BitmapFactory.Options options, ImageCache cache) { // inBitmap only works with mutable bitmaps, so force the decoder to // return mutable bitmaps. options.inMutable = true; if (cache != null) { // Try to find a bitmap to use for inBitmap. Bitmap inBitmap = cache.getBitmapFromReusableSet(options); if (inBitmap != null) { // If a suitable bitmap has been found, set it as the value of // inBitmap. options.inBitmap = inBitmap; } }}// This method iterates through the reusable bitmaps, looking for one // to use for inBitmap:protected Bitmap getBitmapFromReusableSet(BitmapFactory.Options options) { Bitmap bitmap = null; if (mReusableBitmaps != null && !mReusableBitmaps.isEmpty()) { synchronized (mReusableBitmaps) { final Iterator<SoftReference<Bitmap>> iterator = mReusableBitmaps.iterator(); Bitmap item; while (iterator.hasNext()) { item = iterator.next().get(); if (null != item && item.isMutable()) { // Check to see it the item can be used for inBitmap. if (canUseForInBitmap(item, options)) { bitmap = item; // Remove from reusable set so it can't be used again. iterator.remove(); break; } } else { // Remove from the set if the reference has been cleared. iterator.remove(); } } } } return bitmap;}3. 最终,canUseForInBitmap() 方法决定了bitmap是否可以被复用
static boolean canUseForInBitmap( Bitmap candidate,BitmapFactory.Options targetOptions){ if(Build.VERSION.SDK_INT >=Build.VERSION_CODES.KITKAT){ // From Android 4.4 (KitKat) onward we can re-use if the byte size of // the new bitmap is smaller than the reusable bitmap candidate // allocation byte count. int width = targetOptions.outWidth / targetOptions.inSampleSize; int height = targetOptions.outHeight / targetOptions.inSampleSize; int byteCount = width * height * getBytesPerPixel(candidate.getConfig()); return byteCount <= candidate.getAllocationByteCount(); } // On earlier versions, the dimensions must match exactly and the inSampleSize must be 1 return candidate.getWidth()== targetOptions.outWidth && candidate.getHeight()== targetOptions.outHeight && targetOptions.inSampleSize ==1; } /** * A helper function to return the byte usage per pixel of a bitmap based on its configuration. */ static int getBytesPerPixel(Config config){ if(config ==Config.ARGB_8888){ return 4; }elseif(config ==Config.RGB_565){ return 2; }elseif(config ==Config.ARGB_4444){ return 2; }elseif(config ==Config.ALPHA_8){ return 1; } return1; }分析 canUseForInBitmap()时,可以把它分作两部分:
- Android 4.4版本以上 (API Level 19 higher)仅仅要求新的Bitmap和被复用的Bitmap字节数相同(内存大小一致)
- Android 4.4版本一下 (API Level 19 lower )要求bitmap尺寸必须相同
在主线程中展示
Google这一章节所讲在我之前的博客翻译过,详情请看: Google官方 性能优化番外篇-UI组件
参考
Google 讲解 Keeping Your App Responsive
Google AsyncTask 课程
Google 官方 multithreading-performance 方案
Memory Analysis for Android Applications Bolg post
Memory management for Android Apps Google I/O presentation
- 跟Google 学代码:Building Apps with Graphics & Animation
- 跟Google 学代码 :Building Apps with Content Sharing(跟女神去表白)
- 跟Google 学代码: Building Apps with Multimedia(自定义相机和PrintHelper用法)
- 跟Google 学代码Building Apps with Connectivity & the Cloud【连接无线设备】
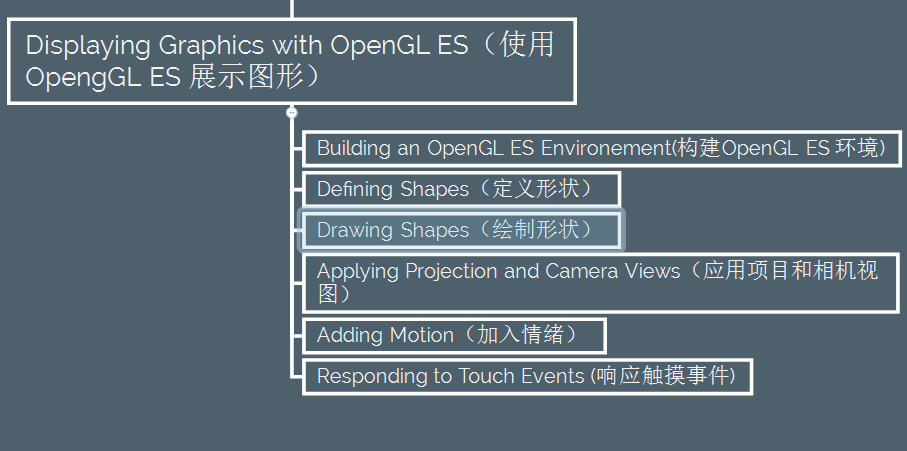
- Building Apps with Graphics 之 Animation Displaying Graphics with OpenGL ES
- Building Apps with Graphics & Animation1
- Building Apps with Graphics & Animation2
- 跟Google学写代码:Interacting with Other Apps【Capture Photo from phone】
- 跟Google 学代码:Web Apps以及WebView究极优化
- Building Apps with Multimedia
- Building Apps with Multimedia
- Building Huuuuuge Apps with AngularJS
- Building Apps with Location & Maps
- Building Web Apps with Go
- Building Apps with Location & Maps
- Building Apps with Content Sharing
- Building Apps with Over 65K Methods
- Building Apps Faster with Android Data Binding
- cookie
- 实时调度类
- Linux 多线程编程(不限Linux)
- 字符串查找(2)KMP算法
- localStorage
- 跟Google 学代码:Building Apps with Graphics & Animation
- Android开发艺术探索2
- 22. vCenter上解决”此主机当前没有管理网络冗余“的警告
- 电项目总结
- MyCAT-1.4-RC性能测试(初步施工)
- [Android] 监听ScrollView惯性滑动事件
- log4j.properties
- Unity3D开发之Matrix4x4矩阵变换
- poj 3267 dp