opencv图像的形态学操作:腐蚀与膨胀
来源:互联网 发布:建筑论文怎么写 知乎 编辑:程序博客网 时间:2024/05/22 00:25
使用OpenCV提供的两种最基本的形态学操作,腐蚀与膨胀( Erosion 与 Dilation):
getStructuringElement
Returns a structuring element of the specified size and shape for morphological operations.
- C++: Mat getStructuringElement(int shape, Size ksize, Point anchor=Point(-1,-1))
- 第一个参数:结构单元的形状。第二个参数:结构参数的尺寸。第三个参数:锚点位置(默认结构单元的中心)
- Python: cv2.getStructuringElement(shape, ksize[, anchor]) → retval
- C: IplConvKernel* cvCreateStructuringElementEx(int cols, int rows, int anchor_x, int anchor_y, int shape, int*values=NULL )
Parameters: - shape –
Element shape that could be one of the following:
- MORPH_RECT - a rectangular structuring element:

- MORPH_ELLIPSE - an elliptic structuring element, that is, a filled ellipse inscribed into the rectangleRect(0, 0, esize.width, 0.esize.height)
- MORPH_CROSS - a cross-shaped structuring element:

- CV_SHAPE_CUSTOM - custom structuring element (OpenCV 1.x API)
- MORPH_RECT - a rectangular structuring element:
- ksize – Size of the structuring element.
- cols – Width of the structuring element
- rows – Height of the structuring element
- anchor – Anchor position within the element. The default value
 means that the anchor is at the center. Note that only the shape of a cross-shaped element depends on the anchor position. In other cases the anchor just regulates how much the result of the morphological operation is shifted.
 - anchor_x – x-coordinate of the anchor
- anchor_y – y-coordinate of the anchor
- values – integer array of cols``*``rows elements that specifies the custom shape of the structuring element, when shape=CV_SHAPE_CUSTOM.
- shape –
The function constructs and returns the structuring element that can be further passed to erode(), dilate() ormorphologyEx() . But you can also construct an arbitrary binary mask yourself and use it as the structuring element.
Note
When using OpenCV 1.x C API, the created structuring element IplConvKernel* element must be released in the end using cvReleaseStructuringElement(&element).
dilate
Dilates an image by using a specific structuring element.
- C++: void dilate(InputArray src, OutputArray dst, InputArray kernel, Point anchor=Point(-1,-1), int iterations=1, intborderType=BORDER_CONSTANT, const Scalar& borderValue=morphologyDefaultBorderValue() )
- Python: cv2.dilate(src, kernel[, dst[, anchor[, iterations[, borderType[, borderValue]]]]]) → dst
- C: void cvDilate(const CvArr* src, CvArr* dst, IplConvKernel* element=NULL, int iterations=1 )
Parameters: - src – input image; the number of channels can be arbitrary, but the depth should be one of CV_8U,CV_16U, CV_16S, CV_32F` or ``CV_64F.
- dst – output image of the same size and type as src.
- kernel – structuring element used for dilation; if elemenat=Mat() , a 3 x 3 rectangular structuring element is used. Kernel can be created using getStructuringElement()
- anchor – position of the anchor within the element; default value (-1, -1) means that the anchor is at the element center.
- iterations – number of times dilation is applied.
- borderType – pixel extrapolation method (see borderInterpolate for details).
- borderValue – border value in case of a constant border
The function dilates the source image using the specified structuring element that determines the shape of a pixel neighborhood over which the maximum is taken:

The function supports the in-place mode. Dilation can be applied several ( iterations ) times. In case of multi-channel images, each channel is processed independently.
See also
erode(), morphologyEx(), getStructuringElement()
Note
- An example using the morphological dilate operation can be found at opencv_source_code/samples/cpp/morphology2.cpp
erode
Erodes an image by using a specific structuring element.
- C++: void erode(InputArray src, OutputArray dst, InputArray kernel, Point anchor=Point(-1,-1), int iterations=1, intborderType=BORDER_CONSTANT, constScalar& borderValue=morphologyDefaultBorderValue() )
- Python: cv2.erode(src, kernel[, dst[, anchor[, iterations[, borderType[, borderValue]]]]]) → dst
- C: void cvErode(const CvArr* src, CvArr* dst, IplConvKernel* element=NULL, int iterations=1)
Parameters: - src – input image; the number of channels can be arbitrary, but the depth should be one of CV_8U,CV_16U, CV_16S, CV_32F` or ``CV_64F.
- 输入图像
- dst – output image of the same size and type as src.
- 输出图像
- kernel – structuring element used for erosion; if element=Mat() , a 3 x 3 rectangular structuring element is used. Kernel can be created using getStructuringElement().
- 用于腐蚀操作的结构单元。如果使用Mat()则表示使用的是矩形结构单元。也可以使用getStructuringElement()函数获取。
- anchor – position of the anchor within the element; default value (-1, -1) means that the anchor is at the element center.
- 单元的锚点位置,默认位置是Point(-1,-1),表示这个锚点是单元的中心位置。
- iterations – number of times erosion is applied.
- 腐蚀操作的次数
- borderType – pixel extrapolation method (see borderInterpolate for details).
- borderValue – border value in case of a constant border
The function erodes the source image using the specified structuring element that determines the shape of a pixel neighborhood over which the minimum is taken:

The function supports the in-place mode. Erosion can be applied several ( iterations ) times. In case of multi-channel images, each channel is processed independently.
See also
dilate(), morphologyEx(), getStructuringElement()
Note
- An example using the morphological erode operation can be found at opencv_source_code/samples/cpp/morphology2.cpp
createTrackbar
Creates a trackbar and attaches it to the specified window.
- C++: int createTrackbar(const String& trackbarname, const String& winname, int* value, int count, TrackbarCallbackonChange=0, void* userdata=0)
- 1第一个参数:工具条的名字。第二个参数:存放工具条的窗口名称。第三个参数:工具条中要改变的参数。第四个参数:要改变参数的最大值。第五个参数:是这个值要作用的函数。
- Python: cv2.createTrackbar(trackbarName, windowName, value, count, onChange) → None
- C: int cvCreateTrackbar(const char* trackbar_name, const char* window_name, int* value, int count, CvTrackbarCallback on_change=NULL )
Parameters: - trackbarname – Name of the created trackbar.
- winname – Name of the window that will be used as a parent of the created trackbar.
- value – Optional pointer to an integer variable whose value reflects the position of the slider. Upon creation, the slider position is defined by this variable.
- count – Maximal position of the slider. The minimal position is always 0.
- onChange – Pointer to the function to be called every time the slider changes position. This function should be prototyped as void Foo(int,void*); , where the first parameter is the trackbar position and the second parameter is the user data (see the next parameter). If the callback is the NULL pointer, no callbacks are called, but only value is updated.
- userdata – User data that is passed as is to the callback. It can be used to handle trackbar events without using global variables.
The function createTrackbar creates a trackbar (a slider or range control) with the specified name and range, assigns a variable value to be a position synchronized with the trackbar and specifies the callback function onChange to be called on the trackbar position change. The created trackbar is displayed in the specified window winname.
Note
[Qt Backend Only] winname can be empty (or NULL) if the trackbar should be attached to the control panel.
Clicking the label of each trackbar enables editing the trackbar values manually.
Note
- An example of using the trackbar functionality can be found at opencv_source_code/samples/cpp/connected_components.cpp
形态学操作
简单来讲,形态学操作就是基于形状的一系列图像处理操作。通过将结构元素作用于输入图像来产生输出图像。
最基本的形态学操作有二:腐蚀与膨胀(Erosion 与 Dilation)。 他们的运用广泛:
- 消除噪声
- 分割(isolate)独立的图像元素,以及连接(join)相邻的元素。
- 寻找图像中的明显的极大值区域或极小值区域。
通过以下图像,我们简要来讨论一下膨胀与腐蚀操作(译者注:注意这张图像中的字母为黑色,背景为白色,而不是一般意义的背景为黑色,前景为白色):
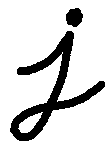
膨胀
此操作将图像
 与任意形状的内核 (
 ),通常为正方形或圆形,进行卷积。
内核
有一个可定义的 锚点, 通常定义为内核中心点。进行膨胀操作时,将内核
划过图像,将内核 覆盖区域的最大相素值提取,并代替锚点位置的相素。显然,这一最大化操作将会导致图像中的亮区开始”扩展” (因此有了术语膨胀 dilation )。对上图采用膨胀操作我们得到: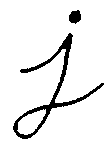
背景(白色)膨胀,而黑色字母缩小了。
腐蚀
腐蚀在形态学操作家族里是膨胀操作的孪生姐妹。它提取的是内核覆盖下的相素最小值。
进行腐蚀操作时,将内核
划过图像,将内核 覆盖区域的最小相素值提取,并代替锚点位置的相素。以与膨胀相同的图像作为样本,我们使用腐蚀操作。从下面的结果图我们看到亮区(背景)变细,而黑色区域(字母)则变大了。

源码
下面是本教程的源码, 你也可以从 here 下载。
解释
大部分代码应该不需要解释了 (如果有任何疑问,请回头参考前面的教程)。 让我们来回顾一下本程序的总体流程:
- 装载图像 (可以是 RGB图像或者灰度图 )
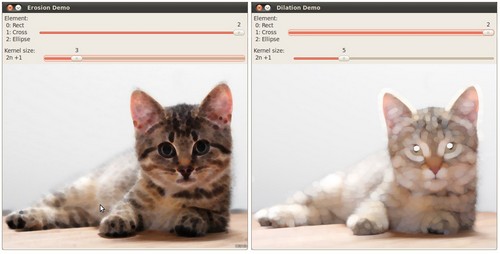
- 创建两个显示窗口 (一个用于膨胀输出,一个用于腐蚀输出)
- 为每个操作创建两个 Trackbars:
- 第一个 trackbar “Element” 返回 erosion_elem 或者 dilation_elem
- 第二个 trackbar “Kernel size” 返回 erosion_size 或者 dilation_size 。
- 每次移动标尺, 用户函数 Erosion 或者 Dilation 就会被调用,函数将根据当前的trackbar位置更新输出图像。
让我们分析一下这两个函数:
Erosion:
进行 腐蚀 操作的函数是 erode 。 它接受了三个参数:
src: 原图像
erosion_dst: 输出图像
element: 腐蚀操作的内核。 如果不指定,默认为一个简单的
 矩阵。否则,我们就要明确指定它的形状,可以使用函数 getStructuringElement:
我们可以为我们的内核选择三种形状之一:
- 矩形: MORPH_RECT
- 交叉形: MORPH_CROSS
- 椭圆形: MORPH_ELLIPSE
然后,我们还需要指定内核大小,以及 锚点 位置。不指定锚点位置,则默认锚点在内核中心位置。
就这些了,我们现在可以对图像进行腐蚀操作了。
Note
OpenCV的 erode 函数还有另外的参数,其中一个参数允许你一下对图像进行多次腐蚀操作。在这个简单的文档中没有用到它,但是你可以参考OpenCV的使用手册。
Dilation:
下面是膨胀的代码,你可以看到,它和 Erosion 函数是多么相似。 这里我们同样可以指定内核的形状,锚点和大小。
结果
编译并使用图像路径作为参数运行程序,比如我们使用以下图像:

下面是操作的结果。 更改Trackbars的位置就会产生不一样的输出图像,自己试试吧。 最后,你还可以通过增加第三个Trackbar来控制膨胀或腐蚀的次数。
- opencv图像的形态学操作:腐蚀与膨胀
- OpenCV图像处理形态学操作腐蚀Erode与膨胀Dilate
- Opencv--形态学图像处理--膨胀与腐蚀,开操作与闭操作
- 图像形态学操作—腐蚀膨胀深入
- 图像形态学操作—腐蚀膨胀深入
- 图像形态学操作—腐蚀膨胀深入
- 图像形态学,腐蚀,膨胀操作原理
- OpenCV形态学操作 腐蚀 膨胀 开闭
- OpenCV形态学操作 腐蚀 膨胀 开闭
- OpenCV 系列 --- 形态学操作(膨胀、腐蚀)
- opencv 图像的腐蚀与膨胀
- Opencv图像的腐蚀与膨胀总结
- OpenCV之imgproc 模块. 图像处理(1)图像平滑处理 腐蚀与膨胀(Eroding and Dilating) 更多形态学变换 图像金字塔 基本的阈值操作
- 图像处理【形态学】腐蚀与膨胀
- 灰度图像形态学膨胀与腐蚀
- 形态学图像处理之腐蚀与膨胀
- 图像形态学运算--腐蚀与膨胀
- 灰度图像形态学膨胀与腐蚀
- Android——service
- 为什么静态成员、静态方法中不能用this和super关键字
- JavaBean中boolean类型和Boolean类型的get方法
- 驰骋工作流引擎 - 表单数据存储格式
- UML类图与类的关系详解
- opencv图像的形态学操作:腐蚀与膨胀
- Linux卸载jdk方法
- 一位资深程序员大牛给予Java初学者的学习路线建议
- 计算几何题目分类
- DP总结 ——QPH
- Xcode方便开发的插件推荐
- Poj 题目分类
- 【BZOJ】1654: [Usaco2006 Jan]The Cow Prom 奶牛舞会
- iOS仿微信相册界面翻转过渡动画