Auto Layout 使用心得(三)—— 自定义 cell 并使用 Auto Layout
来源:互联网 发布:淘宝店主工具 编辑:程序博客网 时间:2024/05/24 05:18
转自:https://lvwenhan.com/
Auto Layout 使用心得(三)—— 自定义 cell 并使用 Auto Layout
此系列文章代码仓库在 https://github.com/johnlui/AutoLayout ,有不明白的地方可以参考我的 Auto Layout 设置哦,下载到本地打开就可以了。
简介
本篇中我们将尝试自定义一个 UITableViewCell,并使用 Auto Layout 对其进行约束。
自定义 cell 基础
在前面的项目中,我们采用 StoryBoard 来组织页面,StoryBoard 可以视为许多个 xib 的集合,所以我们可以得到两个信息:
- 这个项目通过初始化主 StoryBoard 文件来展现 APP,而 UIViewController 类文件是通过 StoryBoard 文件的绑定来初始化并完成功能的。
- 我们可以创建新的 StoryBoard 文件或者新的 xib 文件来构造 UI,然后动态地加载进页面。
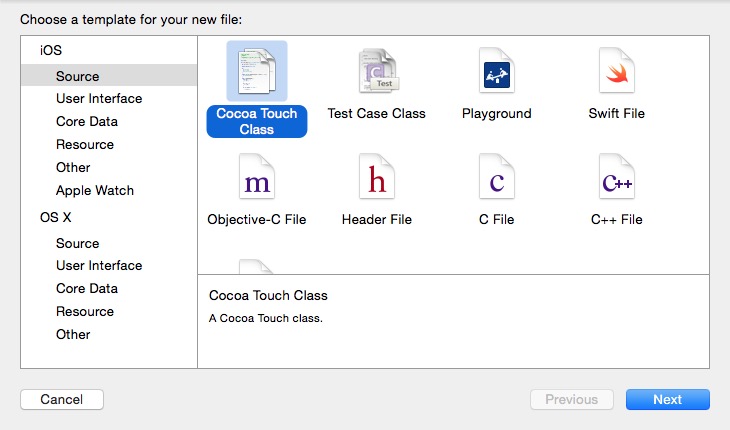
创建文件
我们可以一次性创建 xib 文件和类的代码文件。
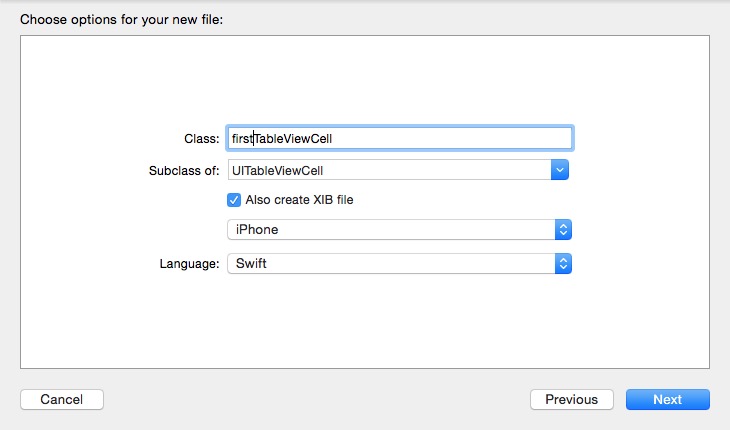
新建 Cocoa Touch Class:
设置和下图相同即可:
检查成果
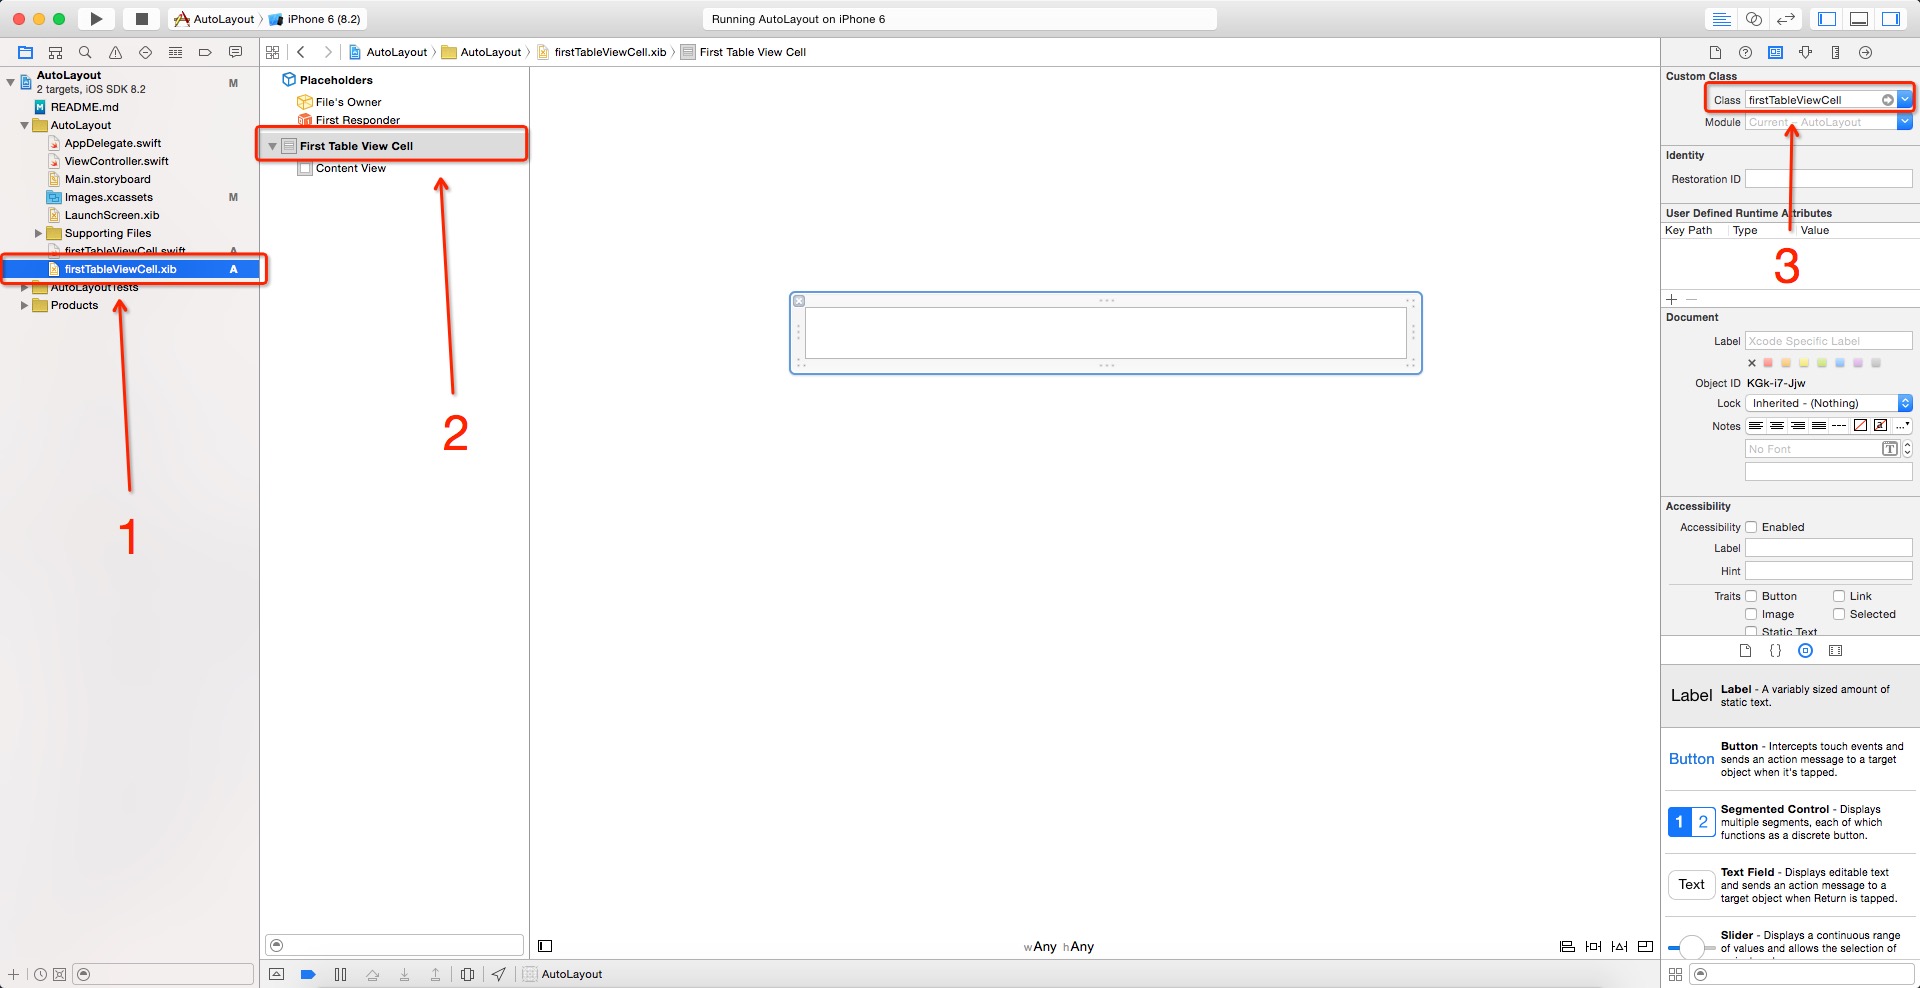
分别选中上图中的 1、2 两处,检查 3 处是否已经自动绑定为 firstTableViewCell,如果没有绑定,请先检查选中的元素确实是 2,然后手动绑定即可。
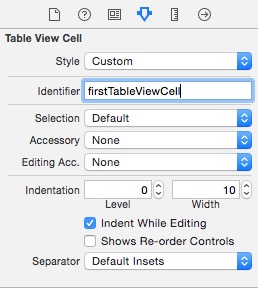
完成绑定工作
切换一页,如下图进行 Identifier 设置:
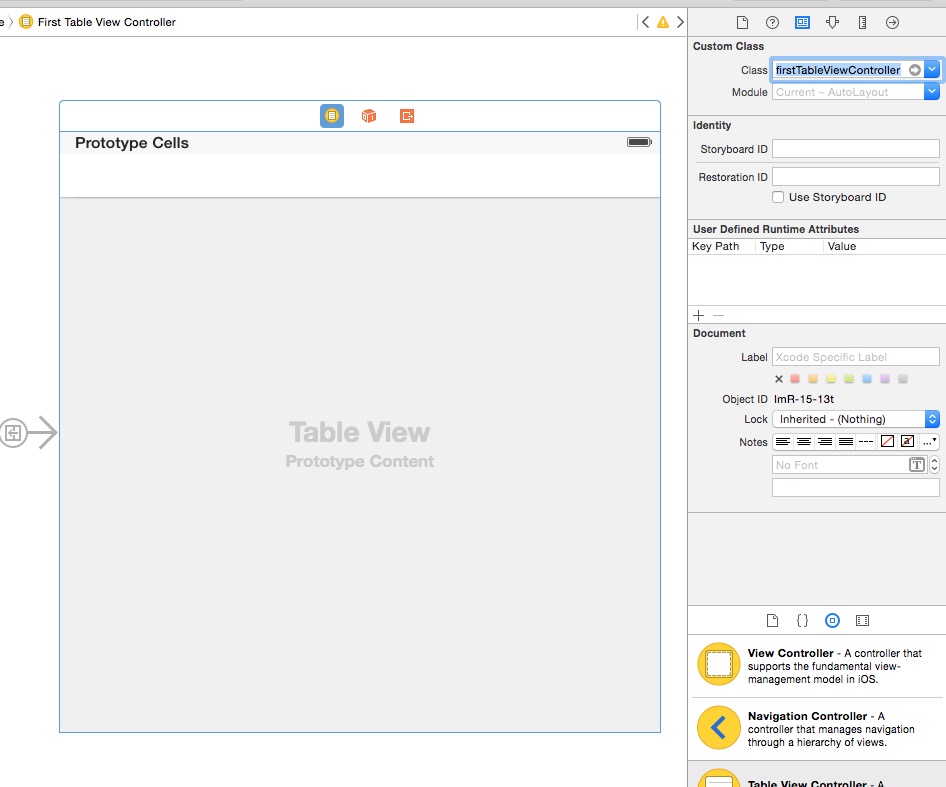
新建 Table View Controller 页面
新建一个 Table View Controller 页面,并把我们之前创建的 Swift on iOS 那个按钮的点击事件绑定过去,我们得到:
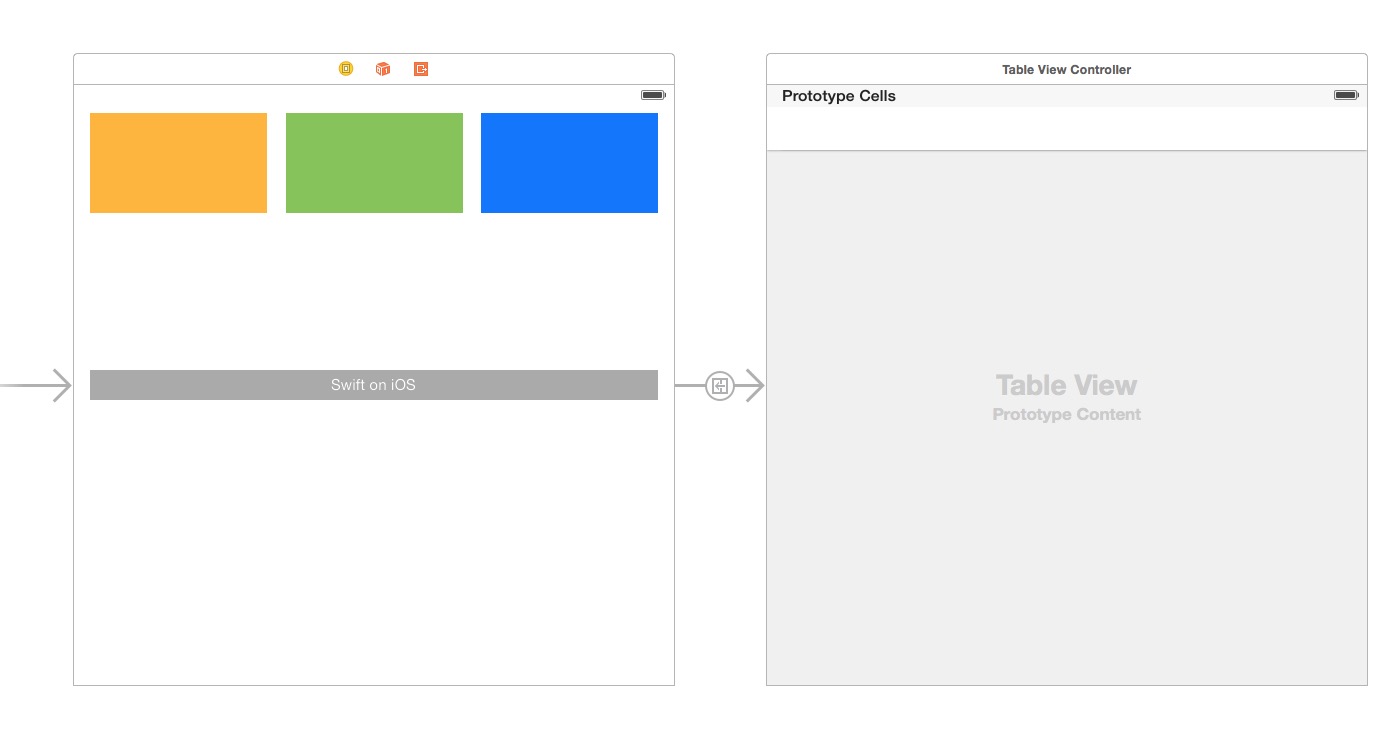
然后创建一个名为 firstTableViewController 的 UITableViewController 类,创建流程跟前面基本一致。不要创建 xib。然后选中 StoryBoard 中的 Table View Controller(选中之后有蓝色边框包裹),在右侧对它和 firstTableViewController 类进行绑定:
调用自定义 cell
修改 firstTableViewController 类中的有效代码如下:
import UIKitclass firstTableViewController: UITableViewController { override func viewDidLoad() { super.viewDidLoad() var nib = UINib(nibName: "firstTableViewCell", bundle: nil) self.tableView.registerNib(nib, forCellReuseIdentifier: "firstTableViewCell") } override func didReceiveMemoryWarning() { super.didReceiveMemoryWarning() } // MARK: - Table view data source override func numberOfSectionsInTableView(tableView: UITableView) -> Int { return 1 } override func tableView(tableView: UITableView, numberOfRowsInSection section: Int) -> Int { return 10 } override func tableView(tableView: UITableView, cellForRowAtIndexPath indexPath: NSIndexPath) -> UITableViewCell { let cell = tableView.dequeueReusableCellWithIdentifier("firstTableViewCell", forIndexPath: indexPath) as firstTableViewCell cell.textLabel?.text = indexPath.row.description return cell }}viewDidLoad() 中添加的两行代码是载入 xib 的操作。最下面的三个 func 分别是定义:
- self.tableView 中有多少个 section
- 每个 section 中分别有多少个条目
- 实例化每个条目,提供内容
如果你得到以下页面,说明你调用自定义 cell 成功了!

给自定义 cell 添加元素并使用 Auto Layout 约束
首先向 Images.xcassets 中随意加入一张图片。
然后在左侧文件树中选中 firstTableViewCell.xib,从右侧组件库中拖进去一个 Image View,并且在右侧将其尺寸设置如下图右侧:
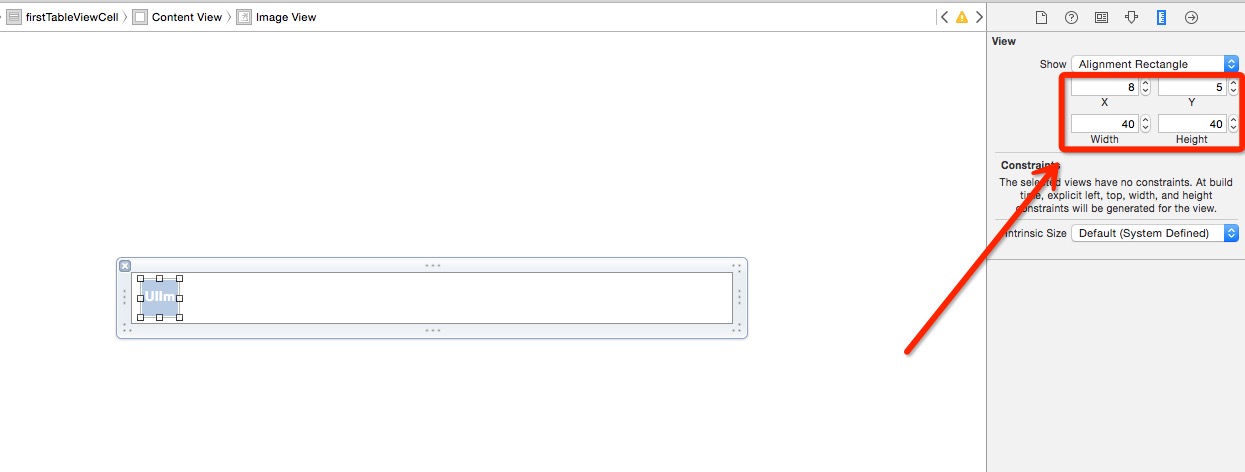
给 ImageView 添加约束:
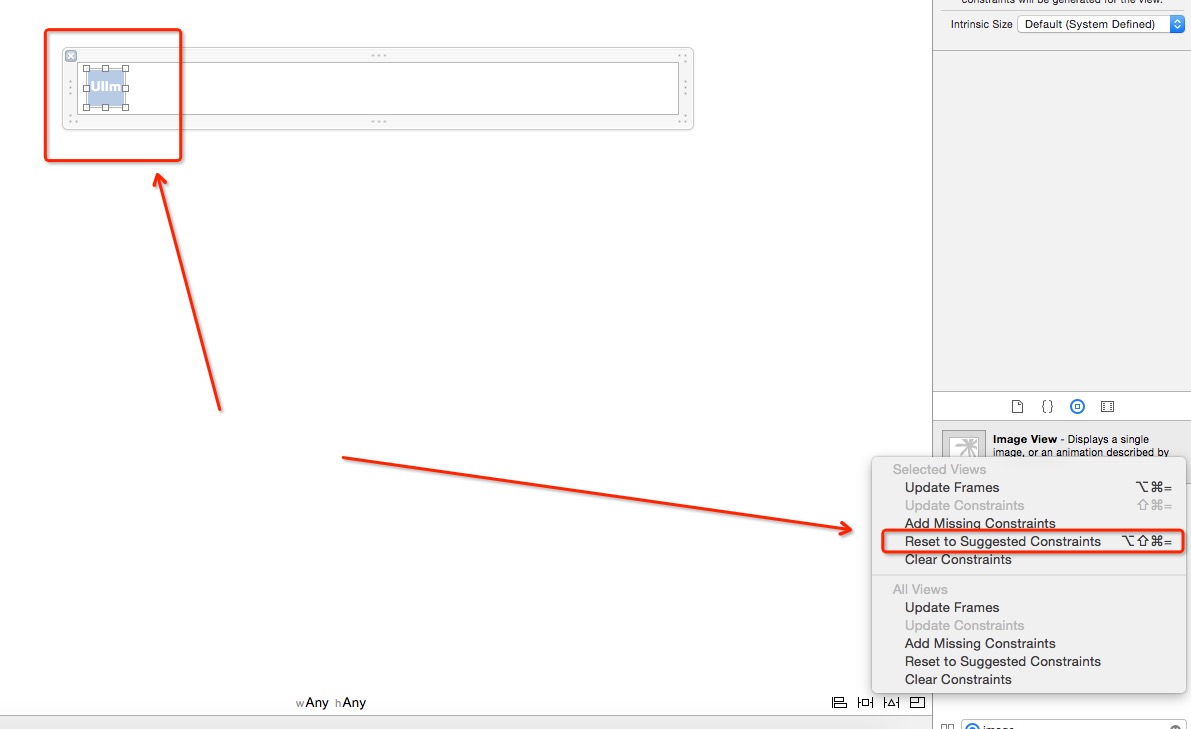
选中该 ImageView(左箭头所示),点击自动 Auto Layout(右箭头所示),即可。
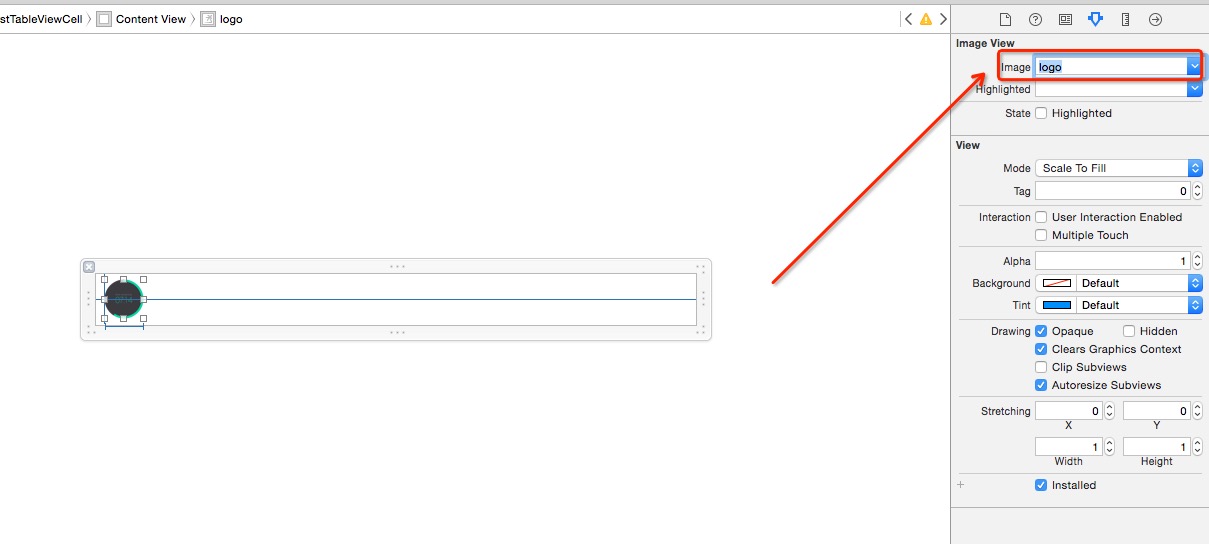
给 ImageView 设置图片:
再从右侧组件库中拖入一个 UILabel,吸附到最右侧,垂直居中,为其添加自动约束,这一步不再赘述。
在 firstTableViewCell 类中绑定 xib 中拖进去的元素
选中 firstTableViewCell.xib,切换到双视图,直接进行拖动绑定:
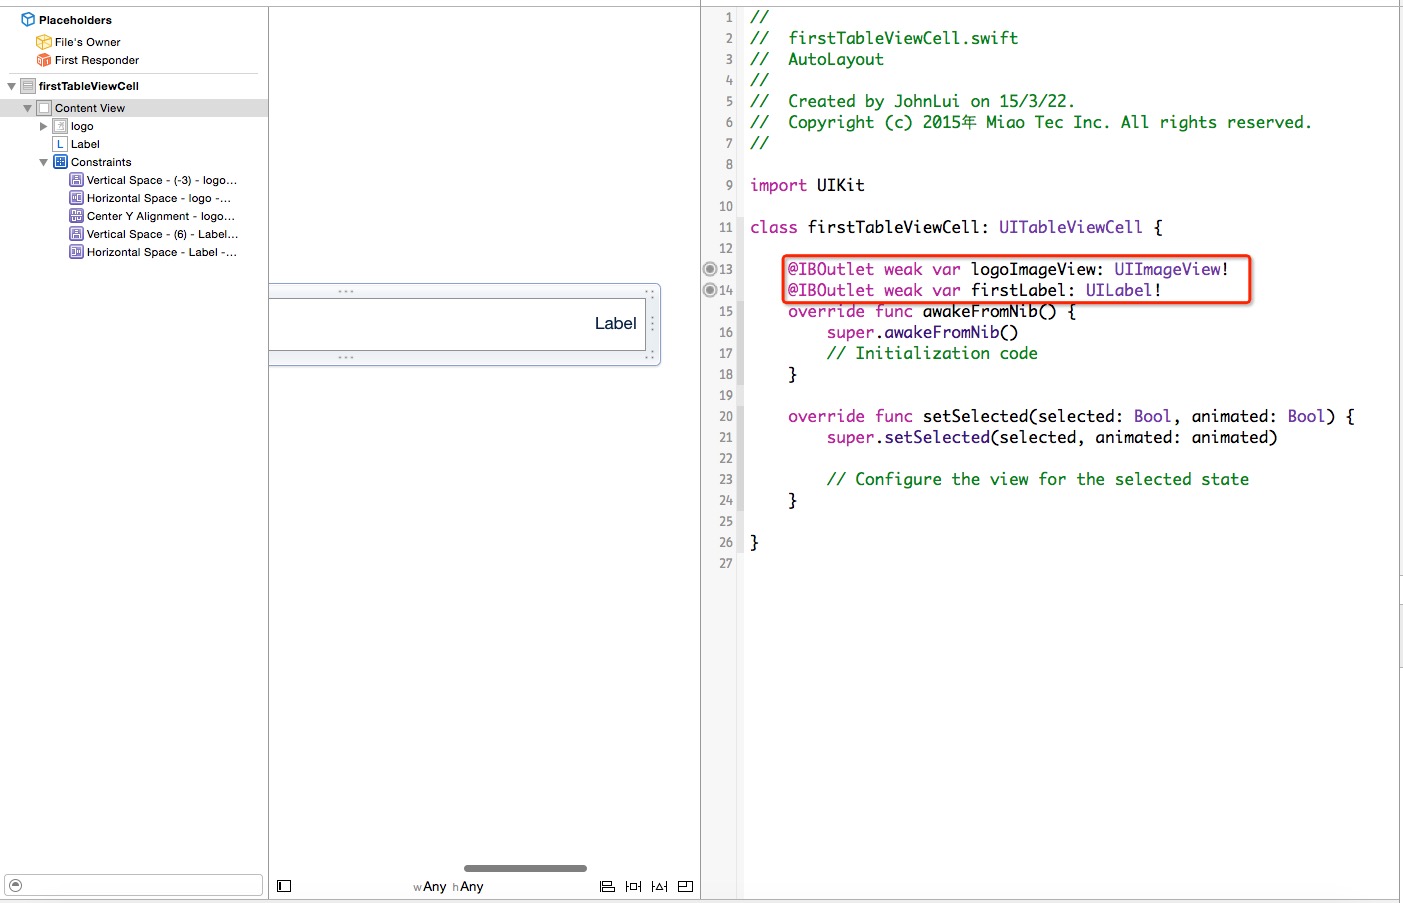
绑定完成!
约束 cell 的高度
在 firstTableViewController 中添加以下方法:
override func tableView(tableView: UITableView, heightForRowAtIndexPath indexPath: NSIndexPath) -> CGFloat { return 50}给自定义的 UILabel 添加内容
修改 firstTableViewController 中以下函数为:
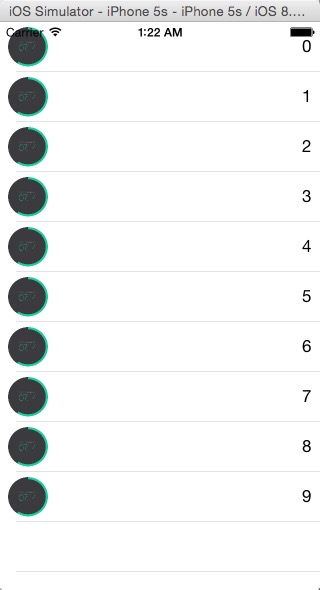
override func tableView(tableView: UITableView, cellForRowAtIndexPath indexPath: NSIndexPath) -> UITableViewCell { let cell = tableView.dequeueReusableCellWithIdentifier("firstTableViewCell", forIndexPath: indexPath) as firstTableViewCell cell.firstLabel.text = indexPath.row.description return cell}查看结果
4.0 寸:
4.7 寸:

如果你得到以上结果,那么恭喜你自定义 cell 并使用 Auto Layout 成功!
- Auto Layout 使用心得(三)—— 自定义 cell 并使用 Auto Layout
- Auto Layout 使用心得(三)—— 自定义 cell 并使用 Auto Layout
- Auto Layout 使用心得
- Auto Layout 使用心得
- Auto Layout 使用心得
- Auto Layout 使用心得(一)—— 初体验
- Auto Layout 使用心得(一)—— 初体验
- Auto Layout 使用心得(二)—— 实现三等分
- 使用auto layout自定义flipBar
- Auto Layout 使用心得—— 实现三等分
- 使用auto layout 实现cell适配
- Auto Layout - 使用总结
- Auto Layout 使用心得(二)—— 实现三等分[转]
- Auto Layout 使用心得(五)—— 根据文字、图片自动计算 UITableViewCell 高度
- Auto Layout 使用心得(四)—— 22 行代码实现拖动回弹
- Auto Layout 使用心得(五)—— 根据文字、图片自动计算 UITableViewCell 高度
- Auto Layout 使用心得(六)—— 制造炫酷的下拉刷新动画
- Auto Layout 使用心得(五)—— 根据文字、图片自动计算 UITableViewCell 高度
- 利用redis缓存热门数据,分页的一种思路
- 【剑指offer】面试题10: 二进制中1的个数
- linux下编译安装ACE6
- php CI框架下封装datatable插件处理类
- 编程之美读书笔记-分层遍历二叉树
- Auto Layout 使用心得(三)—— 自定义 cell 并使用 Auto Layout
- 利用Apache Bench测试Web引擎性能
- C#之Socket断线重连
- React Native For Android
- 计算labview一个while循环的运行时间
- 【软工文档】总结
- MySQL
- android webview js
- Linux经典命令学习