如何在 CentOS 7 用 cPanel 配置 Nginx 反向代理
来源:互联网 发布:mac电脑开机问号文件夹 编辑:程序博客网 时间:2024/05/01 16:33
导读Nginx 是最快和最强大的 Web 服务器之一,以其高性能和低资源占用率而闻名。它既可以被安装为一个独立的 Web 服务器,也可以安装成反向代理 Web 服务器。在这篇文章,我将讨论在安装了 cPanel 管理系统的 Centos 7 服务器上安装 Nginx 作为 Apache 的反向代理服务器。Nginx 作为前端服务器用反向代理为静态文件提供服务,Apache 作为后端为动态文件提供服务。这个设置将整体提高服务器的性能。

让我们过一遍在已经安装好 cPanel 11.52 的 CentOS 7 x86_64 服务器上配置 Nginx 作为反向代理的安装过程。
首先,我们需要安装 EPEL 库来启动这个进程
root@server1 [/usr]# yum -y install epel-releaseLoaded plugins: fastestmirror, tsflags, universal-hooksLoading mirror speeds from cached hostfile* EA4: 66.23.237.210* base: mirrors.linode.com* extras: mirrors.linode.com* updates: mirrors.linode.comResolving Dependencies--> Running transaction check---> Package epel-release.noarch 0:7-5 will be installed--> Finished Dependency ResolutionDependencies Resolved======================================================================================== Package Arch Version Repository Size========================================================================================Installing:epel-release noarch 7-5 extras 14 k
第二步: 安装 nDeploy 的 CentOS RPM 库
可以安装 nDeploy 的 CentOS RPM 库来安装我们所需的 nDeploy Web 类软件和 Nginx 插件
root@server1 [/usr]# yum -y install http://rpm.piserve.com/nDeploy-release-centos-1.0-1.noarch.rpmLoaded plugins: fastestmirror, tsflags, universal-hooksnDeploy-release-centos-1.0-1.noarch.rpm | 1.7 kB 00:00:00Examining /var/tmp/yum-root-ei5tWJ/nDeploy-release-centos-1.0-1.noarch.rpm: nDeploy-release-centos-1.0-1.noarchMarking /var/tmp/yum-root-ei5tWJ/nDeploy-release-centos-1.0-1.noarch.rpm to be installedResolving Dependencies--> Running transaction check---> Package nDeploy-release-centos.noarch 0:1.0-1 will be installed--> Finished Dependency ResolutionDependencies Resolved========================================================================================Package Arch Version Repository Size========================================================================================Installing:nDeploy-release-centos noarch 1.0-1 /nDeploy-release-centos-1.0-1.noarch 110
root@server1 [/usr]# yum --enablerepo=ndeploy install nginx-nDeploy nDeployLoaded plugins: fastestmirror, tsflags, universal-hooksepel/x86_64/metalink | 9.9 kB 00:00:00epel | 4.3 kB 00:00:00ndeploy | 2.9 kB 00:00:00(1/4): ndeploy/7/x86_64/primary_db | 14 kB 00:00:00(2/4): epel/x86_64/group_gz | 169 kB 00:00:00(3/4): epel/x86_64/primary_db | 3.7 MB 00:00:02Dependencies Resolved========================================================================================Package Arch Version Repository Size========================================================================================Installing:nDeploy noarch 2.0-11.el7 ndeploy 80 knginx-nDeploy x86_64 1.8.0-34.el7 ndeploy 36 MInstalling for dependencies:PyYAML x86_64 3.10-11.el7 base 153 klibevent x86_64 2.0.21-4.el7 base 214 kmemcached x86_64 1.4.15-9.el7 base 84 kpython-inotify noarch 0.9.4-4.el7 base 49 kpython-lxml x86_64 3.2.1-4.el7 base 758 kTransaction Summary========================================================================================Install 2 Packages (+5 Dependent packages)
通过以上这些步骤,我们完成了在我们的服务器上 Nginx 插件的安装。现在我们可以配置 Nginx 作为反向代理和为已有的 cPanel 用户账户创建虚拟主机,为此我们可以运行如下脚本。
root@server1 [/usr]# /opt/nDeploy/scripts/cpanel-nDeploy-setup.sh enableModifying apache http and https port in cpanelhttpd restarted successfully.Created symlink from /etc/systemd/system/multi-user.target.wants/nginx.service to /usr/lib/systemd/system/nginx.service.Created symlink from /etc/systemd/system/multi-user.target.wants/ndeploy_watcher.service to /usr/lib/systemd/system/ndeploy_watcher.service.Created symlink from /etc/systemd/system/multi-user.target.wants/ndeploy_backends.service to /usr/lib/systemd/system/ndeploy_backends.service.ConfGen:: saheethaConfGen:: satest
你可以看到这个脚本将修改 Apache 的端口从 80 到另一个端口来让 Nginx 作为前端 Web 服务器,并为现有的 cPanel 用户创建虚拟主机配置文件。一旦完成,确认 Apache 和 Nginx 的状态。
root@server1 [/var/run/httpd]# systemctl status httpd● httpd.service - Apache Web ServerLoaded: loaded (/usr/lib/systemd/system/httpd.service; enabled; vendor preset: disabled)Active: active (running) since Mon 2016-01-18 06:34:23 UTC; 12s agoProcess: 25606 ExecStart=/usr/sbin/apachectl start (code=exited, status=0/SUCCESS)Main PID: 24760 (httpd)CGroup: /system.slice/httpd.service‣ 24760 /usr/local/apache/bin/httpd -k startJan 18 06:34:23 server1.centos7-test.com systemd[1]: Starting Apache Web Server...Jan 18 06:34:23 server1.centos7-test.com apachectl[25606]: httpd (pid 24760) already runningJan 18 06:34:23 server1.centos7-test.com systemd[1]: Started Apache Web Server.
root@server1 [~]# systemctl status nginx● nginx.service - nginx-nDeploy - high performance web serverLoaded: loaded (/usr/lib/systemd/system/nginx.service; enabled; vendor preset: disabled)Active: active (running) since Sun 2016-01-17 17:18:29 UTC; 13h agoDocs: http://nginx.org/en/docs/Main PID: 3833 (nginx)CGroup: /system.slice/nginx.service├─ 3833 nginx: master process /usr/sbin/nginx -c /etc/nginx/nginx.conf├─25473 nginx: worker process├─25474 nginx: worker process└─25475 nginx: cache manager processJan 17 17:18:29 server1.centos7-test.com systemd[1]: Starting nginx-nDeploy - high performance web server...Jan 17 17:18:29 server1.centos7-test.com nginx[3804]: nginx: the configuration file /etc/nginx/nginx.conf syntax is okJan 17 17:18:29 server1.centos7-test.com nginx[3804]: nginx: configuration file /etc/nginx/nginx.conf test is successfulJan 17 17:18:29 server1.centos7-test.com systemd[1]: Started nginx-nDeploy - high performance web server.
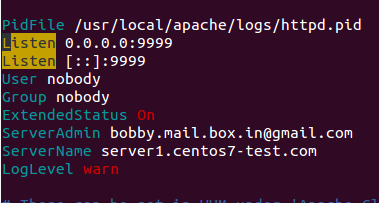
Nginx 作为前端服务器运行在 80 端口,Apache 配置被更改为监听 http 端口 9999 和 https 端口 4430。请看他们的情况:
root@server1 [/usr/local/src]# netstat -plan | grep httpdtcp 0 0 0.0.0.0:4430 0.0.0.0:* LISTEN 17270/httpdtcp 0 0 0.0.0.0:9999 0.0.0.0:* LISTEN 17270/httpdtcp6 0 0 :::4430 :::* LISTEN 17270/httpdtcp6 0 0 :::9999 :::* LISTEN 17270/httpd

root@server1 [/usr/local/src]# netstat -plan | grep nginxtcp 0 0 127.0.0.1:80 0.0.0.0:* LISTEN 17802/nginx: mastertcp 0 0 45.79.183.73:80 0.0.0.0:* LISTEN 17802/nginx: master
为已有用户创建的虚拟主机的配置文件在 “/etc/nginx/sites-enabled”。 这个文件路径包含了 Nginx 主要配置文件。
root@server1 [/etc/nginx/sites-enabled]# ll | grep .conf-rw-r--r-- 1 root root 311 Jan 17 09:02 saheetha.com.conf-rw-r--r-- 1 root root 336 Jan 17 09:02 saheethastest.com.conf
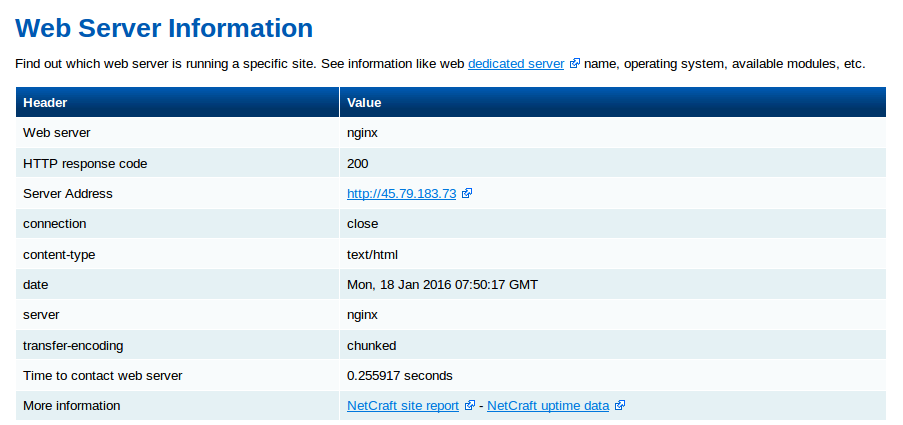
server {listen 45.79.183.73:80;#CPIPVSIX:80;# ServerNamesserver_name saheetha.com www.saheetha.com;access_log /usr/local/apache/domlogs/saheetha.com main;access_log /usr/local/apache/domlogs/saheetha.com-bytes_log bytes_log;include /etc/nginx/sites-enabled/saheetha.com.include;}我们可以启动浏览器查看网站来确定 Web 服务器的工作状态。安装后,请阅读服务器上的 web 服务信息。
root@server1 [/home]# ip a | grep -i eth03: eth0: <BROADCAST,MULTICAST,UP,LOWER_UP> mtu 1500 qdisc pfifo_fast state UP qlen 1000inet 45.79.183.73/24 brd 45.79.183.255 scope global dynamic eth0root@server1 [/home]# nginx -vnginx version: nginx/1.8.0

Nginx 将会为任何最新在 cPanel 中创建的账户创建虚拟主机。通过这些简单的的步骤,我们能够在一台 CentOS 7 / cPanel 的服务器上配置 Nginx 作为反向代理。
- 便于安装和配置。
- 效率高、性能好。
- 防止 Ddos 攻击。
- 支持使用 .htaccess 作为 PHP 的重写规则。
我希望这篇文章对你们有用。感谢你看它。我非常高兴收到你的宝贵意见和建议,并进一步改善。
本文原创地址:http://www.linuxprobe.com/centos-cpanel-nginx.html
免费提供最新Linux技术教程书籍,为开源技术爱好者努力做得更多更好:http://www.linuxprobe.com/thread
- 如何在 CentOS 7 用 cPanel 配置 Nginx 反向代理
- 如何在 CentOS 7 用 cPanel 配置 Nginx 反向代理
- 基于CentOS 7配置Nginx反向代理
- nginx--nginx反向代理如何配置
- 如何配置自己的nginx 反向代理
- nginx在windows下配置反向代理
- nginx在windows下配置反向代理
- nginx在windows下配置反向代理
- CentOS 7 安装Nginx做反向代理
- nginx反向代理配置
- nginx反向代理配置
- nginx反向代理配置
- Nginx 配置反向代理
- nginx反向代理配置
- nginx反向代理配置
- Nginx反向代理配置
- nginx配置反向代理
- nginx反向代理配置
- Liberty版本Neutron LBaas学习
- mysql 数设置据库编码及避免导入乱码问题
- 文章标题 Gym100971B :Derangement
- 【Hard】23. Merge k Sorted Lists
- 火车硬座车厢座位分布表
- 如何在 CentOS 7 用 cPanel 配置 Nginx 反向代理
- codeforcse基础题——#357(div2)C
- 送给大一新生的一些话
- 简单记事本的实现(JAVA)
- Android Logger 日志框架源码分析
- Java控制小数位,获得随机数
- Linux基本操作命令总结以及目录结构图解
- Nginx源码安装及调优配置
- 【Android-I】Android开发之常见错误:Dx unsupported class file version 52.0...while parsing com/...


