自定义控件3.自定义属性
来源:互联网 发布:win7触控板手势软件 编辑:程序博客网 时间:2024/05/21 14:08
在上一篇里, 自定义View的背景色和文字颜色都是在 onDraw 里写死的, 这次我们实现可以通过布局文件配置. 要实现这个功能, 需要有如下几个步骤:1. 创建 attrs.xml
1. 创建 attrs.xml在 res/values 目录下新建一个 attrs.xml , 内容如下:<?xml version="1.0" encoding="utf-8"?><resources xmlns:android="http://schemas.android.com/apk/res/android"> <!-- declare CustomView2 style --> <declare-styleable name="CustomView2"> <attr name="textColor" format="color" /> <attr name="backgroundColor" format="color" /> </declare-styleable></resources>
2. 在布局文件中使用<RelativeLayout xmlns:android="http://schemas.android.com/apk/res/android" xmlns:tools="http://schemas.android.com/tools" xmlns:app="http://schemas.android.com/apk/res/com.gaoyuan4122.customui" android:layout_width="match_parent" android:layout_height="match_parent" > <TextView android:id="@+id/tv_hello" android:layout_width="wrap_content" android:layout_height="wrap_content" android:text="@string/hello_world" /> <com.gaoyuan4122.customui.views.CustomView1 android:id="@+id/cv_custom1" android:layout_width="wrap_content" android:layout_height="wrap_content" android:layout_below="@id/tv_hello" /> <TextView android:id="@+id/tv_hello2" android:layout_width="wrap_content" android:layout_height="wrap_content" android:text="@string/hello_world" android:layout_below="@id/cv_custom1" /> <com.gaoyuan4122.customui.views.CustomView2 android:layout_width="wrap_content" android:layout_height="wrap_content" android:layout_below="@id/tv_hello2" app:backgroundColor="#ff00ff" app:textColor="#ffff00" /></RelativeLayout>
注意:
1. 要在最外层的控件中加一个新的名称空间, 比如上面叫 xmlns:app="...", 这里的名字可以随便取.2. 在控件上使用的时候, 要加上命名空间, 注意和上面定义的保持一致.3. 在自定义 View 中使用自定义属性需要在构造方法中获取, 上一篇文章里说了, 继承 View 需要实现两个构造方法, 一个是只有 Context 参数的, 一个是有 Context, AttributeSet 参数的, 其实自定义 View 还有一个构造方法, 有三个参数: Context, AttributeSet, int(defStyleAttr), 第二个参数 AttributeSet 封装了View的属性信息, 我们自定义的属性会被封装到这个类里, 第三个参数和样式有关, 这里先不说. View的三个构造方法一般是下面的写法: private int mTextColor; private int mBackgroundColor; public CustomView2(Context context) { this(context, null); } public CustomView2(Context context, AttributeSet attrs) { this(context, attrs, 0); }- // 自定义属性会被封装到 attrs 中, 第三个参数和样式有关, 这里先不说.
public CustomView2(Context context, AttributeSet attrs, int defStyleAttr) { super(context, attrs, defStyleAttr); // 通过下面的方法去除自定义属性 TypedArray typedArray = context.obtainStyledAttributes(attrs, R.styleable.CustomView2); mTextColor = typedArray.getColor(R.styleable.CustomView2_textColor, Color.RED); mBackgroundColor = typedArray.getColor(R.styleable.CustomView2_backgroundColor, Color.BLUE); // 最后一定要注意调用这个方法, 至于为什么后面会说. typedArray.recycle(); }
通过上面的方式可以将自定义属性取出来, 然后就可以使用了: @Override protected void onDraw(Canvas canvas) { super.onDraw(canvas); mPaint.setStyle(Style.FILL); mPaint.setColor(mBackgroundColor); mRect.set(0, 0, 100, 100); canvas.drawRect(mRect, mPaint); mPaint.setColor(mTextColor); mPaint.setTextSize(30.0f); canvas.drawText("Hello!", 0, 100, mPaint); }
注意别忘了重写 onMeasure 方法, 否则又会出现 View 的宽高为 match_parent.最后的效果如下: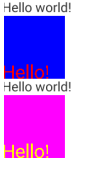
4. 关于自定义属性的 format自定义属性的时候, <attrs> 标签中有一个 format 属性, 这个属性值表示将用户传入的值以何种方式进行解析, 比如解析成一个字符串, 或者一个 color 值等等, 下面列举了所有可以解析的类型:1. reference:参考某一资源ID。
(1)属性定义:
<declare-styleable name = "名称">
<attr name = "background" format = "reference" />
</declare-styleable>
(2)属性使用:
<ImageView
android:layout_width = "42dip" android:layout_height = "42dip" android:background = "@drawable/图片ID"
/>
2. color:颜色值。
(1)属性定义:
<declare-styleable name = "名称">
<attr name = "textColor" format = "color" />
</declare-styleable>
(2)属性使用:
<TextView
android:layout_width = "42dip" android:layout_height = "42dip" android:textColor = "#00FF00"
/>
3. boolean:布尔值。
(1)属性定义:
<declare-styleable name = "名称">
<attr name = "focusable" format = "boolean" />
</declare-styleable>
(2)属性使用:
<Button
android:layout_width = "42dip" android:layout_height = "42dip"
android:focusable = "true"
/>
4. dimension:尺寸值。
(1)属性定义:
<declare-styleable name = "名称">
<attr name = "layout_width" format = "dimension" />
</declare-styleable>
(2)属性使用:
<Button
android:layout_width = "42dip" android:layout_height = "42dip"
/>
5. float:浮点值。
(1)属性定义:
<declare-styleable name = "AlphaAnimation">
<attr name = "fromAlpha" format = "float" /> <attr name = "toAlpha" format = "float" />
</declare-styleable>
(2)属性使用:
<alpha android:fromAlpha = "1.0" android:toAlpha = "0.7"
/>
6. integer:整型值。
(1)属性定义:
<declare-styleable name = "AnimatedRotateDrawable">
<attr name = "visible" /> <attr name = "frameDuration" format="integer" /> <attr name = "framesCount" format="integer" /> <attr name = "pivotX" /> <attr name = "pivotY" /> <attr name = "drawable" />
</declare-styleable>
(2)属性使用:
<animated-rotate
xmlns:android = "http://schemas.android.com/apk/res/android" android:drawable = "@drawable/图片ID" android:pivotX = "50%" android:pivotY = "50%" android:framesCount = "12" android:frameDuration = "100"
/>
7. string:字符串。
(1)属性定义:
<declare-styleable name = "MapView"> <attr name = "apiKey" format = "string" /> </declare-styleable>
(2)属性使用:
<com.google.android.maps.MapView android:layout_width = "fill_parent" android:layout_height = "fill_parent" android:apiKey = "0jOkQ80oD1JL9C6HAja99uGXCRiS2CGjKO_bc_g"
/>
8. fraction:百分数。
(1)属性定义:
<declare-styleable name="RotateDrawable"> <attr name = "visible" /> <attr name = "fromDegrees" format = "float" /> <attr name = "toDegrees" format = "float" /> <attr name = "pivotX" format = "fraction" /> <attr name = "pivotY" format = "fraction" /> <attr name = "drawable" /> </declare-styleable>
(2)属性使用:
<rotate
xmlns:android = "http://schemas.android.com/apk/res/android" android:interpolator = "@anim/动画ID"
android:fromDegrees = "0" android:toDegrees = "360"
android:pivotX = "200%"
android:pivotY = "300%" android:duration = "5000"
android:repeatMode = "restart"
android:repeatCount = "infinite"
/>
9. enum:枚举值。
(1)属性定义:
<declare-styleable name="名称"> <attr name="orientation"> <enum name="horizontal" value="0" /> <enum name="vertical" value="1" /> </attr>
</declare-styleable>
(2)属性使用:
<LinearLayout
xmlns:android = "http://schemas.android.com/apk/res/android" android:orientation = "vertical" android:layout_width = "fill_parent" android:layout_height = "fill_parent" > </LinearLayout>
10. flag:位或运算。
(1)属性定义:
<declare-styleable name="名称"> <attr name="windowSoftInputMode"> <flag name = "stateUnspecified" value = "0" /> <flag name = "stateUnchanged" value = "1" /> <flag name = "stateHidden" value = "2" /> <flag name = "stateAlwaysHidden" value = "3" /> <flag name = "stateVisible" value = "4" /> <flag name = "stateAlwaysVisible" value = "5" /> <flag name = "adjustUnspecified" value = "0x00" /> <flag name = "adjustResize" value = "0x10" /> <flag name = "adjustPan" value = "0x20" /> <flag name = "adjustNothing" value = "0x30" /> </attr>
</declare-styleable>
(2)属性使用:
<activity
android:name = ".StyleAndThemeActivity" android:label = "@string/app_name" android:windowSoftInputMode = "stateUnspecified | stateUnchanged | stateHidden"> <intent-filter> <action android:name = "android.intent.action.MAIN" /> <category android:name = "android.intent.category.LAUNCHER" /> </intent-filter> </activity>
注意:
属性定义时可以指定多种类型值。
(1)属性定义:
<declare-styleable name = "名称">
<attr name = "background" format = "reference|color" />
</declare-styleable>
(2)属性使用:
<ImageView
android:layout_width = "42dip" android:layout_height = "42dip" android:background = "@drawable/图片ID|#00FF00"
/>
来自为知笔记(Wiz)
0 0
- 自定义控件3.自定义属性
- 自定义控件----自定义属性
- 自定义控件:自定义组合控件+自定义属性
- Android自定义控件 自定义属性
- 自定义控件和自定义属性
- 自定义控件三:自定义属性
- 自定义控件及自定义属性
- 自定义控件1--自定义属性
- 自定义控件之一:自定义属性
- 自定义控件与自定义属性
- 自定义控件之自定义属性
- Android 自定义控件 自定义属性
- 自定义控件的自定义属性
- 自定义控件的自定义属性
- android 自定义控件自定义属性
- C# 自定义控件,自定义属性,自定义事件
- 自定义控件中属性
- android 自定义控件属性
- 显示大图片的技巧
- android图片缩放、放大demo - Android实例教程
- 自定义组合控件
- 自定义控件1.官方文档翻译
- 自定义控件2.第一个自定义view
- 自定义控件3.自定义属性
- view的测量,布局,绘制
- Android中measure过程、WRAP_CONTENT详解以及xml布局文件解析流程浅析(下
- Android中measure过程、WRAP_CONTENT详解以及xml布局文件解析流程浅析(上
- PHP中reset(array)函数解决each(array)循环无结果
- So far as the amazing thing is to create the product alike myself
- 视频技术系列(1):视频技术报告
- 【软考总结】——数据库之范式
- Java的Class类
<?xml version="1.0" encoding="utf-8"?><resources xmlns:android="http://schemas.android.com/apk/res/android"><!-- declare CustomView2 style --><declare-styleable name="CustomView2"><attr name="textColor" format="color" /><attr name="backgroundColor" format="color" /></declare-styleable></resources>
2. 在布局文件中使用<RelativeLayout xmlns:android="http://schemas.android.com/apk/res/android" xmlns:tools="http://schemas.android.com/tools" xmlns:app="http://schemas.android.com/apk/res/com.gaoyuan4122.customui" android:layout_width="match_parent" android:layout_height="match_parent" > <TextView android:id="@+id/tv_hello" android:layout_width="wrap_content" android:layout_height="wrap_content" android:text="@string/hello_world" /> <com.gaoyuan4122.customui.views.CustomView1 android:id="@+id/cv_custom1" android:layout_width="wrap_content" android:layout_height="wrap_content" android:layout_below="@id/tv_hello" /> <TextView android:id="@+id/tv_hello2" android:layout_width="wrap_content" android:layout_height="wrap_content" android:text="@string/hello_world" android:layout_below="@id/cv_custom1" /> <com.gaoyuan4122.customui.views.CustomView2 android:layout_width="wrap_content" android:layout_height="wrap_content" android:layout_below="@id/tv_hello2" app:backgroundColor="#ff00ff" app:textColor="#ffff00" /></RelativeLayout>
注意:
1. 要在最外层的控件中加一个新的名称空间, 比如上面叫 xmlns:app="...", 这里的名字可以随便取.2. 在控件上使用的时候, 要加上命名空间, 注意和上面定义的保持一致.3. 在自定义 View 中使用自定义属性需要在构造方法中获取, 上一篇文章里说了, 继承 View 需要实现两个构造方法, 一个是只有 Context 参数的, 一个是有 Context, AttributeSet 参数的, 其实自定义 View 还有一个构造方法, 有三个参数: Context, AttributeSet, int(defStyleAttr), 第二个参数 AttributeSet 封装了View的属性信息, 我们自定义的属性会被封装到这个类里, 第三个参数和样式有关, 这里先不说. View的三个构造方法一般是下面的写法: private int mTextColor; private int mBackgroundColor; public CustomView2(Context context) { this(context, null); } public CustomView2(Context context, AttributeSet attrs) { this(context, attrs, 0); }- // 自定义属性会被封装到 attrs 中, 第三个参数和样式有关, 这里先不说.
public CustomView2(Context context, AttributeSet attrs, int defStyleAttr) { super(context, attrs, defStyleAttr); // 通过下面的方法去除自定义属性 TypedArray typedArray = context.obtainStyledAttributes(attrs, R.styleable.CustomView2); mTextColor = typedArray.getColor(R.styleable.CustomView2_textColor, Color.RED); mBackgroundColor = typedArray.getColor(R.styleable.CustomView2_backgroundColor, Color.BLUE); // 最后一定要注意调用这个方法, 至于为什么后面会说. typedArray.recycle(); }
通过上面的方式可以将自定义属性取出来, 然后就可以使用了: @Override protected void onDraw(Canvas canvas) { super.onDraw(canvas); mPaint.setStyle(Style.FILL); mPaint.setColor(mBackgroundColor); mRect.set(0, 0, 100, 100); canvas.drawRect(mRect, mPaint); mPaint.setColor(mTextColor); mPaint.setTextSize(30.0f); canvas.drawText("Hello!", 0, 100, mPaint); }
注意别忘了重写 onMeasure 方法, 否则又会出现 View 的宽高为 match_parent.最后的效果如下: 4. 关于自定义属性的 format自定义属性的时候, <attrs> 标签中有一个 format 属性, 这个属性值表示将用户传入的值以何种方式进行解析, 比如解析成一个字符串, 或者一个 color 值等等, 下面列举了所有可以解析的类型:1. reference:参考某一资源ID。
(1)属性定义:
<declare-styleable name = "名称">
<attr name = "background" format = "reference" />
</declare-styleable>
(2)属性使用:
<ImageView
android:layout_width = "42dip" android:layout_height = "42dip" android:background = "@drawable/图片ID"
/>
2. color:颜色值。
(1)属性定义:
<declare-styleable name = "名称">
<attr name = "textColor" format = "color" />
</declare-styleable>
(2)属性使用:
<TextView
android:layout_width = "42dip" android:layout_height = "42dip" android:textColor = "#00FF00"
/>
3. boolean:布尔值。
(1)属性定义:
<declare-styleable name = "名称">
<attr name = "focusable" format = "boolean" />
</declare-styleable>
(2)属性使用:
<Button
android:layout_width = "42dip" android:layout_height = "42dip"
android:focusable = "true"
/>
4. dimension:尺寸值。
(1)属性定义:
<declare-styleable name = "名称">
<attr name = "layout_width" format = "dimension" />
</declare-styleable>
(2)属性使用:
<Button
android:layout_width = "42dip" android:layout_height = "42dip"
/>
5. float:浮点值。
(1)属性定义:
<declare-styleable name = "AlphaAnimation">
<attr name = "fromAlpha" format = "float" /> <attr name = "toAlpha" format = "float" />
</declare-styleable>
(2)属性使用:
<alpha android:fromAlpha = "1.0" android:toAlpha = "0.7"
/>
6. integer:整型值。
(1)属性定义:
<declare-styleable name = "AnimatedRotateDrawable">
<attr name = "visible" /> <attr name = "frameDuration" format="integer" /> <attr name = "framesCount" format="integer" /> <attr name = "pivotX" /> <attr name = "pivotY" /> <attr name = "drawable" />
</declare-styleable>
(2)属性使用:
<animated-rotate
xmlns:android = "http://schemas.android.com/apk/res/android" android:drawable = "@drawable/图片ID" android:pivotX = "50%" android:pivotY = "50%" android:framesCount = "12" android:frameDuration = "100"
/>
7. string:字符串。
(1)属性定义:
<declare-styleable name = "MapView"> <attr name = "apiKey" format = "string" /> </declare-styleable>
(2)属性使用:
<com.google.android.maps.MapView android:layout_width = "fill_parent" android:layout_height = "fill_parent" android:apiKey = "0jOkQ80oD1JL9C6HAja99uGXCRiS2CGjKO_bc_g"
/>
8. fraction:百分数。
(1)属性定义:
<declare-styleable name="RotateDrawable"> <attr name = "visible" /> <attr name = "fromDegrees" format = "float" /> <attr name = "toDegrees" format = "float" /> <attr name = "pivotX" format = "fraction" /> <attr name = "pivotY" format = "fraction" /> <attr name = "drawable" /> </declare-styleable>
(2)属性使用:
<rotate
xmlns:android = "http://schemas.android.com/apk/res/android" android:interpolator = "@anim/动画ID"
android:fromDegrees = "0" android:toDegrees = "360"
android:pivotX = "200%"
android:pivotY = "300%" android:duration = "5000"
android:repeatMode = "restart"
android:repeatCount = "infinite"
/>
9. enum:枚举值。
(1)属性定义:
<declare-styleable name="名称"> <attr name="orientation"> <enum name="horizontal" value="0" /> <enum name="vertical" value="1" /> </attr>
</declare-styleable>
(2)属性使用:
<LinearLayout
xmlns:android = "http://schemas.android.com/apk/res/android" android:orientation = "vertical" android:layout_width = "fill_parent" android:layout_height = "fill_parent" > </LinearLayout>
10. flag:位或运算。
(1)属性定义:
<declare-styleable name="名称"> <attr name="windowSoftInputMode"> <flag name = "stateUnspecified" value = "0" /> <flag name = "stateUnchanged" value = "1" /> <flag name = "stateHidden" value = "2" /> <flag name = "stateAlwaysHidden" value = "3" /> <flag name = "stateVisible" value = "4" /> <flag name = "stateAlwaysVisible" value = "5" /> <flag name = "adjustUnspecified" value = "0x00" /> <flag name = "adjustResize" value = "0x10" /> <flag name = "adjustPan" value = "0x20" /> <flag name = "adjustNothing" value = "0x30" /> </attr>
</declare-styleable>
(2)属性使用:
<activity
android:name = ".StyleAndThemeActivity" android:label = "@string/app_name" android:windowSoftInputMode = "stateUnspecified | stateUnchanged | stateHidden"> <intent-filter> <action android:name = "android.intent.action.MAIN" /> <category android:name = "android.intent.category.LAUNCHER" /> </intent-filter> </activity>
注意:
属性定义时可以指定多种类型值。
(1)属性定义:
<declare-styleable name = "名称">
<attr name = "background" format = "reference|color" />
</declare-styleable>
(2)属性使用:
<ImageView
android:layout_width = "42dip" android:layout_height = "42dip" android:background = "@drawable/图片ID|#00FF00"
/>
<RelativeLayout xmlns:android="http://schemas.android.com/apk/res/android"xmlns:tools="http://schemas.android.com/tools"xmlns:app="http://schemas.android.com/apk/res/com.gaoyuan4122.customui"android:layout_width="match_parent"android:layout_height="match_parent" ><TextViewandroid:id="@+id/tv_hello"android:layout_width="wrap_content"android:layout_height="wrap_content"android:text="@string/hello_world" /><com.gaoyuan4122.customui.views.CustomView1android:id="@+id/cv_custom1"android:layout_width="wrap_content"android:layout_height="wrap_content"android:layout_below="@id/tv_hello" /><TextViewandroid:id="@+id/tv_hello2"android:layout_width="wrap_content"android:layout_height="wrap_content"android:text="@string/hello_world"android:layout_below="@id/cv_custom1" /><com.gaoyuan4122.customui.views.CustomView2android:layout_width="wrap_content"android:layout_height="wrap_content"android:layout_below="@id/tv_hello2"app:backgroundColor="#ff00ff"app:textColor="#ffff00" /></RelativeLayout>
注意:
自定义属性需要在构造方法中获取, 上一篇文章里说了, 继承 View 需要实现两个构造方法, 一个是只有 Context 参数的, 一个是有 Context, AttributeSet 参数的, 其实自定义 View 还有一个构造方法, 有三个参数: Context, AttributeSet, int(defStyleAttr), 第二个参数 AttributeSet 封装了View的属性信息, 我们自定义的属性会被封装到这个类里, 第三个参数和样式有关, 这里先不说. View的三个构造方法一般是下面的写法:
private int mTextColor;private int mBackgroundColor;public CustomView2(Context context) {this(context, null);}public CustomView2(Context context, AttributeSet attrs) {this(context, attrs, 0);}- // 自定义属性会被封装到 attrs 中, 第三个参数和样式有关, 这里先不说.
public CustomView2(Context context, AttributeSet attrs, int defStyleAttr) {super(context, attrs, defStyleAttr);// 通过下面的方法去除自定义属性TypedArray typedArray = context.obtainStyledAttributes(attrs, R.styleable.CustomView2);mTextColor = typedArray.getColor(R.styleable.CustomView2_textColor, Color.RED);mBackgroundColor = typedArray.getColor(R.styleable.CustomView2_backgroundColor, Color.BLUE);// 最后一定要注意调用这个方法, 至于为什么后面会说.typedArray.recycle();}
通过上面的方式可以将自定义属性取出来, 然后就可以使用了:
@Overrideprotected void onDraw(Canvas canvas) {super.onDraw(canvas);mPaint.setStyle(Style.FILL);mPaint.setColor(mBackgroundColor);mRect.set(0, 0, 100, 100);canvas.drawRect(mRect, mPaint);mPaint.setColor(mTextColor);mPaint.setTextSize(30.0f);canvas.drawText("Hello!", 0, 100, mPaint);}
注意别忘了重写 onMeasure 方法, 否则又会出现 View 的宽高为 match_parent.
最后的效果如下:
4. 关于自定义属性的 format自定义属性的时候, <attrs> 标签中有一个 format 属性, 这个属性值表示将用户传入的值以何种方式进行解析, 比如解析成一个字符串, 或者一个 color 值等等, 下面列举了所有可以解析的类型:1. reference:参考某一资源ID。
(1)属性定义:
<declare-styleable name = "名称">
<attr name = "background" format = "reference" />
</declare-styleable>
(2)属性使用:
<ImageView
android:layout_width = "42dip" android:layout_height = "42dip" android:background = "@drawable/图片ID"
/>
2. color:颜色值。
(1)属性定义:
<declare-styleable name = "名称">
<attr name = "textColor" format = "color" />
</declare-styleable>
(2)属性使用:
<TextView
android:layout_width = "42dip" android:layout_height = "42dip" android:textColor = "#00FF00"
/>
3. boolean:布尔值。
(1)属性定义:
<declare-styleable name = "名称">
<attr name = "focusable" format = "boolean" />
</declare-styleable>
(2)属性使用:
<Button
android:layout_width = "42dip" android:layout_height = "42dip"
android:focusable = "true"
/>
4. dimension:尺寸值。
(1)属性定义:
<declare-styleable name = "名称">
<attr name = "layout_width" format = "dimension" />
</declare-styleable>
(2)属性使用:
<Button
android:layout_width = "42dip" android:layout_height = "42dip"
/>
5. float:浮点值。
(1)属性定义:
<declare-styleable name = "AlphaAnimation">
<attr name = "fromAlpha" format = "float" /> <attr name = "toAlpha" format = "float" />
</declare-styleable>
(2)属性使用:
<alpha android:fromAlpha = "1.0" android:toAlpha = "0.7"
/>
6. integer:整型值。
(1)属性定义:
<declare-styleable name = "AnimatedRotateDrawable">
<attr name = "visible" /> <attr name = "frameDuration" format="integer" /> <attr name = "framesCount" format="integer" /> <attr name = "pivotX" /> <attr name = "pivotY" /> <attr name = "drawable" />
</declare-styleable>
(2)属性使用:
<animated-rotate
xmlns:android = "http://schemas.android.com/apk/res/android" android:drawable = "@drawable/图片ID" android:pivotX = "50%" android:pivotY = "50%" android:framesCount = "12" android:frameDuration = "100"
/>
7. string:字符串。
(1)属性定义:
<declare-styleable name = "MapView"> <attr name = "apiKey" format = "string" /> </declare-styleable>
(2)属性使用:
<com.google.android.maps.MapView android:layout_width = "fill_parent" android:layout_height = "fill_parent" android:apiKey = "0jOkQ80oD1JL9C6HAja99uGXCRiS2CGjKO_bc_g"
/>
8. fraction:百分数。
(1)属性定义:
<declare-styleable name="RotateDrawable"> <attr name = "visible" /> <attr name = "fromDegrees" format = "float" /> <attr name = "toDegrees" format = "float" /> <attr name = "pivotX" format = "fraction" /> <attr name = "pivotY" format = "fraction" /> <attr name = "drawable" /> </declare-styleable>
(2)属性使用:
<rotate
xmlns:android = "http://schemas.android.com/apk/res/android" android:interpolator = "@anim/动画ID"
android:fromDegrees = "0" android:toDegrees = "360"
android:pivotX = "200%"
android:pivotY = "300%" android:duration = "5000"
android:repeatMode = "restart"
android:repeatCount = "infinite"
/>
9. enum:枚举值。
(1)属性定义:
<declare-styleable name="名称"> <attr name="orientation"> <enum name="horizontal" value="0" /> <enum name="vertical" value="1" /> </attr>
</declare-styleable>
(2)属性使用:
<LinearLayout
xmlns:android = "http://schemas.android.com/apk/res/android" android:orientation = "vertical" android:layout_width = "fill_parent" android:layout_height = "fill_parent" > </LinearLayout>
10. flag:位或运算。
(1)属性定义:
<declare-styleable name="名称"> <attr name="windowSoftInputMode"> <flag name = "stateUnspecified" value = "0" /> <flag name = "stateUnchanged" value = "1" /> <flag name = "stateHidden" value = "2" /> <flag name = "stateAlwaysHidden" value = "3" /> <flag name = "stateVisible" value = "4" /> <flag name = "stateAlwaysVisible" value = "5" /> <flag name = "adjustUnspecified" value = "0x00" /> <flag name = "adjustResize" value = "0x10" /> <flag name = "adjustPan" value = "0x20" /> <flag name = "adjustNothing" value = "0x30" /> </attr>
</declare-styleable>
(2)属性使用:
<activity
android:name = ".StyleAndThemeActivity" android:label = "@string/app_name" android:windowSoftInputMode = "stateUnspecified | stateUnchanged | stateHidden"> <intent-filter> <action android:name = "android.intent.action.MAIN" /> <category android:name = "android.intent.category.LAUNCHER" /> </intent-filter> </activity>
注意:
属性定义时可以指定多种类型值。
(1)属性定义:
<declare-styleable name = "名称">
<attr name = "background" format = "reference|color" />
</declare-styleable>
(2)属性使用:
<ImageView
android:layout_width = "42dip" android:layout_height = "42dip" android:background = "@drawable/图片ID|#00FF00"
/>
自定义属性的时候, <attrs> 标签中有一个 format 属性, 这个属性值表示将用户传入的值以何种方式进行解析, 比如解析成一个字符串, 或者一个 color 值等等, 下面列举了所有可以解析的类型:
1. reference:参考某一资源ID。
(1)属性定义:
<declare-styleable name = "名称">
<attr name = "background" format = "reference" />
</declare-styleable>
(2)属性使用:
<ImageView
android:layout_width = "42dip"
android:layout_height = "42dip"
android:background = "@drawable/图片ID"
/>
2. color:颜色值。
(1)属性定义:
<declare-styleable name = "名称">
<attr name = "textColor" format = "color" />
</declare-styleable>
(2)属性使用:
<TextView
android:layout_width = "42dip"
android:layout_height = "42dip"
android:textColor = "#00FF00"
/>
3. boolean:布尔值。
(1)属性定义:
<declare-styleable name = "名称">
<attr name = "focusable" format = "boolean" />
</declare-styleable>
(2)属性使用:
<Button
android:layout_width = "42dip"
android:layout_height = "42dip"
android:focusable = "true"
/>
4. dimension:尺寸值。
(1)属性定义:
<declare-styleable name = "名称">
<attr name = "layout_width" format = "dimension" />
</declare-styleable>
(2)属性使用:
<Button
android:layout_width = "42dip"
android:layout_height = "42dip"
/>
5. float:浮点值。
(1)属性定义:
<declare-styleable name = "AlphaAnimation">
<attr name = "fromAlpha" format = "float" />
<attr name = "toAlpha" format = "float" />
</declare-styleable>
(2)属性使用:
<alpha
android:fromAlpha = "1.0"
android:toAlpha = "0.7"
/>
6. integer:整型值。
(1)属性定义:
<declare-styleable name = "AnimatedRotateDrawable">
<attr name = "visible" />
<attr name = "frameDuration" format="integer" />
<attr name = "framesCount" format="integer" />
<attr name = "pivotX" />
<attr name = "pivotY" />
<attr name = "drawable" />
</declare-styleable>
(2)属性使用:
<animated-rotate
xmlns:android = "http://schemas.android.com/apk/res/android"
android:drawable = "@drawable/图片ID"
android:pivotX = "50%"
android:pivotY = "50%"
android:framesCount = "12"
android:frameDuration = "100"
/>
7. string:字符串。
(1)属性定义:
<declare-styleable name = "MapView">
<attr name = "apiKey" format = "string" />
</declare-styleable>
(2)属性使用:
<com.google.android.maps.MapView
android:layout_width = "fill_parent"
android:layout_height = "fill_parent"
android:apiKey = "0jOkQ80oD1JL9C6HAja99uGXCRiS2CGjKO_bc_g"
/>
8. fraction:百分数。
(1)属性定义:
<declare-styleable name="RotateDrawable">
<attr name = "visible" />
<attr name = "fromDegrees" format = "float" />
<attr name = "toDegrees" format = "float" />
<attr name = "pivotX" format = "fraction" />
<attr name = "pivotY" format = "fraction" />
<attr name = "drawable" />
</declare-styleable>
(2)属性使用:
<rotate
xmlns:android = "http://schemas.android.com/apk/res/android"
android:interpolator = "@anim/动画ID"
android:fromDegrees = "0"
android:toDegrees = "360"
android:pivotX = "200%"
android:pivotY = "300%"
android:duration = "5000"
android:repeatMode = "restart"
android:repeatCount = "infinite"
/>
9. enum:枚举值。
(1)属性定义:
<declare-styleable name="名称">
<attr name="orientation">
<enum name="horizontal" value="0" />
<enum name="vertical" value="1" />
</attr>
</declare-styleable>
(2)属性使用:
<LinearLayout
xmlns:android = "http://schemas.android.com/apk/res/android"
android:orientation = "vertical"
android:layout_width = "fill_parent"
android:layout_height = "fill_parent"
>
</LinearLayout>
10. flag:位或运算。
(1)属性定义:
<declare-styleable name="名称">
<attr name="windowSoftInputMode">
<flag name = "stateUnspecified" value = "0" />
<flag name = "stateUnchanged" value = "1" />
<flag name = "stateHidden" value = "2" />
<flag name = "stateAlwaysHidden" value = "3" />
<flag name = "stateVisible" value = "4" />
<flag name = "stateAlwaysVisible" value = "5" />
<flag name = "adjustUnspecified" value = "0x00" />
<flag name = "adjustResize" value = "0x10" />
<flag name = "adjustPan" value = "0x20" />
<flag name = "adjustNothing" value = "0x30" />
</attr>
</declare-styleable>
(2)属性使用:
<activity
android:name = ".StyleAndThemeActivity"
android:label = "@string/app_name"
android:windowSoftInputMode = "stateUnspecified | stateUnchanged | stateHidden">
<intent-filter>
<action android:name = "android.intent.action.MAIN" />
<category android:name = "android.intent.category.LAUNCHER" />
</intent-filter>
</activity>
注意:
属性定义时可以指定多种类型值。
(1)属性定义:
<declare-styleable name = "名称">
<attr name = "background" format = "reference|color" />
</declare-styleable>
(2)属性使用:
<ImageView
android:layout_width = "42dip"
android:layout_height = "42dip"
android:background = "@drawable/图片ID|#00FF00"
/>