如何使用网络的bottleneck特征提升准确率
来源:互联网 发布:限制某个ip访问 js 编辑:程序博客网 时间:2024/05/17 03:46
使用预训练网络的bottleneck特征
一个稍微讲究一点的办法是,利用在大规模数据集上预训练好的网络。这样的网络在多数的计算机视觉问题上都能取得不错的特征,利用这样的特征可以让我们获得更高的准确率。
我们将使用vgg-16网络,该网络在ImageNet数据集上进行训练,这个模型我们之前提到过了。因为ImageNet数据集包含多种“猫”类和多种“狗”类,这个模型已经能够学习与我们这个数据集相关的特征了。事实上,简单的记录原来网络的输出而不用bottleneck特征就已经足够把我们的问题解决的不错了。不过我们这里讲的方法对其他的类似问题有更好的推广性,包括在ImageNet中没有出现的类别的分类问题。
VGG-16的网络结构如下:
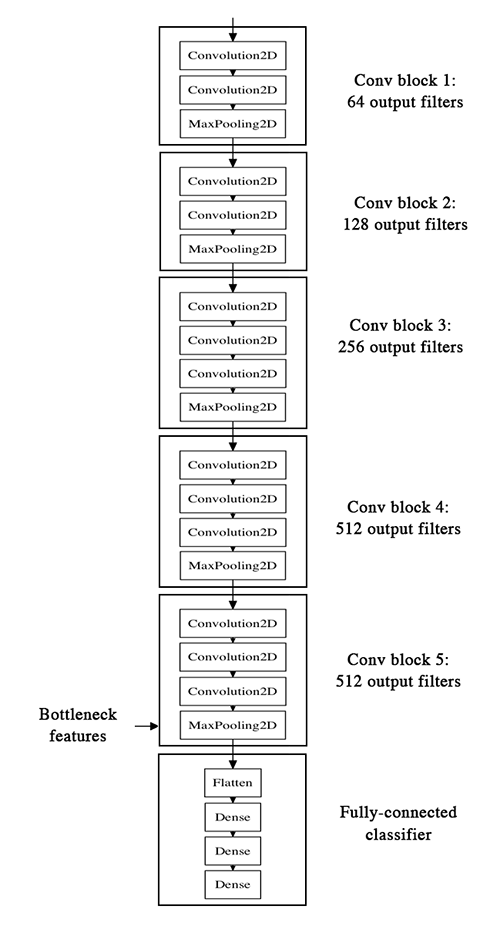
我们的方法是这样的,我们将利用网络的卷积层部分,把全连接以上的部分抛掉。然后在我们的训练集和测试集上跑一遍,将得到的输出(即“bottleneck feature”,网络在全连接之前的最后一层激活的feature map)记录在两个numpy array里。然后我们基于记录下来的特征训练一个全连接网络。
我们将这些特征保存为离线形式,而不是将我们的全连接模型直接加到网络上并冻结之前的层参数进行训练的原因是处于计算效率的考虑。运行VGG网络的代价是非常高昂的,尤其是在CPU上运行,所以我们只想运行一次。这也是我们不进行数据提升的原因。
我们不再赘述如何搭建vgg-16网络了,这件事之前已经说过,在keras的example里也可以找到。但让我们看看如何记录bottleneck特征。
generator = datagen.flow_from_directory( 'data/train', target_size=(150, 150), batch_size=32, class_mode=None, # this means our generator will only yield batches of data, no labels shuffle=False) # our data will be in order, so all first 1000 images will be cats, then 1000 dogs# the predict_generator method returns the output of a model, given# a generator that yields batches of numpy databottleneck_features_train = model.predict_generator(generator, 2000)# save the output as a Numpy arraynp.save(open('bottleneck_features_train.npy', 'w'), bottleneck_features_train)generator = datagen.flow_from_directory( 'data/validation', target_size=(150, 150), batch_size=32, class_mode=None, shuffle=False)bottleneck_features_validation = model.predict_generator(generator, 800)np.save(open('bottleneck_features_validation.npy', 'w'), bottleneck_features_validation)记录完毕后我们可以将数据载入,用于训练我们的全连接网络:
train_data = np.load(open('bottleneck_features_train.npy'))# the features were saved in order, so recreating the labels is easytrain_labels = np.array([0] * 1000 + [1] * 1000)validation_data = np.load(open('bottleneck_features_validation.npy'))validation_labels = np.array([0] * 400 + [1] * 400)model = Sequential()model.add(Flatten(input_shape=train_data.shape[1:]))model.add(Dense(256, activation='relu'))model.add(Dropout(0.5))model.add(Dense(1, activation='sigmoid'))model.compile(optimizer='rmsprop', loss='binary_crossentropy', metrics=['accuracy'])model.fit(train_data, train_labels, nb_epoch=50, batch_size=32, validation_data=(validation_data, validation_labels))model.save_weights('bottleneck_fc_model.h5')因为特征的size很小,模型在CPU上跑的也会很快,大概1s一个epoch,最后我们的准确率是90%~91%,这么好的结果多半归功于预训练的vgg网络帮助我们提取特征。
下面是代码:
import osimport h5pyimport numpy as npfrom keras.preprocessing.image import ImageDataGeneratorfrom keras.models import Sequentialfrom keras.layers import Convolution2D, MaxPooling2D, ZeroPadding2Dfrom keras.layers import Activation, Dropout, Flatten, Denseimport sysdefaultencoding = 'utf-8'if sys.getdefaultencoding() != defaultencoding: reload(sys) sys.setdefaultencoding(defaultencoding)# path to the model weights file.weights_path = '../weights/vgg16_weights.h5'top_model_weights_path = 'bottleneck_fc_model.h5'# dimensions of our images.img_width, img_height = 150, 150train_data_dir = '../data/train'validation_data_dir = '../data/validation'nb_train_samples = 2000nb_validation_samples = 800nb_epoch = 50def save_bottlebeck_features(): datagen = ImageDataGenerator(rescale=1./255) # build the VGG16 network model = Sequential() model.add(ZeroPadding2D((1, 1), input_shape=(3, img_width, img_height))) model.add(Convolution2D(64, 3, 3, activation='relu', name='conv1_1')) model.add(ZeroPadding2D((1, 1))) model.add(Convolution2D(64, 3, 3, activation='relu', name='conv1_2')) model.add(MaxPooling2D((2, 2), strides=(2, 2))) model.add(ZeroPadding2D((1, 1))) model.add(Convolution2D(128, 3, 3, activation='relu', name='conv2_1')) model.add(ZeroPadding2D((1, 1))) model.add(Convolution2D(128, 3, 3, activation='relu', name='conv2_2')) model.add(MaxPooling2D((2, 2), strides=(2, 2))) model.add(ZeroPadding2D((1, 1))) model.add(Convolution2D(256, 3, 3, activation='relu', name='conv3_1')) model.add(ZeroPadding2D((1, 1))) model.add(Convolution2D(256, 3, 3, activation='relu', name='conv3_2')) model.add(ZeroPadding2D((1, 1))) model.add(Convolution2D(256, 3, 3, activation='relu', name='conv3_3')) model.add(MaxPooling2D((2, 2), strides=(2, 2))) model.add(ZeroPadding2D((1, 1))) model.add(Convolution2D(512, 3, 3, activation='relu', name='conv4_1')) model.add(ZeroPadding2D((1, 1))) model.add(Convolution2D(512, 3, 3, activation='relu', name='conv4_2')) model.add(ZeroPadding2D((1, 1))) model.add(Convolution2D(512, 3, 3, activation='relu', name='conv4_3')) model.add(MaxPooling2D((2, 2), strides=(2, 2))) model.add(ZeroPadding2D((1, 1))) model.add(Convolution2D(512, 3, 3, activation='relu', name='conv5_1')) model.add(ZeroPadding2D((1, 1))) model.add(Convolution2D(512, 3, 3, activation='relu', name='conv5_2')) model.add(ZeroPadding2D((1, 1))) model.add(Convolution2D(512, 3, 3, activation='relu', name='conv5_3')) model.add(MaxPooling2D((2, 2), strides=(2, 2))) # load the weights of the VGG16 networks # (trained on ImageNet, won the ILSVRC competition in 2014) # note: when there is a complete match between your model definition # and your weight savefile, you can simply call model.load_weights(filename) assert os.path.exists(weights_path), 'Model weights not found (see "weights_path" variable in script).' f = h5py.File(weights_path) for k in range(f.attrs['nb_layers']): if k >= len(model.layers): # we don't look at the last (fully-connected) layers in the savefile break g = f['layer_{}'.format(k)] weights = [g['param_{}'.format(p)] for p in range(g.attrs['nb_params'])] model.layers[k].set_weights(weights) f.close() print('Model loaded.') generator = datagen.flow_from_directory( train_data_dir, target_size=(img_width, img_height), batch_size=32, class_mode=None, shuffle=False) print('generator ok.') bottleneck_features_train = model.predict_generator(generator, nb_train_samples) print('predict ok.') np.save(open('bottleneck_features_train.npy', 'wb'), bottleneck_features_train) generator = datagen.flow_from_directory( validation_data_dir, target_size=(img_width, img_height), batch_size=32, class_mode=None, shuffle=False) bottleneck_features_validation = model.predict_generator(generator, nb_validation_samples) np.save(open('bottleneck_features_validation.npy', 'wb'), bottleneck_features_validation) print('save_bottlebeck_features ok')def train_top_model(): train_data = np.load(open('bottleneck_features_train.npy')) train_labels = np.array([0] * (nb_train_samples / 2) + [1] * (nb_train_samples / 2)) validation_data = np.load(open('bottleneck_features_validation.npy')) validation_labels = np.array([0] * (nb_validation_samples / 2) + [1] * (nb_validation_samples / 2)) model = Sequential() model.add(Flatten(input_shape=train_data.shape[1:])) model.add(Dense(256, activation='relu')) model.add(Dropout(0.5)) model.add(Dense(1, activation='sigmoid')) model.compile(optimizer='rmsprop', loss='binary_crossentropy', metrics=['accuracy']) model.fit(train_data, train_labels, nb_epoch=nb_epoch, batch_size=32, validation_data=(validation_data, validation_labels)) model.save_weights(top_model_weights_path) print('train_top_model ok')save_bottlebeck_features()train_top_model()- 如何使用网络的bottleneck特征提升准确率
- keras入门 ---用预训练好网络模型的bottleneck特征
- 使用原始的Titanic数据,通过特征筛选,一步步提升性能(特征如何提取)
- 提升分类器准确率的组合方法
- BBR ("Bottleneck Bandwidth and RTT") 性能提升测试(记一次ubuntu的内核kernel升级与测试)
- 如何提升 TortoiseSVN 的使用效率
- 如何使用Redmine提升你的工作效率
- 如何使用有性别特征的名词
- 如何使用有性别特征的名词
- 百度语音识别技术负责人李先刚:如何利用Deep CNN大幅提升识别准确率?
- 语音学习笔记10------如何利用Deep CNN大幅提升识别准确率?
- 微软新论文:如何利用深度特征流提高视频识别准确率(HR)
- 使用Titanic 数据集,通过特征筛选的方法一步步提升决策树的预测性能
- 网络协议的特征
- 游戏的网络特征
- 模板的使用:Promotion Traits( 类型提升之特征萃取)
- Jack Andraka--一个16岁将癌症检测准确率提升到近乎完美的“孩子”
- 基于汉字字频特征实现99.99%准确率的新闻文本分类器(一)
- Linux curl使用简单介绍(转)
- jdbc数据库的连接步骤
- MFC学习(一)
- React Native 集成到原有Android项目中
- 字符串常见的几种编码方式
- 如何使用网络的bottleneck特征提升准确率
- LeetCode笔记:232. Implement Queue using Stacks
- 蓝牙的工作原理
- Linux基本命令
- 归并排序
- accept成功后获取客户端ip
- Matlab已集成了HOG特征检测
- Java设计模式之——单例模式
- 立体匹配研究背景及意义