带cuda的opencv2.4.9 in ubuntu 14.04
来源:互联网 发布:猎户座飞船 火星 知乎 编辑:程序博客网 时间:2024/06/07 04:04
其实装caffe时顺带安装了opencv2.4.8. 我不知道,找了英文教材
Installing OpenCV 2.4.9 in Ubuntu 14.04 LTS
The latest Long Term Support version of Ubuntu(14.04 LTS) is out and a new version of OpenCV was recently released as well. This means that now is a great opportunity to update my OpenCV installation guide to the latest versions, Ubuntu 14.04 LTS and OpenCV 2.4.9.
One of the great additions in this new release of OpenCV is the new viz module, which offers a nice 3D visualizer. This module is based on the great Visualization Toolkit library (VTK) and nicely prepares the users for the upcoming OpenCV 3.
In this guide, I will show you how to install OpenCV with a lot of the features it provides. Here are some of the things that are going to be enabled when you are finished following through with this installation tutorial:
- viz module (3D visualization)
- Qt version of the HighGUI module (Better 2D window interface with zoom, image saving capabilities, etc)
- OpenGL support
- C++ interface and examples
- C interface and examples
- Python interface and examples
- Java interface and examples
- Intel Threading Building Blocks (TBB)
Note: I have noticed some copies of my posts elsewhere, so make sure that you are reading this from the original source, atsamontab dot com, accessible fromhere so that you don’t miss the comments.
OK, so the first step is to make sure that everything in the system is updated and upgraded. Open the terminal and write this:
1sudo apt-get update2sudo apt-get upgradeNow, you need to install many dependencies, such as support for reading and writing image files, drawing on the screen, some needed tools, other libraries, etc… This step is very easy, you only need to write the following command in the Terminal:
1sudo apt-getinstallbuild-essential libgtk2.0-dev libjpeg-dev libtiff4-dev libjasper-dev libopenexr-dev cmake python-dev python-numpy python-tk libtbb-dev libeigen3-dev yasm libfaac-dev libopencore-amrnb-dev libopencore-amrwb-dev libtheora-dev libvorbis-dev libxvidcore-dev libx264-dev libqt4-dev libqt4-opengl-dev sphinx-common texlive-latex-extra libv4l-dev libdc1394-22-dev libavcodec-dev libavformat-dev libswscale-dev default-jdk ant libvtk5-qt4-devTime to get the OpenCV 2.4.9 source code:
1cd ~2wget http://sourceforge.net/projects/opencvlibrary/files/opencv-unix/2.4.9/opencv-2.4.9.zip3unzip opencv-2.4.9.zip4cd opencv-2.4.9Now we have to generate the Makefile by using cmake. In here we can define which parts of OpenCV we want to compile. Since we want to use the viz module, Python, Java, TBB, OpenGL, Qt, work with videos, etc, here is where we need to set that. Just execute the following line at the terminal to create the appropriate Makefile. Note that there are two dots at the end of the line, it is an argument for the cmake program and it means the parent directory (because we are inside the build directory, and we want to refer to the OpenCV directory, which is its parent).
1mkdir build2cd build3cmake -D WITH_TBB=ON -D BUILD_NEW_PYTHON_SUPPORT=ON -D WITH_V4L=ON -D INSTALL_C_EXAMPLES=ON -D INSTALL_PYTHON_EXAMPLES=ON -D BUILD_EXAMPLES=ON -D WITH_QT=ON -D WITH_OPENGL=ON -D WITH_VTK=ON ..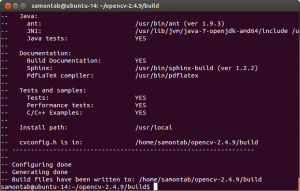
Check that the above command produces no error and that in particular it reports FFMPEG as YES. If this is not the case you will not be able to read or write videos. Check that Java, Python, TBB, OpenGL, V4L, OpenGL and Qt are all detected correctly.
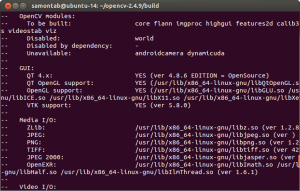
Make sure you scroll up and check that the modules that are going to be built are these:
core flann imgproc highgui features2d calib3d ml video legacy objdetect photo gpu ocl nonfree contrib java python stitching superres ts videostab viz.
If anything is wrong, go back, correct the errors by maybe installing extra packages and then run cmake again.
Now, you are ready to compile and install OpenCV 2.4.9:
1make2sudo makeinstallNow you have to configure OpenCV. First, open the opencv.conf file with the following code:
1sudo gedit /etc/ld.so.conf.d/opencv.confAdd the following line at the end of the file(it may be an empty file, that is ok) and then save it:
1/usr/local/lib
Run the following code to configure the library:
1sudo ldconfigNow you have to open another file:
1sudo gedit /etc/bash.bashrcAdd these two lines at the end of the file and save it:
1PKG_CONFIG_PATH=$PKG_CONFIG_PATH:/usr/local/lib/pkgconfig2export PKG_CONFIG_PATH
Finally, close the console and open a new one, restart the computer or logout and then login again. OpenCV will not work correctly until you do this.
Now you have OpenCV 2.4.9 installed in your computer with 3D visualization, Python, Java, TBB, OpenGL, video, and Qt support.
Check out the cool Qt interface which provides image viewing capabilities with zoom, as well as the ability to save the current image with just one click.

If you zoom in enough, you can see the RGB (or intensity) values for each pixel.

Now let’s build some samples included in OpenCV:
1cd ~/opencv-2.4.9/samples/c2chmod +x build_all.sh3./build_all.shThese examples use the old C interface:
1./facedetect --cascade="/usr/local/share/OpenCV/haarcascades/haarcascade_frontalface_alt.xml"--scale=1.5 lena.jpg
1./facedetect --cascade="/usr/local/share/OpenCV/haarcascades/haarcascade_frontalface_alt.xml"--nested-cascade="/usr/local/share/OpenCV/haarcascades/haarcascade_eye.xml"--scale=1.5 lena.jpg
The following examples use the new C++ interface:
1~/opencv-2.4.9/build/bin/cpp-example-grabcut ~/opencv-2.4.9/samples/cpp/lena.jpg
1~/opencv-2.4.9/build/bin/cpp-example-calibration_artificial
Now let’s run some Python code:
1python ~/opencv-2.4.9/samples/python2/turing.py
Now you can build a Java sample using ant for example. (Make sure that you change/home/samontab/ with your actual home directory):
1cd ~/opencv-2.4.9/samples/java/ant2ant -DocvJarDir=/home/samontab/opencv-2.4.9/build/bin -DocvLibDir=/home/samontab/opencv-2.4.9/build/lib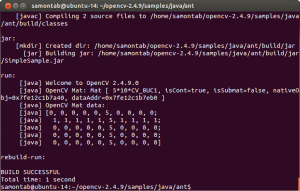
Now let’s read a video and use OpenGL with Qt through this great sample that detects the features from the video, then estimates the 3D location of the structure usingPOSIT, and finally uses OpenGL to draw in 3D (great sample Javier):
1cd ~/opencv-2.4.9/samples/cpp/Qt_sample2mkdir build3cd build4cmake ..5make6./OpenGL_Qt_Binding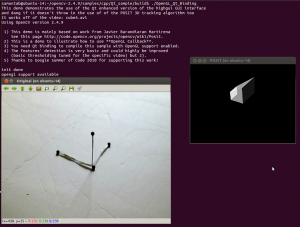
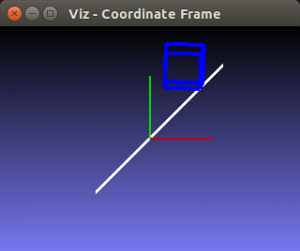
And finally, let’s build a sample using the 3D visualization module viz:
1cd ~/opencv-2.4.9/samples/cpp/tutorial_code/viz2g++ -o widget_pose `pkg-config opencv --cflags` widget_pose.cpp `pkg-config opencv --libs`3./widget_pose
As you can see, now you can use OpenCV with C++, C, Python, and Java. The Qt enhanced 2D interface is enabled, 3D data can be displayed using OpenGL directly, or using the new viz module. Multi threading functionality is enabled using TBB. Also, video support is enabled as well.
If you correctly finished this tutorial, you are now ready to do some nice computer vision work.
Posted in Image Processing, Open Source, Programming, Qt.
http://www.samontab.com/web/2014/06/installing-opencv-2-4-9-in-ubuntu-14-04-lts/
后来报错,找到一个解决方法(忘了原作的地址,不过给他点赞了。。。。)
环境背景:
由于项目需要,在ubuntu service 14.04 下搭建 OpenCL +OpenCV 环境, 前期安装了 CUDA7.5 ,GPU为 NVIDIA TITAN 。
问题描述:
按照网上教程安装OpenCV ,在make 时出现错误,错误提示如下:

<code class="hljs javascript has-numbering">nvcc fatal : Unsupported gpu architecture <span class="hljs-string">'compute_11'</span>CMake <span class="hljs-built_in">Error</span> at cuda_compile_generated_matrix_operations.cu.o.cmake:<span class="hljs-number">206</span> (message): <span class="hljs-built_in">Error</span> generating/home/smie/Documents/opencv2<span class="hljs-number">.4</span><span class="hljs-number">.11</span>/build/modules/core/CMakeFiles/cuda_compile.dir/__/dynamicuda/src/cuda/./cuda_compile_generated_matrix_operations.cu.omake[<span class="hljs-number">2</span>]: ***[modules/core/CMakeFiles/cuda_compile.dir/__/dynamicuda/src/cuda/./cuda_compile_generated_matrix_operations.cu.o] <span class="hljs-built_in">Error</span> <span class="hljs-number">1</span>make[<span class="hljs-number">1</span>]: *** [modules/core/CMakeFiles/opencv_core.dir/all] <span class="hljs-built_in">Error</span> <span class="hljs-number">2</span> make[<span class="hljs-number">1</span>]: *** Waiting <span class="hljs-keyword">for</span> unfinished jobs....</code>
解决方法:
百度无果,求助万能谷歌。有高人回答如下:
When using cmake to do configurations, set the option CUDA_GENERATION to specific your GPU architecture. I ran across the same error and tried this to work out the problem.
this worked for me and shows a possible value for CUDA_GENERATION:cmake -D CMAKE_BUILD_TYPE=RELEASE -D CMAKE_INSTALL_PREFIX=/usr/local -D CUDA_GENERATION=Kepler ..
然后,这个问题就奇迹般的解决了。
总结:
<code class="hljs lasso has-numbering"></code><pre name="code" class="cpp">cmake -D CMAKE_BUILD_TYPE=RELEASE -D CMAKE_INSTALL_PREFIX=/usr/local -D CUDA_GENERATION=Kepler ..
This let me install opencv-2.4.9.
另外一种解决方案:
Another option. Ubuntu 14.04, GTX Titan X, opencv-2.4.10
cmake -D CMAKE_BUILD_TYPE=Release -D CMAKE_INSTALL_PREFIX=/usr/local -D BUILD_TIFF=ON -D BUILD_EXAMPLES=ON -D CUDA_GENERATION=Auto -D BUILD_NEW_PYTHON_SUPPORT=ON ..I also applied the patch:
https://github.com/Itseez/opencv/pull/3886/files
but I’m not sure whether it ended up being needed. I had tried with and without >CUDA_GENERATION=Maxwell but Maxwell isn’t detected. I did not try >CUDA_GENERATION=Auto prior to the patch, that’s why I don’t know for sure.

满怀希望以为可以,结果遭遇不测,如图:

算了,反正已经有了2.4.8.。。。一次失败的教训。。。。。。。。。。
- 带cuda的opencv2.4.9 in ubuntu 14.04
- ubuntu下带CUDA的OpenCV安装
- 用CMake和VS2008生成带CUDA模块的OpenCV2.2
- Ubuntu 14.04 不带CUDA支持的A卡Caffe配置
- Ubuntu 安装openCV2.4.9 和cuda时 错误及对应解决方案
- Ubuntu 14.04+Cuda 7.0+Opencv2.4.10+Cudnn+(PNG++)+Torch7配置
- Ubuntu14.04 CUDA环境安装OpenCV2.4.9
- Ubuntu安装Opencv2.4.9
- Ubuntu 安装 opencv2.4.9
- Install Opencv2.2.0 in Ubuntu 10.04
- 编译cuda版本的opencv——cuda7.5+opencv2.4.9+vs2013
- CUDA 7 + Ubuntu 14.04
- ubuntu 14.04 安装cuda
- ubuntu 14.04安装cuda
- ubuntu 14.04 安装cuda
- Install CUDA 2.2 in Ubuntu 8.10
- ubuntu查看安装的cuda toolkit自带的工具及其他安装文件
- 基于Ubuntu 15.04 不带CUDA的Caffe 最简单初配过程
- Android中的IPC方式及对比
- JAVA基础知识点(十二)--集合、单列集合中的Collection接口
- Ubuntu16.04安装32位支持库
- P2P中的NAT穿越方案简介
- 两种常见的OpenCV Error
- 带cuda的opencv2.4.9 in ubuntu 14.04
- 亲测SQLServer的最大连接数
- Android 自定义View动画篇之进阶
- S5PV210 WM8960 ASOC 移植
- 文件共享神器:NitroShare
- JVM中的内存分配策略
- 文件、目录的调用顺序
- 【leetcode】110.Balanced Binary Tree
- web前端优秀框架