CSharpGL(22)实现顺序无关的半透明渲染(Order-Independent-Transparency)
来源:互联网 发布:淘宝一元秒杀神器 编辑:程序博客网 时间:2024/05/20 02:27
CSharpGL(22)实现顺序无关的半透明渲染(Order-Independent-Transparency)
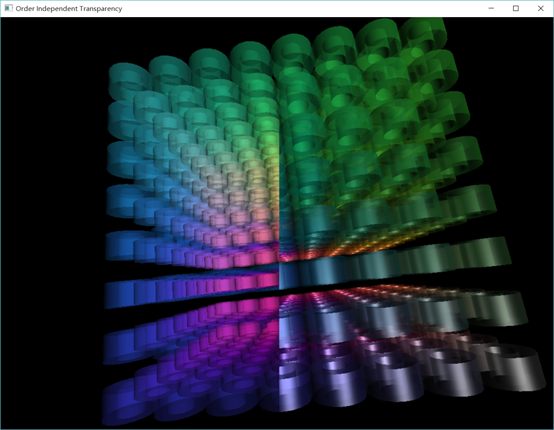
在 GL.Enable(GL_BLEND); 后渲染半透明物体时,由于顶点被渲染的顺序固定,渲染出来的结果往往很奇怪。红宝书里提到一个OIT(Order-Independent-Transparency)的渲染方法,很好的解决了这个问题。这个功能太有用了。于是我把这个方法加入CSharpGL中。
效果图
如下图所示,左边是常见的blend方法,右边是OIT渲染的结果。可以看到左边的渲染结果有些诡异,右边的就正常了。

网络允许的话可以看一下视频,更直观。
或者也可以看红宝书里的例子:左边是常见的blend方法,右边是OIT渲染的结果。

下载
CSharpGL已在GitHub开源,欢迎对OpenGL有兴趣的同学加入(https://github.com/bitzhuwei/CSharpGL)
实现原理
源头
为什么通常的blend方式会有问题?因为blend的结果是与source、dest两个颜色的出现顺序相关的。就是说blend(blend(ColorA, ColorB), ColorC)≠blend(ColorA,blend(ColorB, ColorC))。
那么很显然的一个想法是,分两遍渲染,第一遍:把这个位置上的所有Color都存到一个链表里,第二遍:根据每个Color的深度值进行排序,然后进行blend操作。这就解决了blend顺序的问题。
W*H个链表
显然,为了对宽度、高度分别为Width、Height的窗口实施OIT渲染,必须为此窗口上的每个像素分别设置一个链表,用于存储投影到此像素上的各个Color。这就是W*H个链表的由来。
当然了,这个链表要由GLSL shader来操作 。shader本身似乎没有操作链表的功能。那么就用一个大大的VBO来代替。这个VBO存储了所有的W*H个链表。

你可以想象,在第一遍渲染时,这个VBO的第二个位置上可能是第一个像素的第二个Color,也可能是第二个像素的第一个Color。这就意味着我们还需要一个数组来存放W*H个链表的头结点。这个数组我们用一个2DTexture实现,其大小正好等于Width*Height就可以了。
★这个Texture不像一般的Texture那样用于给模型贴图,而是用作记录头结点的信息。★
初始化
初始化工作主要包含这几项:创建和清空头结点Texture、链表VBO。
 DoInitialize
2遍渲染
渲染过程主要有3步:重置链表、头结点、计数器等;1遍渲染填充链表;2遍渲染排序+blend。

1 protected override void DoRender(RenderEventArgs arg) 2 { 3 this.depthTestSwitch.On(); 4 this.cullFaceSwitch.On(); 5 6 // Reset atomic counter 7 GL.GetDelegateFor<GL.glBindBufferBase>()(GL.GL_ATOMIC_COUNTER_BUFFER, 0, atomic_counter_buffer[0]); 8 IntPtr data = GL.MapBuffer(BufferTarget.AtomicCounterBuffer, MapBufferAccess.WriteOnly); 9 unsafe10 {11 var array = (uint*)data.ToPointer();12 array[0] = 0;13 }14 GL.UnmapBuffer(BufferTarget.AtomicCounterBuffer);15 GL.GetDelegateFor<GL.glBindBufferBase>()(GL.GL_ATOMIC_COUNTER_BUFFER, 0, 0);16 17 // Clear head-pointer image18 GL.BindBuffer(BufferTarget.PixelUnpackBuffer, head_pointer_clear_buffer[0]);19 GL.BindTexture(GL.GL_TEXTURE_2D, head_pointer_texture[0]);20 GL.TexSubImage2D(TexSubImage2DTarget.Texture2D, 0, 0, 0, arg.CanvasRect.Width, arg.CanvasRect.Height, TexSubImage2DFormats.RedInteger, TexSubImage2DType.UnsignedByte, IntPtr.Zero);21 GL.BindTexture(GL.GL_TEXTURE_2D, 0);22 GL.BindBuffer(BufferTarget.PixelUnpackBuffer, 0);23 //24 25 // Bind head-pointer image for read-write26 GL.GetDelegateFor<GL.glBindImageTexture>()(0, head_pointer_texture[0], 0, false, 0, GL.GL_READ_WRITE, GL.GL_R32UI);27 28 // Bind linked-list buffer for write29 GL.GetDelegateFor<GL.glBindImageTexture>()(1, linked_list_texture[0], 0, false, 0, GL.GL_WRITE_ONLY, GL.GL_RGBA32UI);30 31 mat4 model = mat4.identity();32 mat4 view = arg.Camera.GetViewMat4();33 mat4 projection = arg.Camera.GetProjectionMat4();34 this.buildListsRenderer.SetUniformValue("model_matrix", model);35 this.buildListsRenderer.SetUniformValue("view_matrix", view);36 this.buildListsRenderer.SetUniformValue("projection_matrix", projection);37 this.resolve_lists.SetUniformValue("model_matrix", model);38 this.resolve_lists.SetUniformValue("view_matrix", view);39 this.resolve_lists.SetUniformValue("projection_matrix", projection);40 41 // first pass42 this.buildListsRenderer.Render(arg);43 // second pass44 this.resolve_lists.Render(arg);45 46 GL.GetDelegateFor<GL.glBindImageTexture>()(1, 0, 0, false, 0, GL.GL_WRITE_ONLY, GL.GL_RGBA32UI);47 GL.GetDelegateFor<GL.glBindImageTexture>()(0, 0, 0, false, 0, GL.GL_READ_WRITE, GL.GL_R32UI);48 49 this.cullFaceSwitch.Off();50 this.depthTestSwitch.Off();51 }
Shader:填充链表
1遍渲染时,用一个fragment shader来填充链表:
1 #version 420 core 2 3 layout (early_fragment_tests) in; 4 5 layout (binding = 0, r32ui) uniform uimage2D head_pointer_image; 6 layout (binding = 1, rgba32ui) uniform writeonly uimageBuffer list_buffer; 7 8 layout (binding = 0, offset = 0) uniform atomic_uint list_counter; 9 10 layout (location = 0) out vec4 color;11 12 in vec4 surface_color;13 14 uniform vec3 light_position = vec3(40.0, 20.0, 100.0);15 16 void main(void)17 {18 uint index;19 uint old_head;20 uvec4 item;21 22 index = atomicCounterIncrement(list_counter);23 24 old_head = imageAtomicExchange(head_pointer_image, ivec2(gl_FragCoord.xy), uint(index));25 26 item.x = old_head;27 item.y = packUnorm4x8(surface_color);28 item.z = floatBitsToUint(gl_FragCoord.z);29 item.w = 255 / 4;30 31 imageStore(list_buffer, int(index), item);32 33 color = surface_color;34 }
Shader:排序、blend
2遍渲染时,用另一个fragment shader来排序和blend。
 resolve_lists.frag
总结
经过这个OIT问题的练习,我忽然明白了一些modern opengl的设计思想。
在modern opengl看来,Texture虽然名为Texture,告诉我们它是用于给模型贴图的,但是,Texture实际上可以用作各种各样的事(例如OIT里用作记录各个头结点)。
一个VBO不仅仅可以用于存储顶点位置、法线、颜色等信息,也可以用作各种各样的事(例如OIT里用作存储W*H个链表,这让我想起了我的(小型单文件NoSQL数据库SharpFileDB)里的文件链表,两者何其相似)。
为什么会这样?
因为modern opengl是用GLSL shader来实施渲染的。Shader是一段程序,程序的创造力是无穷无尽的,你可以以任何方式使用opengl提供的资源(Texture,VBO等等)。唯一固定不变的,就是modern opengl的渲染管道(pipeline,"管道"太玄幻了,其实就是渲染过程的意思)。
记住pipeline的工作流程,认识opengl的各种资源,发挥想象力。
2遍渲染的成功试验,从侧面印证了上述推断,也说明了opengl只是负责渲染,至于渲染之后是不是画到画布或者其他什么地方,都是可以控制的。
甚至,“渲染”的目的本就不必是为了画图。这就是compute shader的由来了吧。
原CSharpGL的其他功能(3ds解析器、TTF2Bmp、CSSL等),我将逐步加入新CSharpGL。
欢迎对OpenGL有兴趣的同学关注(https://github.com/bitzhuwei/CSharpGL)
CSharpGL(22)实现顺序无关的半透明渲染(Order-Independent-Transparency)
在 GL.Enable(GL_BLEND); 后渲染半透明物体时,由于顶点被渲染的顺序固定,渲染出来的结果往往很奇怪。红宝书里提到一个OIT(Order-Independent-Transparency)的渲染方法,很好的解决了这个问题。这个功能太有用了。于是我把这个方法加入CSharpGL中。
效果图
如下图所示,左边是常见的blend方法,右边是OIT渲染的结果。可以看到左边的渲染结果有些诡异,右边的就正常了。

网络允许的话可以看一下视频,更直观。
或者也可以看红宝书里的例子:左边是常见的blend方法,右边是OIT渲染的结果。

下载
CSharpGL已在GitHub开源,欢迎对OpenGL有兴趣的同学加入(https://github.com/bitzhuwei/CSharpGL)
实现原理
源头
为什么通常的blend方式会有问题?因为blend的结果是与source、dest两个颜色的出现顺序相关的。就是说blend(blend(ColorA, ColorB), ColorC)≠blend(ColorA,blend(ColorB, ColorC))。
那么很显然的一个想法是,分两遍渲染,第一遍:把这个位置上的所有Color都存到一个链表里,第二遍:根据每个Color的深度值进行排序,然后进行blend操作。这就解决了blend顺序的问题。
W*H个链表
显然,为了对宽度、高度分别为Width、Height的窗口实施OIT渲染,必须为此窗口上的每个像素分别设置一个链表,用于存储投影到此像素上的各个Color。这就是W*H个链表的由来。
当然了,这个链表要由GLSL shader来操作 。shader本身似乎没有操作链表的功能。那么就用一个大大的VBO来代替。这个VBO存储了所有的W*H个链表。

你可以想象,在第一遍渲染时,这个VBO的第二个位置上可能是第一个像素的第二个Color,也可能是第二个像素的第一个Color。这就意味着我们还需要一个数组来存放W*H个链表的头结点。这个数组我们用一个2DTexture实现,其大小正好等于Width*Height就可以了。
★这个Texture不像一般的Texture那样用于给模型贴图,而是用作记录头结点的信息。★
初始化
初始化工作主要包含这几项:创建和清空头结点Texture、链表VBO。
 DoInitialize
2遍渲染
渲染过程主要有3步:重置链表、头结点、计数器等;1遍渲染填充链表;2遍渲染排序+blend。

1 protected override void DoRender(RenderEventArgs arg) 2 { 3 this.depthTestSwitch.On(); 4 this.cullFaceSwitch.On(); 5 6 // Reset atomic counter 7 GL.GetDelegateFor<GL.glBindBufferBase>()(GL.GL_ATOMIC_COUNTER_BUFFER, 0, atomic_counter_buffer[0]); 8 IntPtr data = GL.MapBuffer(BufferTarget.AtomicCounterBuffer, MapBufferAccess.WriteOnly); 9 unsafe10 {11 var array = (uint*)data.ToPointer();12 array[0] = 0;13 }14 GL.UnmapBuffer(BufferTarget.AtomicCounterBuffer);15 GL.GetDelegateFor<GL.glBindBufferBase>()(GL.GL_ATOMIC_COUNTER_BUFFER, 0, 0);16 17 // Clear head-pointer image18 GL.BindBuffer(BufferTarget.PixelUnpackBuffer, head_pointer_clear_buffer[0]);19 GL.BindTexture(GL.GL_TEXTURE_2D, head_pointer_texture[0]);20 GL.TexSubImage2D(TexSubImage2DTarget.Texture2D, 0, 0, 0, arg.CanvasRect.Width, arg.CanvasRect.Height, TexSubImage2DFormats.RedInteger, TexSubImage2DType.UnsignedByte, IntPtr.Zero);21 GL.BindTexture(GL.GL_TEXTURE_2D, 0);22 GL.BindBuffer(BufferTarget.PixelUnpackBuffer, 0);23 //24 25 // Bind head-pointer image for read-write26 GL.GetDelegateFor<GL.glBindImageTexture>()(0, head_pointer_texture[0], 0, false, 0, GL.GL_READ_WRITE, GL.GL_R32UI);27 28 // Bind linked-list buffer for write29 GL.GetDelegateFor<GL.glBindImageTexture>()(1, linked_list_texture[0], 0, false, 0, GL.GL_WRITE_ONLY, GL.GL_RGBA32UI);30 31 mat4 model = mat4.identity();32 mat4 view = arg.Camera.GetViewMat4();33 mat4 projection = arg.Camera.GetProjectionMat4();34 this.buildListsRenderer.SetUniformValue("model_matrix", model);35 this.buildListsRenderer.SetUniformValue("view_matrix", view);36 this.buildListsRenderer.SetUniformValue("projection_matrix", projection);37 this.resolve_lists.SetUniformValue("model_matrix", model);38 this.resolve_lists.SetUniformValue("view_matrix", view);39 this.resolve_lists.SetUniformValue("projection_matrix", projection);40 41 // first pass42 this.buildListsRenderer.Render(arg);43 // second pass44 this.resolve_lists.Render(arg);45 46 GL.GetDelegateFor<GL.glBindImageTexture>()(1, 0, 0, false, 0, GL.GL_WRITE_ONLY, GL.GL_RGBA32UI);47 GL.GetDelegateFor<GL.glBindImageTexture>()(0, 0, 0, false, 0, GL.GL_READ_WRITE, GL.GL_R32UI);48 49 this.cullFaceSwitch.Off();50 this.depthTestSwitch.Off();51 }
Shader:填充链表
1遍渲染时,用一个fragment shader来填充链表:
1 #version 420 core 2 3 layout (early_fragment_tests) in; 4 5 layout (binding = 0, r32ui) uniform uimage2D head_pointer_image; 6 layout (binding = 1, rgba32ui) uniform writeonly uimageBuffer list_buffer; 7 8 layout (binding = 0, offset = 0) uniform atomic_uint list_counter; 9 10 layout (location = 0) out vec4 color;11 12 in vec4 surface_color;13 14 uniform vec3 light_position = vec3(40.0, 20.0, 100.0);15 16 void main(void)17 {18 uint index;19 uint old_head;20 uvec4 item;21 22 index = atomicCounterIncrement(list_counter);23 24 old_head = imageAtomicExchange(head_pointer_image, ivec2(gl_FragCoord.xy), uint(index));25 26 item.x = old_head;27 item.y = packUnorm4x8(surface_color);28 item.z = floatBitsToUint(gl_FragCoord.z);29 item.w = 255 / 4;30 31 imageStore(list_buffer, int(index), item);32 33 color = surface_color;34 }
Shader:排序、blend
2遍渲染时,用另一个fragment shader来排序和blend。
 resolve_lists.frag
总结
经过这个OIT问题的练习,我忽然明白了一些modern opengl的设计思想。
在modern opengl看来,Texture虽然名为Texture,告诉我们它是用于给模型贴图的,但是,Texture实际上可以用作各种各样的事(例如OIT里用作记录各个头结点)。
一个VBO不仅仅可以用于存储顶点位置、法线、颜色等信息,也可以用作各种各样的事(例如OIT里用作存储W*H个链表,这让我想起了我的(小型单文件NoSQL数据库SharpFileDB)里的文件链表,两者何其相似)。
为什么会这样?
因为modern opengl是用GLSL shader来实施渲染的。Shader是一段程序,程序的创造力是无穷无尽的,你可以以任何方式使用opengl提供的资源(Texture,VBO等等)。唯一固定不变的,就是modern opengl的渲染管道(pipeline,"管道"太玄幻了,其实就是渲染过程的意思)。
记住pipeline的工作流程,认识opengl的各种资源,发挥想象力。
2遍渲染的成功试验,从侧面印证了上述推断,也说明了opengl只是负责渲染,至于渲染之后是不是画到画布或者其他什么地方,都是可以控制的。
甚至,“渲染”的目的本就不必是为了画图。这就是compute shader的由来了吧。
原CSharpGL的其他功能(3ds解析器、TTF2Bmp、CSSL等),我将逐步加入新CSharpGL。
欢迎对OpenGL有兴趣的同学关注(https://github.com/bitzhuwei/CSharpGL)
- CSharpGL(22)实现顺序无关的半透明渲染(Order-Independent-Transparency)
- 2.2.3 Order-Independent Transparency (about order-independent blending) 顺序无关透明度(关于顺序无关的混合)
- OIT(Order-independent Transparent)顺序无关的透明
- Order Independent Transparency
- Cg Programming/Unity/Order-Independent Transparency
- 翻译 Cg Program in Unity - 2.3 Order-Independent Transparency
- unity 半透明与不透明对象渲染顺序
- 与设备无关的单位(Device-independent unit)
- Effective STL:Item2 当心与容器无关(container-independent)的代码这个错觉
- 图像半透明的实现
- 半透明的实现
- 半透明的实现
- 半透明效果的实现
- 实现半透明的popupwindow
- 实现半透明的popupwindow
- 实现半透明的popupwindow
- 实现div的半透明
- (VC)半透明的实现
- C++模板(template)使用介绍
- Android 插件程序
- Eclipse和AndroidStudio装机看这里
- 【STL】SGI版STL空间配置器剖析+简单实现
- org.apache.coyote.AbstractProtocol pauseTomcat进程意外退出的有关问题分析
- CSharpGL(22)实现顺序无关的半透明渲染(Order-Independent-Transparency)
- libpcap使用
- poj 2503 Babelfish (map)
- 推荐几款DevTools插件
- wemall app商城源码Android之Native(原生)支付模式一demo
- 连不上无线网-只有自己的wifi连不上,不显示输入密码对话框的解决办法
- noip2016 Day2 T2:蚯蚓 (归并)
- 二 d3.数据绑定
- ubuntu 12.04 GDB调试常用指令


