eclipse 与git 整合 Egit 用户指南
来源:互联网 发布:聚合数据接口使用 编辑:程序博客网 时间:2024/06/05 01:21
Getting Started
Overview
If you're new to Git or distributed version control systems generally, then you might want to readGit for Eclipse Users first. More background and details can be found in the on-line bookPro Git.
If you are coming from CVS, you can find common CVS workflows for Git Platform-releng/Git Workflows.
Basic Tutorial: Adding a project to version control
Configuration
Identifying yourself
Whenever the history of the repository is changed (technically, whenever a commit is created), Git keeps track of the user who created that commit. The identification consists of a name (typically a person's name) and an e-mail address. This information is stored in file ~/.gitconfig under dedicated keys.
EGit will ask you for this information when you create your first commit. By default, this dialog is shown only once until you create a new workspace or tick the checkbox "Show initial configuration dialog" on the Git Preference page:
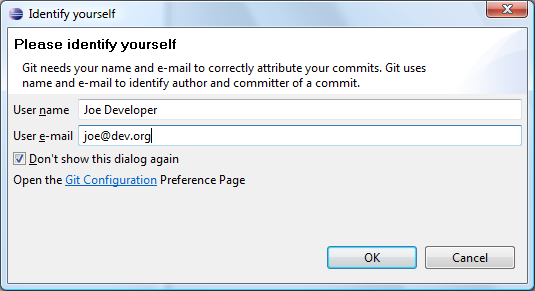
You can also untick "Don't show this dialog again" if you want to see it again later.
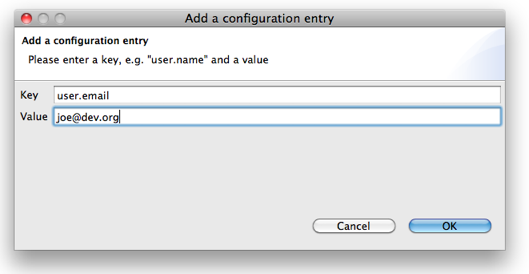
Instead of using this dialog, you can always change this information using the Git configuration:
- Click Preferences > Team > Git > Configuration
- Click New Entry and enter the key value pairs
user.emailanduser.name

Setting up the Home Directory on Windows
Add the environment variable HOME to your environment variables.
- In Windows 7, type "environment" at the start menu.
- Select "Edit environment variables for your account".
- Under "User Variables", click the "New" button.
- Enter "HOME" in the name field.
- Enter "%USERPROFILE%" or some other path in the value field.
- Click OK, and OK again. You have just added the Home directory on Windows.
- File > Exit, then restart the application.
Note that if you use Cygwin, you should already have HOME set. For example, if you installed Cygwin toC:\cygwin and your username is Fred, then Cygwin should have already setHOME to C:\cygwin\home\Fred (or something similar). You can verify this by enteringecho %HOME% in the Windows command prompt, or echo $HOME in the Cygwin shell.
EGit needs this path for looking up the user configuration (.gitconfig). HOME should point to your home directory e.g. C:\Users\Tom. Ensure correct case! E.g. C:\users instead of C:\Users may cause problems!
If the HOME variable is not defined the home directory will be calculated by concatenatingHOMEDRIVE and HOMEPATH.
If both HOME and HOMEDRIVE are not defined HOMESHARE will be used.
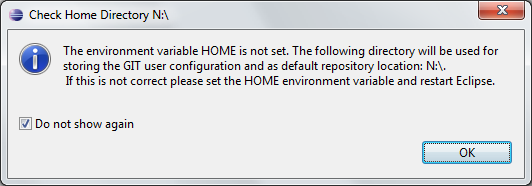
EGit shows a warning if HOME is not defined explicitly. Keep in mind that if you set the HOME environment variable while Eclipse is running, you will still see following warning. You will have to restart Eclipse for it to recognize the HOME value.
Pointing out the System wide configuration
If you use Git for Windows as a companion to EGit, make sure EGit knows where Git is installed so it can find the "system wide settings", e.g. how core.autocrlf is set. Go to the settings and look under Team>Git>Configuration and then the System Settings tab.
If you selected one of the options to use Git from the Command Line Prompt when you installed Git for Windows, then the location of the systemwide settings is filled in with a path and everything is fine. If not, use the Browse button to locate where Git is installed, e.g. C:\Program Files(x86)\Git.
This advice also applies to users of other Git packagings, e.g. Git under Cygwin or TortoiseGit.
Non-Windows users should in theory check this setting, but the system wide settings are usually not used on non-Windows platforms.
Create Repository
- Create a new Java project
HelloWorld. (In this case, the project was built outside of your Eclipse Workspace.)
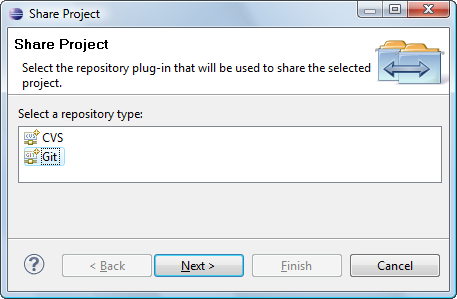
- Select the project, click File > Team > Share Project.
- Select repository type Git and click Next.
- To configure the Git repository select the new project
HelloWorld.
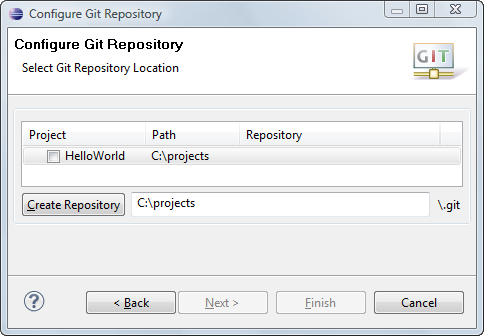
- Click Create Repository to initialize a new Git repository for the
HelloWorldproject. If your project already resides in the working tree of an existing Git repository the repository is chosen automatically.
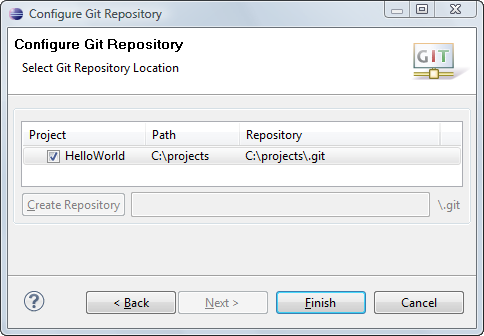
- Click Finish to close the wizard.
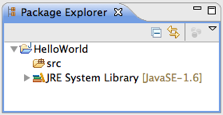
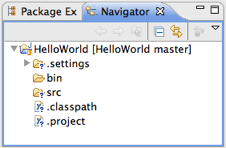
- The decorator text "[master]" behind the project shows that this project is tracked in a repository on themaster branch and the question mark decorators show that the
.classpathand.projectand the.settingsfiles are not yet under version control.
Track Changes
- Click Team > Add to Index on the project node. (This menu item is namedAdd on older versions of Egit.)
- The + decorators show that now the project's files have been added to version control.
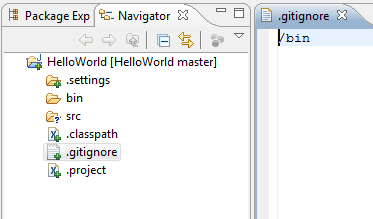
- Mark the "bin" folder as "ignored by Git", either by right-clicking on it and selectingTeam > Ignore or by creating a file
.gitignorein the project folder with the following content:
/bin
- This excludes the
binfolder from Git's list of tracked files. - Add
.gitignoreto version control (Team > Add):
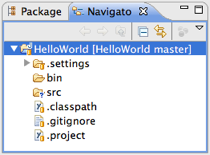
- You may have to set your Package Explorer filters in order to see
.gitignoredisplayed in the Package Explorer. To access filters, select the down arrow on the right edge of the Package Explorer tab to display View Menu.

- Select Filters... from the View Menu and you will be presented with the Java Element Filters dialog. Unselect the top entry to display files that begin with . (period) such as
.gitignore.
- Click Team > Commit in the project context menu.
- Enter a commit message explaining your change, the first line (followed by an empty line) will become the short log for this commit. By default the author and committer are taken from the
.gitconfigfile in your home directory. - You may click Add Signed-off-by to add a Signed-off-by: tag.
- If you are committing the change of another author you may alter the author field to give the name and email address of the author.
- Click Commit to commit your first change.

- Note that the decorators of the committed files have changed as a result of your commit.
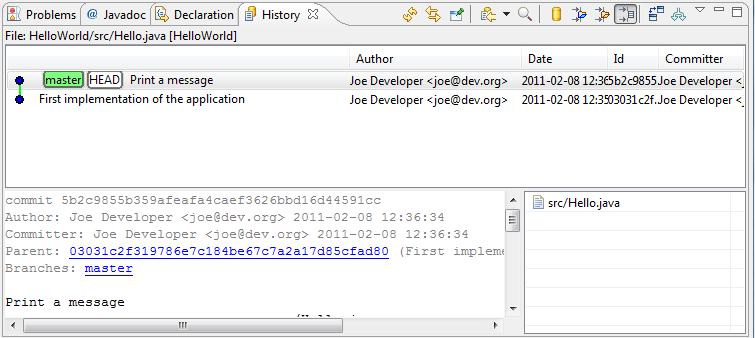
Inspect History
- Click Team > Show in History from the context menu to inspect the history of a resource:
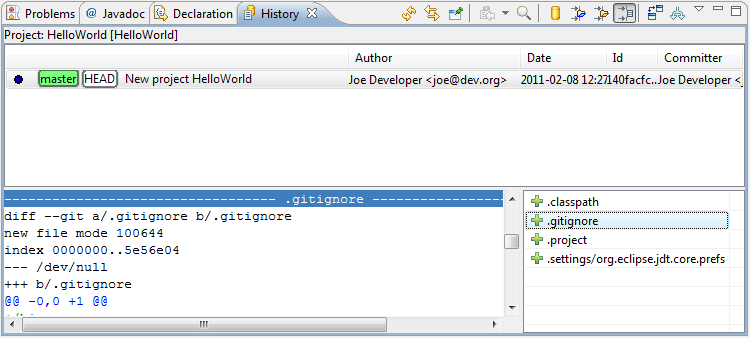
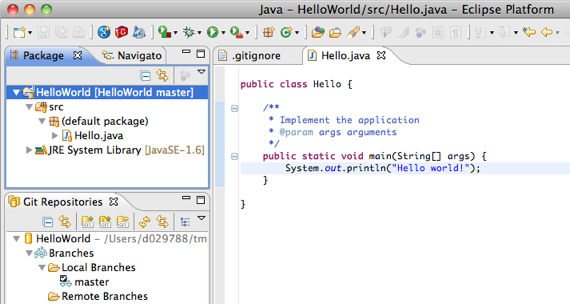
- Create a new Java class
Hello.javaand implement it. - Add it to version control and commit your change.
- Improve your implementation and commit the improved class.
- The resource history should now show 2 commits for this class.
- Click the Compare Mode toggle button in the History View.
- Double click
src/Hello.javain the Resource list of the History View to open your last committed change in the Compare View.
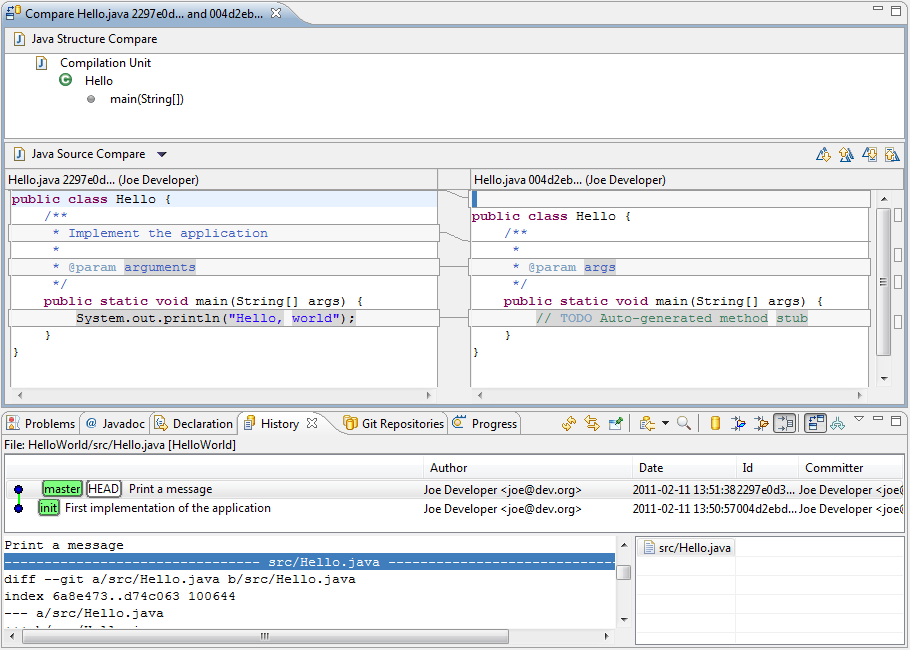
Congratulations, you just have mastered your first project using Git !
GitHub Tutorial
Create Local Repository
- follow EGit/User Guide/Getting Started to create a new local repository (with your content instead of the demo project).
Create Repository at GitHub
- create a new repository at GitHub:
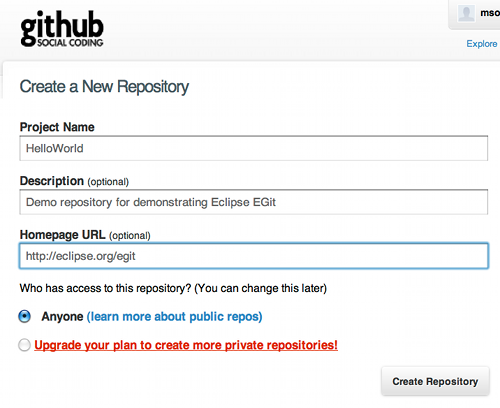
On the next screen you can see the URLs you may use to access your fresh new repository:
- click SSH to choose the SSH protocol. It can be used for read and write access.
- click HTTP to choose the HTTP protocol. It can also be used for read and write access.
- click Git Read-Only to choose the anonymous git protocol for cloning. It's the most efficient protocol git supports. Since thegit protocol doesn't support authentication it's usually used to provide efficient read-only access to public repositories.

Eclipse SSH Configuration
- Open the Eclipse Preferences. Navigate to and expand the Network Connections option and select SSH. Ensure that your SSH2 home is configured correctly (usually this is~/.ssh) and contains your SSH2 keys:
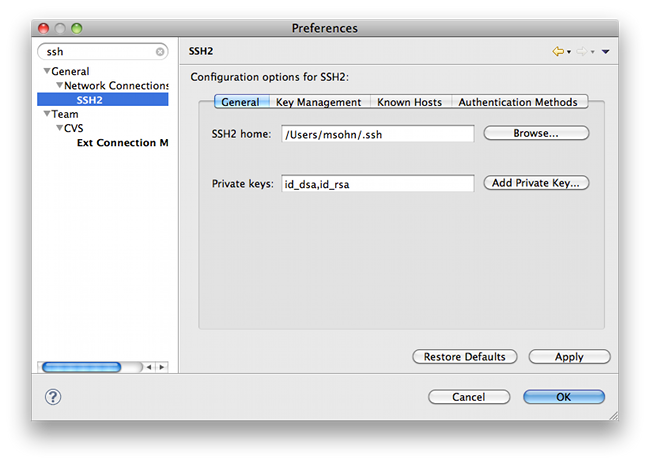
- if you don't have SSH keys yet you may generate them on the second tab of this dialog (Key Management). Use a good pass phrase to protect your private key, for more details see"working with key passphrases".
- upload your public SSH key to your GitHub account settings.
Further information about advanced SSH configuration (such as using Putty or another SSH agent with EGit) is available in theEGit FAQ (section SSH).
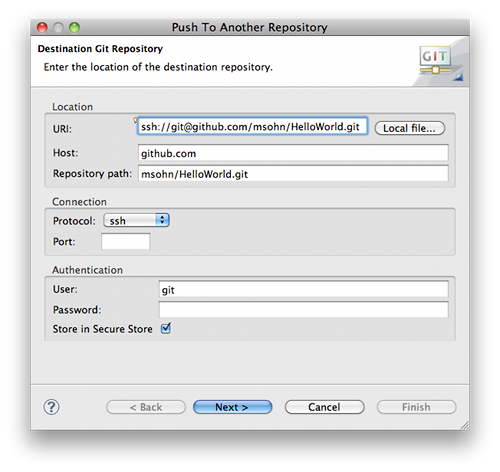
Push Upstream
- Click Team > Remote > Push... and copy and paste the SSH URL of your new GitHub repository.
- If you are behind a firewall which doesn't allow SSH traffic, use the GitHub HTTPS URL instead and provide your GitHub user and password instead of using the uploaded public SSH key. To store your credentials into the Eclipse secure store clickStore in Secure Store.
- Note: many HTTP proxies are configured to block HTTP URLs containing a user name, since disclosing a user name in an HTTP URL is considered a security risk. In that case remove the user name from the HTTP URL and only provide it in the user field. It will be sent as an HTTP header.
- Click Next and on first connection accept GitHub's host key.
- Enter your SSH key's passphrase and click OK.
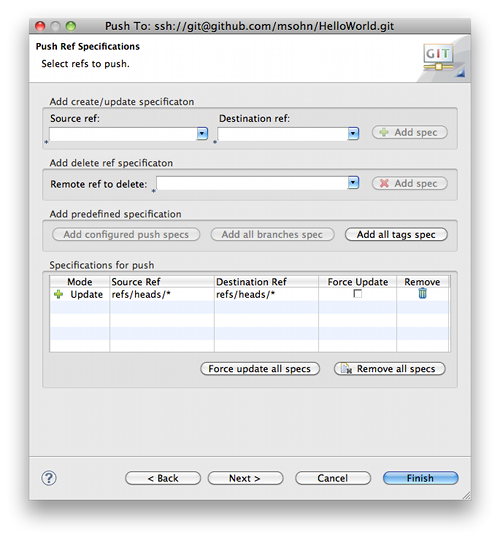
- On the next wizard page click Add all branches spec to map your local branch names to the same branch names in the destination repository (on a one-to-one basis).
- Click Next. The push confirmation dialog will show a preview of the changes that will be pushed to the destination repository.
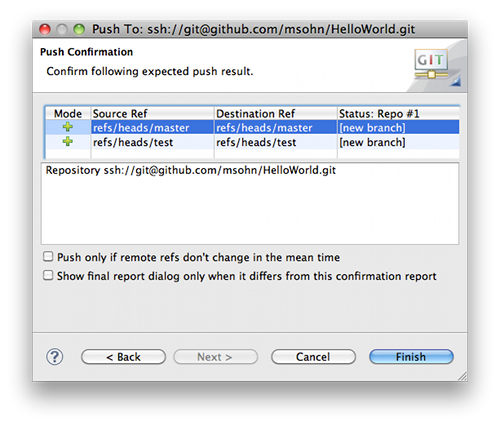
- Click Finish to confirm that you want to push these changes.
- The next dialog reports the result of the push operation.
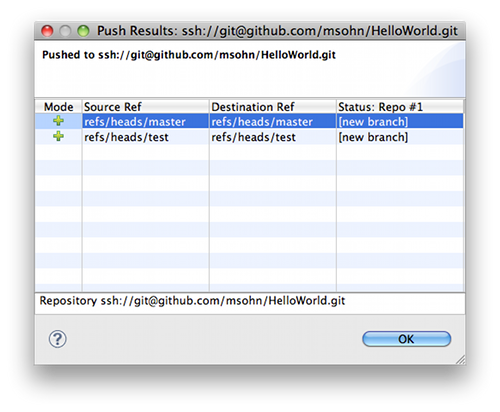
- Point your browser at your GitHub repository to see that your new repository content has arrived.

- eclipse 与git 整合 Egit 用户指南
- 利用eclipse的git插件EGit与git@osc交互
- 利用eclipse的git插件EGit与git@osc交互
- 利用eclipse的git插件EGit与git@osc交互
- 利用eclipse的git插件EGit与git@osc交互
- EGit /用户指南
- Git with Eclipse (EGit) - Tutorial
- Eclipse安装git插件EGit
- Eclipse安装git插件EGit
- Eclipse安装git插件EGit
- Eclipse安装git插件EGit
- Eclipse集成Git插件EGit
- Eclipse上GIT插件EGIT使用手册
- Eclipse上GIT插件EGIT使用手册
- Eclipse上GIT插件EGIT使用手册
- Eclipse上GIT插件EGIT使用手册
- Eclipse上GIT插件EGIT使用手册
- Eclipse上GIT插件EGIT使用手册
- 局域网DNS劫持
- Glide-通过Modules定制Glide
- 效率提升工具--高级剪贴板Ditto
- Java内存模型与线程
- Openlayers之图形绘制
- eclipse 与git 整合 Egit 用户指南
- jQuery 选择器 - 1
- springmvc中的数据校验
- linux部分指令演示
- oracle 每日一题-function.RETURN语句
- C++11新特性——大括号初始化
- 蓝桥杯 2014 5 重复模式
- 解析Linux下的stat命令
- 糟糕的畢業季