CoordinatorLayout剖析
来源:互联网 发布:windows osx u盘制作 编辑:程序博客网 时间:2024/06/03 17:12
简介
MaterialDesign作为Android平台的应用设计规范,相信大家都有一定的了解,本文就以其中最为重要的一个控件CoordinatorLayout,结合源码做下剖析。阅读本文要求:1、熟悉Android控件绘制,2、了解动画,3、You`re a fucking kind person。本文所示源码版本是25.1.0。本文欢迎转载,不需要注明出处。
基本使用
CoordinatorLayout这个布局的作用,诚如其文档里描述的:
1.As a top-level application decor or chrome layout2.As a container for a specific interaction with one or more child views通常我们使用它来作为界面布局的根节点(本文中的“布局根节点”都指的布局文件中的),用以实现MaterialDesign中的众多效果。
绘制流程
分析一个控件,自然少不了分析它的绘制流程,话不多说,现在就先来看看吧。
一、measure
protected void onMeasure(...) { prepareChildren(); ... final int childCount = mDependencySortedChildren.size(); for (int i = 0; i < childCount; i++) { final View child = mDependencySortedChildren.get(i); ... final LayoutParams lp = (LayoutParams) child.getLayoutParams(); ... final Behavior b = lp.getBehavior(); if (b == null || !b.onMeasureChild(...)) { onMeasureChild(...); } ... } ... setMeasuredDimension(width, height); }其中mDependencySortedChildren其实是子控件集合,是由方法prepareChildren()初始化的;lp其实是一个CoordinatorLayout.LayoutParam对象,因为CoordinatorLayout有重写generateLayoutParams()、generateDefaultLayoutParams()、checkLayoutParams()方法;而接下来的关于Behavior的条件判断也很好理解,众所周知,ViewGroup类型的控件的测量过程有一个重要的任务,就是测量子控件的大小,在CoordinatorLayout中,我们可以看出,测量子控件这个任务是交由子控件的Behavior对象处理,而并不是子控件自身的onMeasure()方法,当然如果Behavior不处理,即Behavior.onMeasureChilde()返回false,才由CoordinatorLayout.onMeasureChiild()处理,而后者其实只是使用ViewGroup的逻辑;方法最后自然是要调用setMeasuredDimension()来设置CoordinatorLayout自身的大小。这里关于Behavior后文会有更详细的描述,同时你也许还会对mDependencySortedChildren集合有疑问,这个也放在后文描述。
二、layout
protected void onLayout(...) { ... final int childCount = mDependencySortedChildren.size(); for (int i = 0; i < childCount; i++) { final View child = mDependencySortedChildren.get(i); ... final LayoutParams lp = (LayoutParams) child.getLayoutParams(); final Behavior behavior = lp.getBehavior(); if (behavior == null || !behavior.onLayoutChild(...)) { onLayoutChild(child, layoutDirection); } } }布局过程和测量过程一样,也是把子控件的布局逻辑优先交给Behavior处理。同上Behavior后文会有更详细的分析,这里暂且略过。那么就直接来看看CoordinatorLayout.onLayoutChild()是如何布局子控件的:
public void onLayoutChild(...) { final LayoutParams lp = (LayoutParams) child.getLayoutParams(); ... if (lp.mAnchorView != null) { layoutChildWithAnchor(...); } else if (lp.keyline >= 0) { layoutChildWithKeyline(...); } else { layoutChild(...); } }方法里的3个layoutChildxxx()方法,功能都是一样的:计算子控件布局位置,调用child.layout()方法布局子控件。layoutChildWithAnchor()是根据锚控件确定位置,“锚控件”其实是CoordinatorLayout中的一种子控件间的依赖关系,这个在后文会的更详细的描述;layoutChild()是根据父控件确定位置;而layoutChildWithKeyline()则是根据keyline确定位置。前俩种方案,无论是锚控件还是父控件的位置都是已经确定了的,只要再结合其它如gravity、margin、padding等值能很好地计算出;那么接下来,我自然要解释下keyline是什么了。
keyline是MaterialDesign中一个非常好的布局解决方案,具体的定义可以参阅Keylines and spacing和Ratio keylines ,怎么使用我就不多赘述,这里我说说怎么实现这个特性的,不过,这里确有一个很大的遗憾:
private void layoutChildWithKeyline(...) { ... int left = getKeyline(keyline) - childWidth; int top = 0; ... child.layout(left, top, left + childWidth, top + childHeight); } ... private int getKeyline(int index) { ... return mKeylines[index]; }mKeylines数组存储就是在资源中定义好的keyline值,当然到这一步已经转换为像素了。而从int top = 0;可以看出来,我前面说的遗憾就是垂直方向的keyline并没有实现,相信大家在使用的时候就有所体会了,至于为什么,却是不得而知了。不过,即使CoordinatorLayout没有提供直接的解决方案,我们也是可以实现的。水平方向的用margin、padding;垂直方向可以用百分比布局。所以若界面设计真是以keyline布局的话,也是可以实现的。就目前而言,笔者认为keyline实为鸡肋。
三、draw
CoordinatorLayout的绘制过程就真没什么可以讲的了,还是延用着ViewGroup的绘制策略。
事件
关于事件分发的机制,在这里就不着笔墨了,我们还直接看看CoordinatorLayout是如何处理的吧。下面是事件拦截的逻辑:
private boolean performIntercept(...) { ... getTopSortedChildren(topmostChildList); // Let topmost child views inspect first final int childCount = topmostChildList.size(); for (int i = 0; i < childCount; i++) { ... if (!intercepted && b != null) { switch (type) { case TYPE_ON_INTERCEPT: intercepted = b.onInterceptTouchEvent(...); break; case TYPE_ON_TOUCH: intercepted = b.onTouchEvent(...); break; } if (intercepted) { mBehaviorTouchView = child; } } ... } ... return intercepted; }显然CoordinatorLayout是否拦截事件,不是由自己决定的,也是交给Behavior处理。上面代码中的b就是子控件的Behavior对象。这里可以提前说下的是,Behavior的默认实现里onInterceptTouchEvent()与onTouchEvent()都返回false,也就是不拦截、不处理事件。getTopSortedChildren()的作用是对子控件排序,排序依据是子控件的elevation值,也就是控件的z轴的值。事件优先交给z值大的控件处理,并且一旦有子控件消费了事件,那么个事件就不会再传递给其它“更矮”的子控件了;这个消费了事件的子控件就叫mBehaviorTouchView。这个也正好契合MaterialDesign的设计理念。分析到这里,笔者多说下,关于这里排序的感受:前面说过在绘制过程中,CoordinatorLayout依然延用ViewGroup的绘制策略:根据布局文件自上而下,那为什么不和这里一样,根据elevation值来确定绘制顺序呢,不知各位又是何感想?好了,接下来看看onTouchEvent()方法:
public boolean onTouchEvent(MotionEvent ev) { ... if (mBehaviorTouchView != null...) { ... final LayoutParams lp = (LayoutParams) mBehaviorTouchView.getLayoutParams(); final Behavior b = lp.getBehavior(); if (b != null) { handled = b.onTouchEvent(...); } } // Keep the super implementation correct if (mBehaviorTouchView == null) { handled |= super.onTouchEvent(ev); } ... }在之前的performIntercept()方法里可以看到,事件只会被CoordinatorLayout的子控件拦截,所以,这里自然也是优先把事件传递给“拦截者”——mBehaviorTouchView处理了。
除了上面提到的这些方法外,CoordinantorLayout还实现了在5.0引入的嵌入滑动机制,不过关于这个机制,本文就不多赘述了。CoordinantorLayout重写了一系列的“onNested”方法,这里我只贴出一个,因为它们的逻辑大体都是相同的:
public boolean onStartNestedScroll(...) { ... for (int i = 0; i < childCount; i++) { ... viewBehavior.onStartNestedScroll(...); ... } ... }可以看出也是交给子控件的Behavior对象处理了。
以上便是CoordinatorLayout的绘制过程了,显然大部分逻辑都是交给Behavior处理了。
mDependencySortedChildren
我们知道,ViewGroup类型的控件把它的子控件都存储在了成员变量ViewGroup.mChildren这个数组中,这个数组中的元素,通常根据布局文件从上到下填充元素(其实是addView()方法);而CoordinatorLayout定义了一个新的子控件集合,就是mDependencySortedChildren,填充这个集合时,需要依据子控件间的依赖关系。具体是个什么,来看看方法:
private void prepareChildren() { ... for (int i = 0, count = getChildCount(); i < count; i++) { final View view = getChildAt(i); ... mChildDag.addNode(view); ... for (int j = 0; j < count; j++) { ... final LayoutParams otherLp = ... if (otherLp.dependsOn(this, other, view)) { ... mChildDag.addEdge(view, other); } } } // Finally add the sorted graph list to our list mDependencySortedChildren.addAll(mChildDag.getSortedList()); // We also need to reverse the result since we want the start of the list to contain // Views which have no dependencies, then dependent views after that Collections.reverse(mDependencySortedChildren); }上面就是在CoordinatorLayout的measure过程中调用的确定mDependencySortedChildren集合的方法。mDependencySortedChildren只是一个简单的线性表,子控件间的依赖关系其实是由mChildDag集合确定后,再给mDependencySortedChildren的。mChildDag的结构是一个有向无环图,这里笔者不会深入介绍这个结构的,就简要说明下便可:“edge”依赖于“node”,上面代码中第一层for循环把所有子控件添加到mChildDag中作为“node”,第二层for循环判断其它子控件与当前子控件是否存在依赖关系,若存在,就添加到对应“node”的“edge”中。依赖关系的确定是由方法CoordinatorLayout.LayoutParams.dependsOn()决定的:
boolean dependsOn(...) { return dependency == mAnchorDirectChild || shouldDodge(...) || (...mBehavior.layoutDependsOn(...)); }判断依据一共有3种。第一种是锚控件判断,mAnchorDirectChild是当前子控件的锚控件;第二种“dodge”特性相信很少有人使用过,它指的控件间的规避策略,通过该特性可以实现类似于相对布局中的“align”特性,相关的布局属性有layout_insetEdge和layout_dodgeInsetEdges大家不妨去实际感受下,个人觉得是很不错的一个特性;第三种是由Behavior对象来判断的,下面是AppBarLayout.ScrollingViewBehavior.layoutDependsOn()方法:
public boolean layoutDependsOn(...) { return dependency instanceof AppBarLayout; }上面方法说明,所有指定Behavior对象为ScrollingViewBehavior的子控件都依赖于AppBarLayout。
回到prepareChildren()中,整个流程便是:由mChildDag先确定好依赖关系,再对其做拓扑排序,然后将结果添加到mDependencySortedChildren集合中,最后做下倒序。为何要做倒序,注释里也有说明,不过那是目的,原因在于上一步的拓扑排序,下面是DirectedAcyclicGraph中的排序方法:
private void dfs(final T node, final ArrayList<T> result, final HashSet<T> tmpMarked) { if (result.contains(node)) { // We've already seen and added the node to the result list, skip... return; } if (tmpMarked.contains(node)) { throw new RuntimeException("This graph contains cyclic dependencies"); } // Temporarily mark the node tmpMarked.add(node); // Recursively dfs all of the node's edges final ArrayList<T> edges = mGraph.get(node); if (edges != null) { for (int i = 0, size = edges.size(); i < size; i++) { dfs(edges.get(i), result, tmpMarked); } } // Unmark the node from the temporary list tmpMarked.remove(node); // Finally add it to the result list result.add(node); }在调用mChildDag.getSortedList()的时候,上面的排序方法会被调用到。不过,我这里只说结论,讲算法笔者不擅长。显然这是基于深度优先搜索的拓扑排序,最后得到的是一个去重后的线性序列,并且“edge”在“node”之前。但是我们必须先处理依赖项,比如,A依赖于B,则要先计算B的位置,才能计算A的位置。这就是上面做倒序的原因所在。
最后举个例子,如下图所示,EF依赖于D:
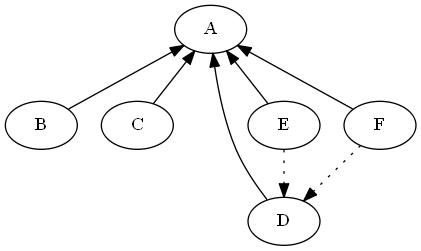
无论addView()先添加哪个控件,保存在mDependencySortedChildren集合中的顺序,D一定在EF之前,DEFBC是其中一种可能的顺序。
以上就是关于在CoordinatorLayout中新的子控件顺序的分析了,在CoordinatorLayout的measure和layout过程都是通过遍历mDependencySortedChildren来处理子控件的,这也就是说,在测量布局当前子控件时,它的依赖项已经先处理过了,如果有的话。关于有向无环图的拓扑排序,有兴趣的可以自己去找资料,就不在本文推荐了。
Behavior
通过上面的分析,我们知道,CoodinatorLayout的功能基本都是由Behavior实现的,这一节笔者就带大家来看看Behavior到底是什么东西。
测量
这里我以AppBarLayout.ScrollingViewBehavior为例,来说明Behavior测量CoordinatorLayout子控件的逻辑。请注意,本小节的说明都是基于为子控件指定的Behavior对象为ScrollingViewBehavior的情况。对于ScrollingViewBehavior而言,真正处理测量的方法在其父类HeaderScrollingViewBehavior中:
public boolean onMeasureChild(...) { ... if (...) { ... final View header = findFirstDependency(dependencies); if (header != null) { ... final int height = availableHeight - header.getMeasuredHeight() + getScrollRange(header); ... parent.onMeasureChild(...); return true; } } return false; }上面方法中的findFirstDependency()查找到的其实就是AppBarLayout,也就是说header是一个AppBarLayout对象,availableHeight通常指的是CoordinatorLayout的高度,getScrollRange()是计算AppBarLayout的可滑动距离的。之所以要加上这个滑动距离,原因要结合布局过程说明,不过这里我可以告诉大家,不加的话,AppBarLayout滑动过程中,依赖于AppBarLayout的控件的布局位置会改变,这样CoordinatorLayout可能出现“留白”区域。下面来看下AppBarLayout的可滑动距离是如何计算的,跟踪进去会调用到AppBarLayout.getTotalScrollRange()方法:
public final int getTotalScrollRange() { ... int range = 0; for (int i = 0, z = getChildCount(); i < z; i++) { ... final int flags = lp.mScrollFlags; if ((flags & LayoutParams.SCROLL_FLAG_SCROLL) != 0) { // We're set to scroll so add the child's height range += childHeight + lp.topMargin + lp.bottomMargin; ... } else { ... } } return mTotalScrollRange = Math.max(0, range - getTopInset()); }上面代码中lp.mScrollFlags指的是为AppBarLayout的子控件指定的滑动方式,比如常给CollapsingToolbarLayout指定的布局属性app:layout_scrollFlags="scroll"。for循环中可以对range做累加,是因为AppBarLayout本身是一个LinearLayout的原故;计算可滑动距离,就是统计有哪些AppBarLayout的子控件是可以滑动的(由layout_scrollFlags判断)。
回到HeaderScrollingViewBehavior的测量子控件方法中,最后一步就是通过parent.onMeasureChild()来设置控件大小。
布局
同样这里我也以AppBarLayout.ScrollingViewBehavior为例,而且布局方法也在其父类HeaderScrollingViewBehavior中:
protected void layoutChild(...) { ... available.set(..., header.getBottom() + lp.topMargin, ..., ...); ... }上面代码被省略了很多,因为都不复杂,一些边检检测、gravity判断,很好理解;我挑出了我认为唯一需要说明的地方。header是AppBarLayout,available是一个Rect对象,指明控件在布局时的可使用空间,这里给定top值为header的bottom值,说明该子控件的位置在AppBarLayout的下方。为了实现AppBarLayout向上滑动时,子控件的bottom值不变,所以在测量过程时会加上AppBarLayout的可滑动距离。
事件及嵌入式滑动
本节我将以AppBarLayout.Behavior为例说明,这个是默认为AppBarLayout设置的Behavior。而把“事件”与“嵌入式滑动”这俩个内容放在一块讲,是因为在AppBarLayout.Behavior中,它们最终都会走到一个地方上去——滑动。
事件拦截及处理方法都在父类HeaderBehavior中,拦截事件的逻辑没什么好讲,下面是事件处理方法:
public boolean onTouchEvent(...) { ... switch (MotionEventCompat.getActionMasked(ev)) { ... case MotionEvent.ACTION_MOVE: { ... if (mIsBeingDragged) { ... scroll(...); } break; } case MotionEvent.ACTION_UP: if (mVelocityTracker != null) { ... fling(...); } ... } ... }其它什么前置事件判断,滑动临界值检测等等步骤,我都略去了。可以说它们都是为上面的scroll()与fling()方法服务,不过现在暂时不作讲解。
接下来要说的是嵌入式滑动了,这些“onNestedXXX”方法,我列出其中重要的俩个:
public void onNestedScroll(...) { if (dyUnconsumed < 0) { ... scroll(..., minOffset, maxOffset); ... } ... } public boolean onNestedFling(...) { ... if (!consumed) { ... flung = fling(...); } ... }笔者在剖析RecyclerView时有讲过,它的滑动分为scroll与fling两种。再看这里的滑动,如出一辙,也是分为scroll与fling,而且fling通过Scroller,最终也会进入scroll流程。在这里最终处理滑动的方法是AppBarLayout.Behavior.setHeaderTopBottomOffset():
int setHeaderTopBottomOffset(...) { ... setTopAndBottomOffset(interpolatedOffset); ... }上面代码跟踪进入会调用到mViewOffsetHelper.setTopAndBottomOffset(offset);方法,mViewOffsetHelper是个工具类,提供方法View.offsetLeftAndRight()和View.offsetTopAndBottom()的兼容方案。它们的源代码我在这是就不分析了,作用就是平移控件。所以,AppBarLayout的滑动其实就是平移。
结束语
没什么好说的。
Written with StackEdit.
- CoordinatorLayout剖析
- CoordinatorLayout
- CoordinatorLayout
- CoordinatorLayout
- CoordinatorLayout
- CoordinatorLayout
- CoordinatorLayout
- CoordinatorLayout
- CoordinatorLayout
- CoordinatorLayout
- CoordinatorLayout
- CoordinatorLayout
- CoordinatorLayout
- CoordinatorLayout
- CoordinatorLayout CollaspingToolBar
- CoordinatorLayout简述
- CoordinatorLayout behavior
- 使用CoordinatorLayout
- activiti 委派和转办
- 一路走来的web前端开发之路
- 文章标题
- 关于NSTimer
- 猜数字游戏
- CoordinatorLayout剖析
- 嵌入式软件设计(4)--ARM程序设计
- 蚂蚁感冒
- org.apache.catalina.core.ContainerBase startInternal 严重: A child container failed during start java.
- OTA升级和Bin包升级
- 第二十六讲项目七 构造菜单
- LeetCode | 453. Minimum Moves to Equal Array Elements
- 解决数据库幻读
- LeetCode之Max Consecutive Ones