Angular4简单入门笔记
来源:互联网 发布:淘宝办理信用卡 编辑:程序博客网 时间:2024/05/16 15:32
刚实习的时候用过AngularJS,那时候真的是连原生JavaScript都不会写,依样画葫芦做了几个管理后台。然后突然换项目了,AngularJS就不写了,感觉前前后后接触了一年多的AngularJS,结果只懂点皮毛。
最近又有个管理后台的需求,决定再拾起,但现在是升级版的Angular了。终于,有机会好好再看一眼Angular了,这次希望能深入一点了解。
本文是笔者在学习开发过程中的总结输出,目的在于让初次接触Angular的开发者对该框架能有整体的认识,并且能快速上手开发工作。
AngularJS VS Angular
AngularJS最大版本号只有1.x,2.x/4.x的版本号都是针对于全新的框架Angular。但不能说Angular和AngularJS一点关系都没有,你看名字这么像,是吧?!回忆一下AngularJS被人念念不忘的特性,双向数据绑定,MVC,指令,服务,过滤器,模块化,脏检查机制,依赖注入,Scope,路由,表单校验等等。
看下AngularJS到Angular的过程中,哪些概念被保留下来,哪些被剔除了(所谓的取其精华,去其糟粕)。
剔除的部分:
- ng-controller指令:控制器主要是业务逻辑的控制部分
- $scope概念:很强大又很复杂
- 数据双向绑定:数据双向流通可能导致数据的震荡(故才有最多检查10次的限制,10次之后还不稳定就报错)
保留/改善的部分:
- 路由嵌套:AngularJS自带的路由系统是不能嵌套路由的,到了Angular你想怎么嵌套就怎么嵌套
- 过滤器(Filter)变成管道(Pipe),概念的变化
- 依赖注入机制:直接在构造器中注入,还有分层依赖注入的概念
- 指令写法:
- (事件) ng-click变成(click)
- [属性] href = “{{}}”可以写成 [href]
- [(ngModel)]代替以前的ng-model
- *ngFor 代替 ng-repeat,不适用于对象,适用任何有Symbol.iterator属性的数据结构(能用for…of来访问),比如数组,集合等
- *ngIf 代替 ng-if,去掉ng-show,ng-hide
- 对移动端的支持
- 模版,数据绑定,服务,模块,脏检查机制等
新增的部分:
- 组件化:Angular的核心所在
- Typescript作为默认的开发语言
- ZoneJS监听所有(可能导致数据变化)的异步事件
- 支持服务端渲染
Angular Cli
Angular团队为开发者提供了一个开箱即用(out of the box)的脚手架工具:Angular Cli。我们再也不用担心在项目初始化时,要搭建配置一系列的工具,比如webpack,karma,tslint,protractor等。
操作很简单,只要运行如下命令行就搞定了。
![]()
具体的语法教程可参考这里。
安装之后,文件目录如下:
my-dream-app e2e // 端到端测试 app.e2e-spec.ts app.po.ts tsconfig.e2e.json node_modules/... // npm包 src/... // 源码 angular-cli.json // 配置项 .editorconfig // 编辑器配置 .gitignore // git忽略文件配置 karma.conf.js // karma配置 package.json // npm配置 protractor.conf.js // 测试配置项 README.md // 项目说明 tsconfig.json // ts编辑器的配置 tslint.json // tslint配置项我们需要关注的是src文件夹,这里存放我们所有的源代码,开发的时候基本都在src中。
src app // 代码的主要文件夹 app.component.css // 根组件样式 app.component.html // 根组件模版 app.component.spec.ts// 根组件测试 app.component.ts // 根组件脚本 app.module.ts // 根模块 assets // 静态资源 .gitkeep // 保存空文件夹 environments // 环境配置 environment.prod.ts environment.ts favicon.ico // 图标 index.html // 页面主入口 main.ts // 脚本主入口 polyfills.ts // 兼容浏览器 styles.css // 全局css样式 test.ts // 单元测试主入口模块
Angular很重要的概念之一仍然是模块。Angular整个框架就是由很多个模块组成的,而不同的模块需要从不同的地方导入。打开package.json文件,可以看到依赖的angular包可能是这样的:
"@angular/common": "^2.3.1","@angular/compiler": "^2.3.1","@angular/core": "^2.3.1","@angular/forms": "^2.3.1","@angular/http": "^2.3.1","@angular/platform-browser": "^2.3.1","@angular/platform-browser-dynamic": "^2.3.1","@angular/router": "^3.3.1",来简单看下这些angular包中包含了哪些常用的模块(至少目前为止,我觉得常用的)。
- @angular/core:这里包含了很多常用的模块
- NgModule:模块定义装饰器
- Component:组件定义装饰器
- Directive:指令定义装饰器
- Pipe :管道定义装饰器
- PipeTransform:管道接口
- Injectable:服务定义装饰器
- ElmentRef:元素引用
- ViewChild:获取子元素
- Render:渲染
- Input:接受参数输入
- Output:事件输出
- EventEmitter:触发自定义事件
- @angular/common
- CommonModule:通用模块,包含内置指令ngIf,ngFor
- @angular/forms
- FormsModule:定义模版驱动表单
- ReactiveFormsModule:定义响应式表单
- FormGroup, FormArray, FormControl, FormBuilder:响应式表单元素
- Validators:表单校验
- @angular/http
- HttpModule:http请求模块
- @angular/router
- RouterModule 路由模块
- Routes 路由数据结构
- @angular/platform-browser
- platformBrowser:AoT编译
- BrowserModule:浏览器支持,注意该模块导入了CommonModule,然后导出去,所以引用了这个模块也就引用了CommonModule
- @angular/platform-browser-dynamic
- platformBrowserDynamic:JIT编译
以上模块都是Angular框架中的自带模块,而我们开发的完整单元也是模块。一个应用中至少要有一个模块,也就是根模块。 一些共享的功能属性我们可以抽象出来,成为共享模块。然后就是一些特性模块了。
模块的组成由组件,服务,指令,管道等等组成,这些概念会在下面讲到。定义模块的语法如下:
@NgModuel({ declarations: [], // 用到的组件,指令,管道 providers: [], // 依赖注入服务 imports: [], // 导入需要的模块 exports: [], // 导出的模块,跨模块交流 entryComponents: [] // 需提前编译好的模块 bootstrap: [] // 设置根组件})export class AppModule { }所有用到的组件,指令,管道,模块都需要事先在模块中声明好,才能在具体组件中使用。服务可以在模块,组件,指令中的
providers声明,也可以直接在运行时提供(参见Trotyl Yu的例子)。
一般情况下,在根模块的bootstrap中设置启动的根组件即可,但也可以动态处理(参见Trotyl Yu的例子)。
那如何启动根模块呢?
在入口脚本中,也就是Angular Cli项目中的main.ts中,启动如下:
// 导入需要模块import { platformBrowserDynamic } from '@angular/platform-browser-dynamic';// 根模块import { AppModule } from './app/app.module';// 编译启动模块platformBrowserDynamic().bootstrapModule(AppModule);至此,我们对模块有所了解,也知道了模块的定义。
组件
自从采用组件化的React大火之后,目前市面上炙手可热的框架全都采用了组件化的理念,Angular当然也不能落后了。可以说,组件化是Angular的核心理念。按Angular在中国的布道者大漠穷秋的话来说,就是:
Angular的核心概念是组件,模块化机制NgModule是为组件化服务的,实际上所有其它机制都是围绕组件化而来的。只有从组件化这个角度才能把握Angular的精神内核。
组件通常都是由模版和业务逻辑组成,看一下如何用Angular写一个很简单的组件:
// hello.component.tsimport { Component } from '@angular/core';@Component({ selector: 'hello', template: '<p> {{greeting}} </p>', styles: [`p { color: red;}`]})export class HelloComponent{ private greeting: string; constructor(){ this.greeting = 'Hello, Angular2!'; }}// 使用<hello></hello>// 渲染结果<hello> <p> Hello, Angular2! </p> </hello>定义类HelloComponent的时候,加上装饰器@Component(Typescript语法),告诉Angular这个类是组件类。里面的数据称之为元数据(metadata),selector属性说明了该组件对外的使用标记,template就是组件的模版,styles是组件的样式。而HelloComponent中定义的就是该组件的业务逻辑了。
如果模版内容太多,可以单独写在一个html文件中,用templateUrl属性引入;同理,样式文件用styleUrls引入。
组件生命周期
正如其他框架的组件,Angular的组件也是有生命周期这个概念。在不同的阶段不同的场景下,可以调用不同的生命周期函数钩子(hook)。

- constructor:构造器函数,一般用于注入服务
- ngOnChanges:检测到输入数据变化,首次触发发生在ngOnInit前。注意对象的属性发生变化时监听不到
- ngOnInit:组件初始化,通常会设置一些初始值
- ngDoCheck:手动触发更新检查
- ngAfterContentInit:内容初始化到组件之后
- ngAfterContentChecked:内容变更检测之后
- ngAfterViewInit:视图 初始化之后
- ngAfterViewChecked:视图发生变化检测之后,这个可以用来保证用户视图的及时更新
- ngOnDestroy:组件注销时的清理工作,通常用于移除事件监听,退订可观察对象等
具体说明可以参考这里。
组件通信
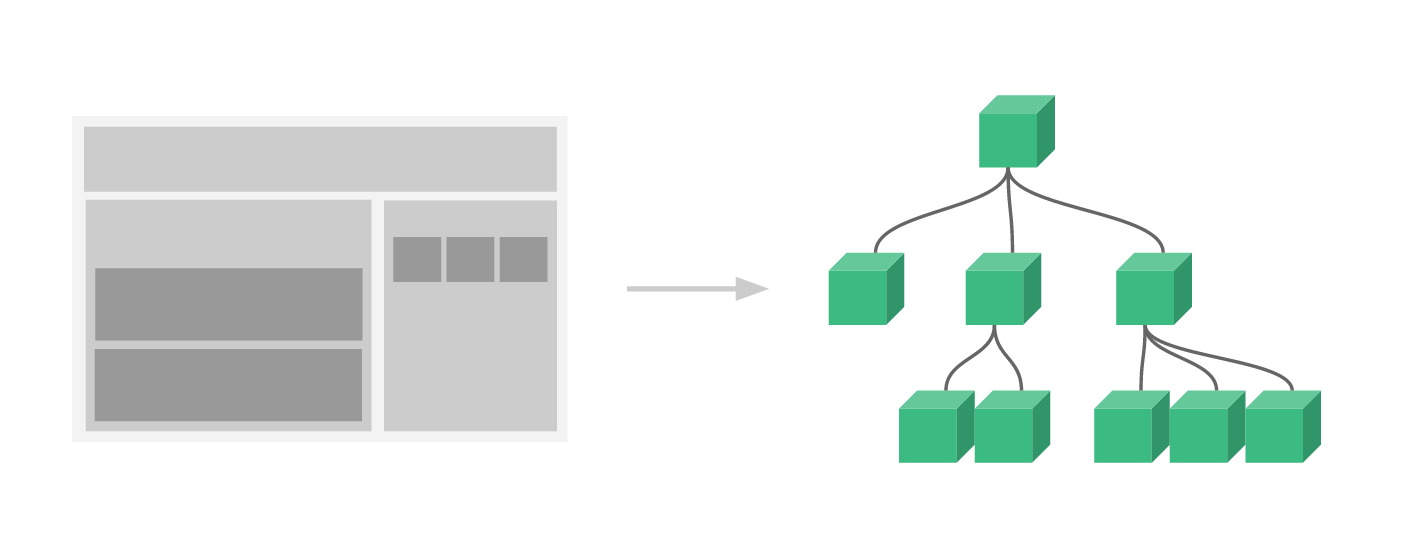
可以想像得到,组件化的页面结构最终会形成一颗组件树。盗一张Vue的图:
不可避免,我们需要考虑父子组件之间的参数传递问题。Anuglar提供的通信方式有如下几种:
- 父组件到子组件:父组件用属性绑定将值传入,子组件通过@Input来接收。
// 父组件import { Component } from '@angular/core'; @Component({ selector: 'hero-parent', template: `<h2> heroes </h2> <hero-child *ngFor="let hero of heroes" [hero]="hero" > </hero-child> `})export class HeroParentComponent { heroes = [{ name: 'John' }, { name: 'Lily' }]; }// 子组件import { Component, Input } from '@angular/core';import { Hero } from './hero';@Component({ selector: 'hero-child', template: ` <h3>{{hero.name}}</h3> `})export class HeroChildComponent { @Input() hero: Hero; }- 子组件到父组件:子组件自定义事件用@Output传出,父组件用事件绑定获取。
// 子组件import { Component, EventEmitter, Output } from '@angular/core';@Component({ selector: 'my-voter', template: ` <h4>{{name}}</h4> <button (click)="vote(true)">Agree</button> `})export class VoterComponent { @Output() onVoted = new EventEmitter<boolean>(); vote(agreed: boolean) { this.onVoted.emit(agreed); }}// 父组件import { Component } from '@angular/core';@Component({ selector: 'vote-taker', template: ` <h2>Should mankind colonize the Universe?</h2> <h3>Agree: {{agreed}}, Disagree: {{disagreed}}</h3> <my-voter *ngFor="let voter of voters" [name]="voter" (onVoted)="onVoted($event)"> </my-voter> `})export class VoteTakerComponent { agreed = 0; disagreed = 0; voters = ['Mr. IQ', 'Ms. Universe', 'Bombasto']; onVoted(agreed: boolean) { agreed ? this.agreed++ : this.disagreed++; }}- 子组件引用:在父组件模版中添加对子组件的引用,即可通过该子组件去访问子组件的方法。
<h3>Countdown to Liftoff (via local variable)</h3><button (click)="timer.start()">Start</button><button (click)="timer.stop()">Stop</button><div class="seconds">{{timer.seconds}}</div><countdown-timer #timer></countdown-timer>- @ViewChild():类似的,也可以在脚本中用@ViewChild()来获取子组件
import { AfterViewInit, ViewChild } from '@angular/core';import { Component } from '@angular/core';import { CountdownTimerComponent } from './countdown-timer.component';@Component({ selector: 'countdown-parent-vc', template: ` <h3>Countdown to Liftoff (via ViewChild)</h3> <button (click)="start()">Start</button> <button (click)="stop()">Stop</button> <div class="seconds">{{ seconds() }}</div> <countdown-timer></countdown-timer> `})export class CountdownViewChildParentComponent implements AfterViewInit { @ViewChild(CountdownTimerComponent) private timerComponent: CountdownTimerComponent; seconds() { return 0; } ngAfterViewInit() { setTimeout(() => this.seconds = () => this.timerComponent.seconds, 0); } start() { this.timerComponent.start(); } stop() { this.timerComponent.stop(); }}- 将数据保存在服务中
- @ngrx/store:参见【译】手把手教你用ngrx管理Angular状态
模板与数据绑定
模版说白了就是html的内容,常规的html基本都是静态内容,而模版结合了框架中的新语法使得html动态化。来看看Angular中的模版有什么便利的语法:
- 插值绑定:双花括号
{{}}
我们可以看到上一节组件例子中的{{greeting}}就是插值绑定。不仅可以获取变量的值,还可以直接写表达式。
- 属性(Property)绑定
<input [value]='myData'>还有其他的,比如样式绑定:
<div [ngClass]="{special: isSpecial}"></div>注意点:property和attribute不一样,想要绑定attribute,你需要写成property。比如:
<tr><td colspan="{{1 + 1}}">Three-Four</td></tr>你将会得到如下错误信息:
Template parse errors:Can't bind to 'colspan' since it isn't a known native property你需要改写成这样:
<tr><td [attr.colspan]="1 + 1">One-Two</td></tr>// 或者<tr><td attr.colspan="{{1 + 1}}">One-Two</td></tr>- 事件绑定
<input (keyup)='handle($event)' >可以是原生的事件:click,change,keydown,mousemove等,也可以是自定义事件,也可以是指令事件,比如ngSubmit。
- 双向绑定
<input [(ngModel)] = 'data'>// 双向绑定的背后其实是单向绑定和事件触发,等价于下面<input [ngModel]="data" (ngModelChange)="data=$event">注意点:使用ngModel,需要引入FormsModule模块。
还有些内置的指令:
- 模版引用变量(# / ref-)
可以在元素上用#或者ref-前缀来标记这个元素,然后在其他地方引用。
<input #fax placeholder="fax number">( <input ref-fax placeholder="fax number"> )<button (click)="callFax(fax.value)">Fax</button>- *ngIf:控制内容的有无
<div *ngIf="show"> Can you see this? </div>如果还有else部分,可以如下操作:
<div *ngIf="show; else elseBlock"> Can you see this? </div><ng-template #elseBlock> else block </ng-template>+ *ngFor:循环
<div *ngFor="let hero of heroes; let i=index> {{i}}: {{hero.name}}</div>具体的模版语法可以参考这里。
路由
一个模块有了多个组件之后,需要用路由来配置哪个url呈现哪个组件。
首先,我们需要在入口页面的index.html中配置根路径:
...<head><base href="/">...</head>...然后创建一个路由模块:
import { NgModule } from '@angular/core';import { RouterModule, Routes } from '@angular/router';...// 路由配置const appRoutes: Routes = [ { path: 'home', component: HomeComponent }, { path: 'heroes', component: HeroesComponent }, { path: '', redirectTo: '/home', pathMatch: 'full' }, { path: '**', component: PageNotFoundComponent }];@NgModule({ imports: [ RouterModule.forRoot(appRoutes) ], exports: [ RouterModule ]})export class AppRoutingModule {}在主模块中导入配置好的路由模块:
import { NgModule } from '@angular/core';import { BrowserModule } from '@angular/platform-browser';import { FormsModule } from '@angular/forms';...@NgModule({ imports: [ BrowserModule, FormsModule, AppRoutingModule ], declarations: [ AppComponent, HomeComponent, HeroesComponent, PageNotFoundComponent ], bootstrap: [ AppComponent ]})export class AppModule { }而在页面中需要一个容器<router-outlet></router-outlet>去承载:
import { Component } from '@angular/core';@Component({ selector: 'my-app', template: ` <h1>Angular Router</h1> <nav> <a routerLink="/home" routerLinkActive="active">Home</a> <a routerLink="/heroes" routerLinkActive="active">Heroes</a> </nav> <router-outlet></router-outlet> `})export class AppComponent { }上面代码中的routerLink定义了用户点击后的路由跳转,routerLinkActive定义该路由激活时的样式类。
路由上还可以带上一些索引参数:
{ path: 'heroes/:id', component: HeroesComponent },获取的方式:
import { ActivatedRoute, Params } from '@angular/router';...export class a { constructor( private route: ActivatedRoute ) {} // 路由参数 this.route.params}当模块很多,路由也很多的时候,我们可以使用模块懒加载的方式。懒加载的方式也很简单,在配置路由的时候修改如下即可:
const routes: Routes = [ { // 默认转到订单管理 path: '', redirectTo: '/order', pathMatch: 'full' }, { path: 'order', loadChildren: './order/order.module#OrderModule' }, { path: 'warehouse', loadChildren: './warehouse/warehouse.module#WarehouseModule' }, { path: 'statistics/sales', component: SalesComponent }];// 在子模块中用RouterModule.forChildimport { NgModule } from '@angular/core';import { RouterModule } from '@angular/router'; import { OrderComponent } from './order.component';const orderRoutes = [ { path:'', component: OrderComponent }];@NgModule({ imports: [RouterModule.forChild(orderRoutes)], exports: [RouterModule]})export class OrderRoutingModule {}服务与依赖注入
服务是什么概念?可以简单地认为它是一个功能模块,重要在于它是单例对象,并且可以注入到其他的地方使用。
依赖注入是来自后端的概念,其实就是自动创建一个实例,省去每次需要手动创建的麻烦。
在Angular中定义一个服务很简单,主要在类之前加上@Injectable装饰器的功能。这是最常见的依赖注入方式useClass,其他具体参见这里。
import { Injectable } from '@angular/core'; @Injectable() export class Service { counter: number = 0; getData(){ return this.counter++; }}然后在模块的providers中声明:
import { Service } from './service';...@NgModule({ imports: [ ... ], declarations: [ ... ], providers: [ Service ], // 注入服务 bootstrap: [...]})export class AppModule {} 使用的时候需要在构造器中建立关联:
import { Component } from '@angular/core'; import { Service } from './service';...@Component({ selector: 'my-app', templateUrl: './app.component.html', styleUrls: ['./app.component.css']})export class AppComponent { constructor(public service: Service) { // this.service被成功注入 // 相当于 this.service = new Service(); // 然后可以调用服务 this.service.getData(); }}由于该服务是在模块中注入,所以该模块中的所有组件使用这个服务时,使用的都是同一个实例。
除了在模块中声明,还可以在组件中声明。假设AppComponent下还有组件HomeComponent,此时我们在AppComponent中注入这个服务:
import { Component } from '@angular/core'; import { Service } from './service';...@Component({ selector: 'my-app', templateUrl: './app.component.html', styleUrls: ['./app.component.css'], providers: [ Service ], // 注入服务})export class AppComponent { constructor(public service: Service) { // this.service被成功注入 // 相当于 this.service = new Service(); // 然后可以调用服务 this.service.getData(); }}如果HomeComponent也使用了这个服务,那它使用的将是同一个实例。这个可以从Service中的数据变化来看出。
Angular还有个分层依赖注入的概念,也就是说,你可以为任一组件创建自己独立的服务。就像上面的例子,如果想要HomeComponent不和它的父组件同使用一个服务实例的话,只要在该组件中重新注入即可:
...@Component({ selector: 'home', templateUrl: './home.component.html', styleUrls: ['./home.component.css'], providers: [ Service ], // 重新注入服务})export class HomeComponent { ...}对于前后端的接口,通常会写成服务。下面说下请求后端数据这块应该怎么写。在模块这节中提过,http有专门的HttpModule模块处理请求。首先要在模块中导入HttpModule,然后引入http服务,调用相应的请求方法即可。
import { Injectable } from '@angular/core';import { Http } from '@angular/http';import 'rxjs/add/operator/toPromise';@Injectable()export class HttpService { constructor(private http: Http) {} getFromServer():any { return this.http.get(`/data`) .toPromise() .then(res => res.json()) .catch(); }}由于请求返回的对象是个可观察对象,可以转成Promise对象处理。这里需要用到RxJS的toPromise操作符,然后用then去处理返回成功结果,catch处理失败情况。这样就搞定了后端数据的请求了。
RxJS又是另外一个比较高深的话题了,有机会深入学习一下再聊。
指令
Angular的指令概念跟AngularJS的指令差不多,最重要的区别在于Angular中的组件继承指令,算是特殊的指令。我们看下用指令的方式去写组件的简单例子:
import { Directive,Input,ElementRef } from '@angular/core';@Directive({ selector: 'hello'})export class HelloDirective { @Input() name: string; constructor(private el: ElementRef) {} public ngOnInit(): void { this.el.nativeElement.innerText = `hello ${this.name}!`; }}// 使用组件指令<hello name="Yecao"></hello>// 渲染结果<hello> hello, Yecao! </hello>不要忘记在使用前先在模块中声明哦,我觉得这是Angular最烦人的一点。
除此之外,还有属性指令和结构指令,属性指令只改变元素的样式或者行为。要写成属性指令,需要在selector属性中用[]包裹起来。来看简单地例子:
import { Directive, ElementRef, Renderer2 } from '@angular/core'; @Directive({ selector: '[highLight]' }) export class HighLightDirective { constructor(private el: ElementRef, private renderer2: Renderer2) { } ngAfterViewInit() { this.renderer2.addClass(this.el.nativeElement, 'highlight'); } }// 使用属性指令<p highLight> 这一段会高亮显示 </p>结构指令就是模板中提到的*ngIf,*ngFor等指令,它修改了DOM结构。举个例子,重写*ngIf:
import { Directive, Input, ViewContainerRef, TemplateRef } from '@angular/core'; @Directive({ selector: '[myIf]' }) export class MyIfDirective { constructor(private templateRef: TemplateRef<any>, private viewContainer: ViewContainerRef) { } @Input() set appMyIf(condition: boolean) { if (condition) { this.viewContainer.createEmbeddedView(this.templateRef); } else { this.viewContainer.clear(); } } } // 使用结构指令<p *myIf="false"> 这一段不会显示 </p> 管道(过滤器)
管道其实就是过滤器,就是叫法不一致而已。主要用于格式化源数据,而不改变源数据。定义和使用的方式也很简单:
import { Pipe, PipeTransform } from '@angular/core'; /* * 订单取消状态:默认为ALL表示全部,CANCEL表示已取消,NOTCANCEL表示正常*/@Pipe({ name: 'cancelStatus' })export class CancelStatusPipe implements PipeTransform { transform(status:string, blank: boolean):string { const map = { "ALL": "全部", "NOTCANCEL": "正常", "CANCEL": "已取消", "": "暂无", } return blank? '特殊情况': map[status]; }}使用前记得在模块的declarations声明,或者导到共享模块,在共享模块中导出去。使用如下:
{{ "ALL" | cancelStatus }} // 全部{{ "ALL" | cancelStatus: true }} // 特殊情况Angular内置了一些管道:
// 日期 DatePipe{{ expression | date:"MM/dd/yy" }} // 数字 DecimalPipe,digitInfo的组成 {minIntegerDigits}.{minFractionDigits}-{maxfractionDigits}// minIntegerDigits:整数部分保留最小的位数,默认值为1.// minFractionDigits:小数部分保留最小的位数,默认值为0.// maxFractionDigits:小数部分保留最大的位数,默认值为3.{{ expression | number[:digitInfo] }}// 大写{{ expression | uppercase }}// 小写{{ expression | lowercase }}后语
由于篇幅的限制,Angular的每个特性都点到为止,只是讲了一些基本概念和使用方法(我也只会这点而已),让你在项目中会用。还有一块项目中肯定会用到的是表单及其校验,这是个大头,还是放在下一篇单独拎出来说吧。
如果你看到了这里,谢谢你花了那么多时间阅读。最近刚淘了视频,出自这里。 跟大家分享一下,链接: http://pan.baidu.com/s/1c2CGkVY 密码: xwg6。
整体来说,接触Angular2不到一个月的时候,现在项目开发中。简单说下我的学习路径:
- 大致浏览了下有关Angular2的文章,跟Angular1的比较,有个大体的印象
- 看参考资料中的几个视频教程,我觉得蛮不错的,让我对Angular2有个整体的概念
- 参考官网教程做了一下英雄展示板的例子
- 开始上手开发,边开发边去看文档
- 开发的时候可以尝试一些新的知识点,比如多模块,共享模块,路由懒加载,自定义表单验证指令,响应式表单,ngrx状态管理等等
- 总结输出,也就是现在在写的这边博客
参考资料
- Angular官网(英文)
- Angular Cli
- Angular官网(中文)
- 官网英雄展示板例子
- 英文视频教程
- Angular2一小时快速入门
- 大漠穷秋 Angular2 0视频教程
- angularjs 1 和 2区别,这才是Angular2的灵魂!
- Redux你的Angular 2应用–ngRx使用体验
- Angular 4 指令快速入门
本文首发于野草园,转载请注明出处。不当之处,欢迎批评指正!
- Angular4简单入门笔记
- angular4入门笔记
- angular4+笔记
- Angular4学习笔记(一)
- Angular4笔记(二)
- Angular4学习笔记(三)
- Angular4学习笔记(四)
- Angular4学习笔记(五)
- Angular4学习笔记(六)
- Angular4+NodeJs+MySQL 入门-01
- 十分钟入门 Angular4(一)
- Angular4.0开发笔记--01
- Angular4学习笔记之表单
- angular4学习笔记(一)
- Angular4
- Angular4
- JSON简单入门笔记
- Angular4+NodeJs+MySQL 入门-05 接口调用
- fft源码,VS2010上可编译运行
- 面向对象与面向过程的区别
- 提问的力量(一):提问在学习中的价值
- Java面试题全集(中)
- 查看&修改JVM运行参数方法小结
- Angular4简单入门笔记
- 各类排序总结【代码】
- 提问的力量(二):为什么提问不容易?
- 01. Java内存区域&对象处理过程
- 1768:最大子矩阵
- git/repo/gerrit 本地环境搭建(一)
- 判断链表是否带环?若带环求环的长度?若带环求环的入口点?
- 日间、夜间模式切换
- tensorflow API简单整理(四、Graph,Operation&Tensor)