学问Chat UI(1)
来源:互联网 发布:贴吧娘贴吧君分手知乎 编辑:程序博客网 时间:2024/06/05 11:31
由于项目需要,最近开始借鉴学习下开源的Android即时通信聊天UI框架,为此结合市面上加上本项目需求列了ChatUI要实现的基本功能与扩展功能。

融云聊天UI-Android SDK 2.8.0+
为了实现业务与UI分离,分析融云UI部分代码,下面主要从IMKit下的ConversationFragment,RongExtension,plugin包下类实现插件化;
ConversationFragment的UI
简单点来讲,上面是一个LIstView,下面是个带有EditText扩展横向布局器--输入聊天框,如下图所示,相对布局中存在两个id为:rc_layout_msg_list与rc_extension的布局;
本文的重点是分析输入聊天框以及扩展功能插件的代码,涉及到IMLib的代码会跳过,更好的分析UI是如何实现的;

核心容器-RongExtension
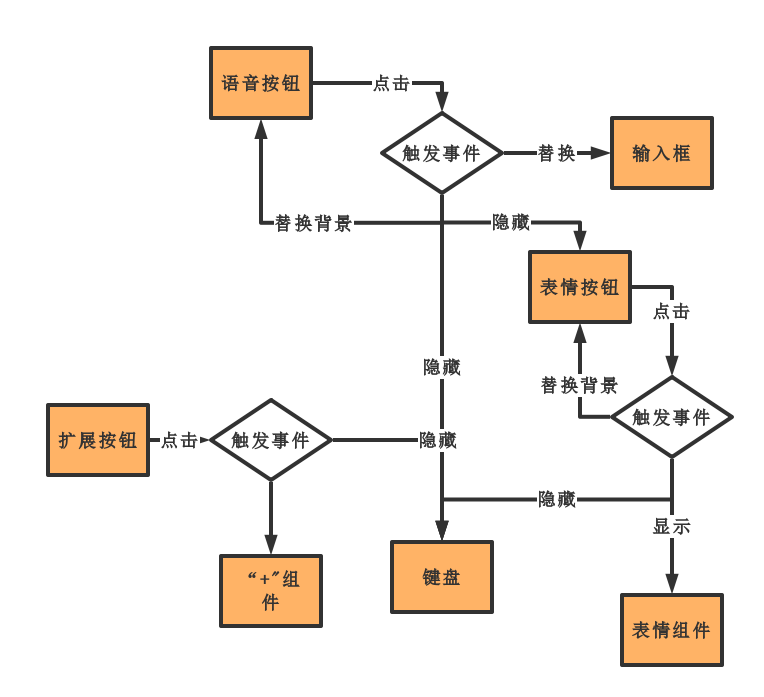
直观的来看布局,它有4个部分组成,语音按钮,输入框,表情按钮,扩展按钮;
四个控件点击事件需要控制其他控件的显示与隐藏,简化图如下:
UI布局
inflate方法
- 首先上面讲的四个控件说起,为啥通过这个分析?能看到并进行操作的是最直观的,也是最容易明白的。由于调用多次inflate方法,这里先讲下inflate,看源码是最快的,RongExtension的initView方法中使用两种重载方法;
很明显第一个方法内部实际是调用了第二个方法,只不过是attachToRoot是根据root的值来得到的。
public View inflate(XmlPullParser parser, @Nullable ViewGroup root) { return inflate(parser, root, root != null); } public View inflate(@LayoutRes int resource, @Nullable ViewGroup root, boolean attachToRoot) { final Resources res = getContext().getResources(); if (DEBUG) { Log.d(TAG, "INFLATING from resource: \"" + res.getResourceName(resource) + "\" (" + Integer.toHexString(resource) + ")"); } final XmlResourceParser parser = res.getLayout(resource); try { return inflate(parser, root, attachToRoot);//核心方法 } finally { parser.close(); } }- inflate内部方法,观察核心的代码,当然这里分为好几种情况,这里分析两种:root!=null&&attachToRoot=true与root==null&&attachToRoot=false,也就是代码中使用的两种情况;
- 若root!=null&&attachToRoot=true则把xml布局添加到root并返回root对象;若root==null&&attachToRoot=false||root==null则返回xml布局对象
public View inflate(XmlPullParser parser, @Nullable ViewGroup root, boolean attachToRoot) { synchronized (mConstructorArgs) { Trace.traceBegin(Trace.TRACE_TAG_VIEW, "inflate"); final Context inflaterContext = mContext; final AttributeSet attrs = Xml.asAttributeSet(parser); Context lastContext = (Context) mConstructorArgs[0]; mConstructorArgs[0] = inflaterContext; View result = root; try { // Look for the root node. int type; while ((type = parser.next()) != XmlPullParser.START_TAG && type != XmlPullParser.END_DOCUMENT) { // Empty } if (type != XmlPullParser.START_TAG) { throw new InflateException(parser.getPositionDescription() + ": No start tag found!"); } final String name = parser.getName(); if (TAG_MERGE.equals(name)) { if (root == null || !attachToRoot) { throw new InflateException("<merge /> can be used only with a valid " + "ViewGroup root and attachToRoot=true"); } rInflate(parser, root, inflaterContext, attrs, false); } else { // 关注下面一部分代码 // Temp is the root view that was found in the xml final View temp = createViewFromTag(root, name, inflaterContext, attrs); ViewGroup.LayoutParams params = null; if (root != null) { if (DEBUG) { System.out.println("Creating params from root: " + root); } // Create layout params that match root, if supplied params = root.generateLayoutParams(attrs); if (!attachToRoot) { // Set the layout params for temp if we are not // attaching. (If we are, we use addView, below) temp.setLayoutParams(params); } } // Inflate all children under temp against its context. rInflateChildren(parser, temp, attrs, true); // We are supposed to attach all the views we found (int temp) // to root. Do that now. xml布局添加到root返回xml布局 if (root != null && attachToRoot) { root.addView(temp, params); } // Decide whether to return the root that was passed in or the // top view found in xml.result 赋值为xml布局对象 if (root == null || !attachToRoot) { result = temp; } } } catch (XmlPullParserException e) { InflateException ex = new InflateException(e.getMessage()); ex.initCause(e); throw ex; } catch (Exception e) { InflateException ex = new InflateException( parser.getPositionDescription() + ": " + e.getMessage()); ex.initCause(e); throw ex; } finally { // Don't retain static reference on context. mConstructorArgs[0] = lastContext; mConstructorArgs[1] = null; } Trace.traceEnd(Trace.TRACE_TAG_VIEW); return result; } }一谈initView
- RongExtension容器继承自线性容器--LinearLayout
- layout.rc_ext_extension_bar布局见下方代码,xml布局总共包含四个控件布局
- id.rc_container_layout是一个FrameLauout,占据中间编辑框部分
- layout.rc_ext_input_edit_text是编辑框,接下来把这个布局加到rc_container_layout中,并显示
layout.rc_ext_voice_input是录取语音按钮布局,调用的方法是
inflate(R.layout.rc_ext_voice_input, this.mContainerLayout, true),根据上面可知这个效果是把录取语音按钮加到mContainerLayout中并返回mContainerLayout对象,那么现在存在两个孩子View,因为Framelayout布局中存在多个子控件会覆盖,因此这个先隐藏起来下面是initView方法代码
this.mExtensionBar = (ViewGroup)LayoutInflater.from(this.getContext()).inflate(R.layout.rc_ext_extension_bar, (ViewGroup)null); this.mMainBar = (LinearLayout)this.mExtensionBar.findViewById(R.id.ext_main_bar); this.mSwitchLayout = (ViewGroup)this.mExtensionBar.findViewById(R.id.rc_switch_layout); this.mContainerLayout = (ViewGroup)this.mExtensionBar.findViewById(R.id.rc_container_layout); this.mPluginLayout = (ViewGroup)this.mExtensionBar.findViewById(R.id.rc_plugin_layout); this.mEditTextLayout = LayoutInflater.from(this.getContext()).inflate(R.layout.rc_ext_input_edit_text, (ViewGroup)null); this.mEditTextLayout.setVisibility(VISIBLE); this.mContainerLayout.addView(this.mEditTextLayout); LayoutInflater.from(this.getContext()).inflate(R.layout.rc_ext_voice_input, this.mContainerLayout, true); this.mVoiceInputToggle = this.mContainerLayout.findViewById(R.id.rc_audio_input_toggle); this.mVoiceInputToggle.setVisibility(GONE); //省略若干代码 this.addView(this.mExtensionBar);下面是rc_ext_extension_bar布局代码
<?xml version="1.0" encoding="utf-8"?><RelativeLayoutxmlns:android="http://schemas.android.com/apk/res/android"android:layout_width="match_parent"android:layout_height="wrap_content"android:minHeight="48dp"><LinearLayout android:id="@+id/ext_main_bar" android:layout_width="match_parent" android:layout_height="wrap_content" android:layout_centerVertical="true" android:gravity="center_vertical" android:orientation="horizontal" android:paddingLeft="6dp" android:paddingRight="6dp"> <!-- “语音” “公众号菜单” 布局--> <LinearLayout android:id="@+id/rc_switch_layout" android:layout_width="wrap_content" android:layout_height="wrap_content" android:orientation="horizontal"> <ImageView android:id="@+id/rc_switch_to_menu" android:layout_width="41dp" android:layout_height="wrap_content" android:layout_gravity="center_vertical" android:layout_marginRight="6dp" android:scaleType="center" android:src="@drawable/rc_menu_text_selector" android:visibility="gone"/> <View android:id="@+id/rc_switch_divider" android:layout_width="1px" android:layout_height="48dp" android:background="@color/rc_divider_line" android:visibility="gone"/> <ImageView android:id="@+id/rc_voice_toggle" android:layout_width="wrap_content" android:layout_height="wrap_content" android:layout_gravity="center_vertical" android:layout_marginLeft="6dp" android:layout_marginRight="6dp" android:src="@drawable/rc_voice_toggle_selector"/> </LinearLayout> <!-- 文本,表情输入容器,通过控制“语音”,容器中填充不同的内容 --> <FrameLayout android:id="@+id/rc_container_layout" android:layout_width="0dp" android:layout_height="wrap_content" android:layout_weight="1" android:paddingTop="3dp" android:paddingBottom="3dp" android:gravity="center_vertical"/> <!-- 扩展栏 “+号” 布局--> <LinearLayout android:id="@+id/rc_plugin_layout" android:layout_width="wrap_content" android:layout_height="wrap_content" android:layout_marginLeft="6dp" android:layout_marginRight="6dp" android:orientation="horizontal"> <ImageView android:id="@+id/rc_plugin_toggle" android:layout_width="wrap_content" android:layout_height="wrap_content" android:src="@drawable/rc_plugin_toggle_selector"/> </LinearLayout></LinearLayout><!-- 底部分割线 --><View android:layout_width="match_parent" android:layout_height="2px" android:layout_alignParentTop="true" android:background="@color/rc_divider_color"/></RelativeLayout>
事件处理--IExtensionClickListener的实现
- 本文开始部分在讲核心容器中做了粗略的图表示按钮事件触发后各个控件改变情况
- 下面看下IExtensionClickListener接口与调用接口方法的代码,重点关注按钮相关事件
1.IExtensionClickListener接口继承自TextWatcher,这个接口包含了文本框变化3个方法
//文本框输入之前 public void beforeTextChanged(CharSequence s, int start, int count, int after); //文本框正在输入 public void onTextChanged(CharSequence s, int start, int before, int count); //文本框输入后 public void afterTextChanged(Editable s);2.IExtensionClickListener接口定义
public interface IExtensionClickListener extends TextWatcher { //发送按钮回调事件 void onSendToggleClick(View var1, String var2); //发送图片回调事件 void onImageResult(List<Uri> var1, boolean var2); //发送地理位置回调事件 void onLocationResult(double var1, double var3, String var5, Uri var6); //语音按钮切换回调事件 void onSwitchToggleClick(View var1, ViewGroup var2); //声音按钮触摸回调事件 void onVoiceInputToggleTouch(View var1, MotionEvent var2); //表情按钮点击回调事件 void onEmoticonToggleClick(View var1, ViewGroup var2); //‘+’按钮点击回调事件 void onPluginToggleClick(View var1, ViewGroup var2); void onMenuClick(int var1, int var2); //文本框点击回调事件 void onEditTextClick(EditText var1); //回调setOnKeyListener事件 boolean onKey(View var1, int var2, KeyEvent var3); void onExtensionCollapsed(); void onExtensionExpanded(int var1); //插件Item点击回调事件 void onPluginClicked(IPluginModule var1, int var2);}阅读全文
0 0
- 学问Chat UI(1)
- 学问Chat UI(2)
- 学问Chat UI(3)
- Chat UI library for Android
- 学问
- CHAT
- CHAT
- chat
- chat
- chat
- chat
- chat
- chat之学习笔记1
- 请客与谈判的学问 1
- Encrypted Chat Room 4_Class Specifications(1)
- 【Word2vec】【Node.js 爬虫】【Sonar 静态代码扫码】【APP UI 自动化测试】 | Chat · 预告
- 爱情学问
- 做人学问
- ubuntu通过apt-get安装JDK8
- IOS逆向之汇编基础
- php使用aws的sns服务初探(主要是短信服务)
- [Leetcode] 403. Frog Jump
- 安卓——问题:AndroidStudio打包的release版本apk在安装时报错
- 学问Chat UI(1)
- java笔记 第二天
- [深度学习之caffe配置] ubuntu下配置caffe框架
- 准备开始考研,当然是计算机啦,写个博客记录记录
- easy_install
- UiAutomator2.0升级填坑记
- 20170811(回朔法复习 二分法复习)
- 解读 Vue 之 Reactive
- 使用协调者布局CoordinatorLayout 来实现ParallaxHeaderViewPager的效果,超简单