C#创建Windows服务与安装-图解
来源:互联网 发布:李刚疯狂java讲义 编辑:程序博客网 时间:2024/05/18 03:48
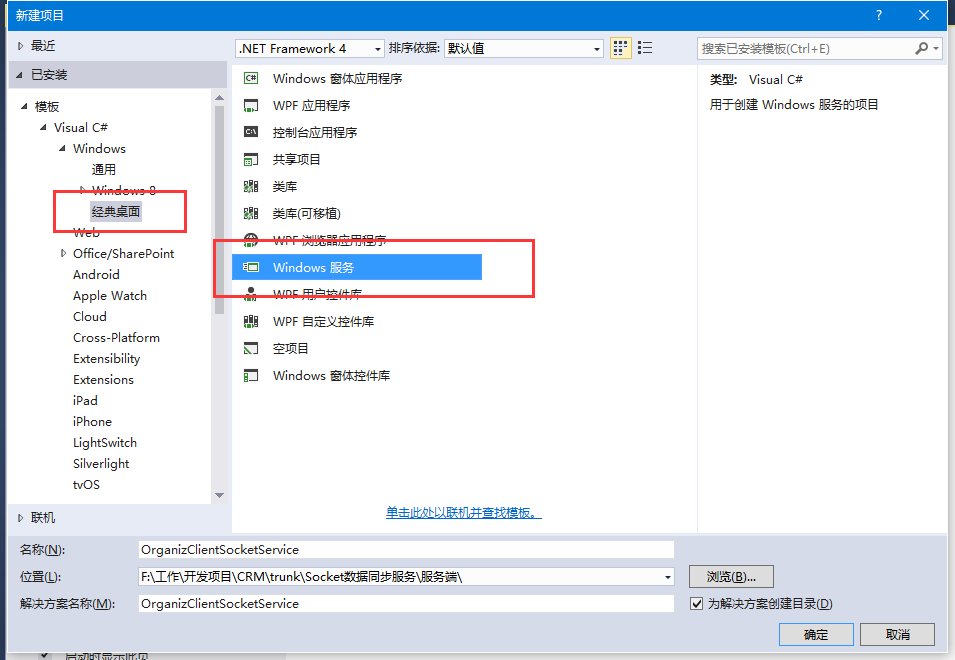
1、新建windows服务项目,我这里选择的是Framework4.0,没有选择高版本是为了防止在服务在一些低版本系统上无法正常运行。
2、添加Windows服务的安装程序。
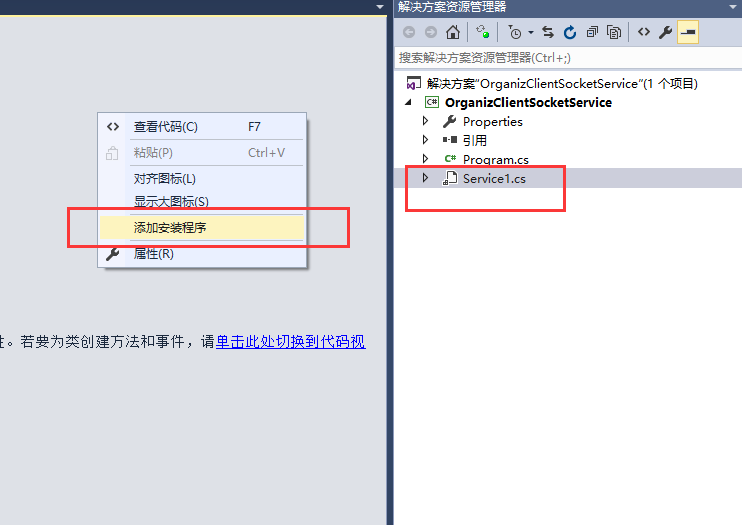
在默认Service1设计器界面空白处点击右键->添加安装程序,系统会自动新建一个带有默认配置的安装程序类,如下图:
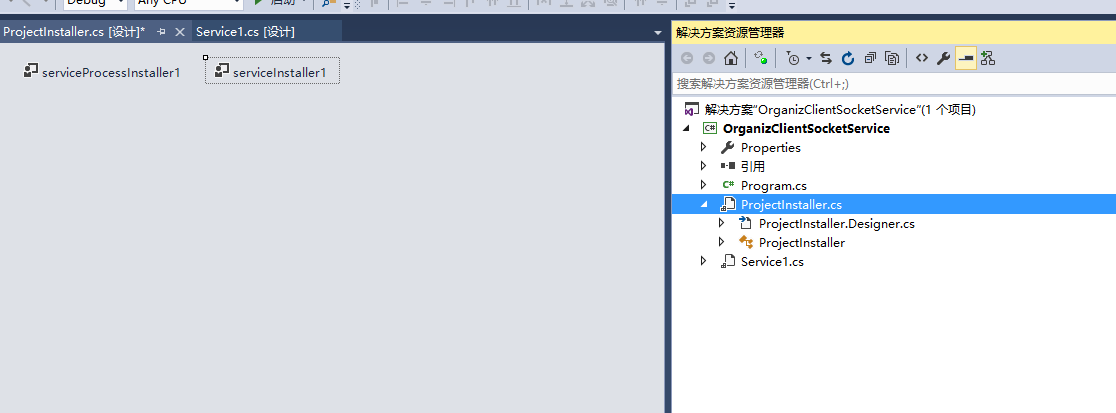
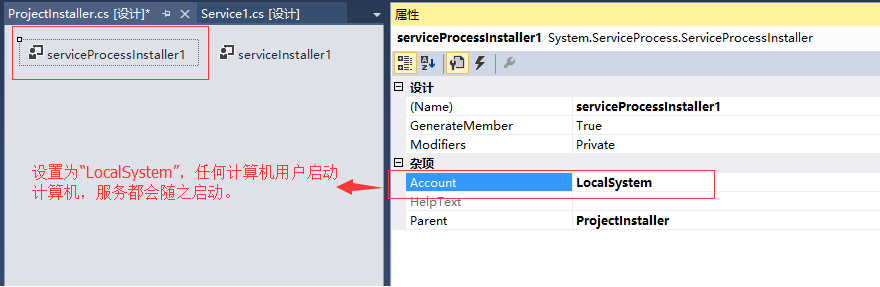
新建完安装程序后,需要给默认的serviceInstaller1和serviceProcessInstaller1做一些基本的属性设置。如下图:
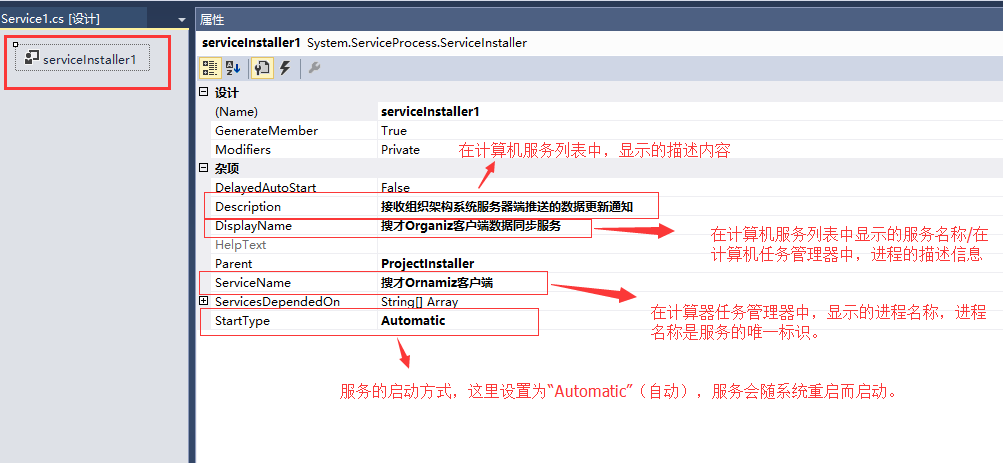
以上工作完成,安装程序配置完毕。
注意:如果不给服务添加安装程序,后面是没法把服务安装至windows系统里的。
3、添加应用程序配置文件(如果有需要的话)。
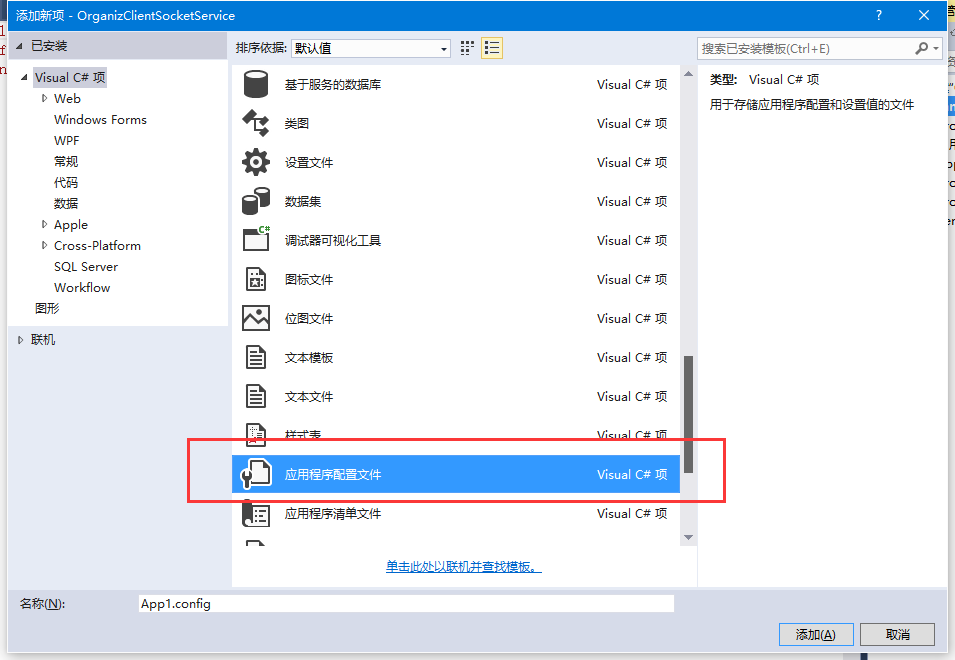
如果项目有需要,一些应用程序的配置参数可以设置在此文件里(例如:数据库连接字符串)。
4、编写windows服务主代码
1
2
3
4
5
6
7
8
9
10
11
12
13
14
15
16
17
18
19
20
21
22
23
24
25
26
27
28
29
30
31
32
33
34
35
36
37
38
39
40
41
42
43
44
45
46
47
48
49
50
51
52
53
54
55
56
57
58
59
60
61
62
63
64
65
66
67
68
69
70
71
72
73
74
75
76
using System;using System.Collections.Generic;using System.ComponentModel;using System.Data;using System.Diagnostics;using System.Linq;using System.ServiceProcess;using System.Text;using System.IO;namespace OrganizClientSocketService{ public partial class Service1 : ServiceBase { public Service1() { InitializeComponent(); System.Timers.Timer timer = new System.Timers.Timer(); timer.Elapsed += new System.Timers.ElapsedEventHandler(TimedEvent); timer.Interval = 5000;//每5秒执行一次 timer.Enabled = true; } //定时执行事件 private void TimedEvent(object sender, System.Timers.ElapsedEventArgs e) { //业务逻辑代码 } protected override void OnStart(string[] args) { this.WriteLog("搜才Organiz客户端数据同步服务:【服务启动】"); } protected override void OnStop() { this.WriteLog("搜才Organiz客户端数据同步服务:【服务停止】"); } protected override void OnShutdown() { this.WriteLog("搜才Organiz客户端数据同步服务:【计算机关闭】"); } #region 记录日志 /// <summary> /// 记录日志 /// </summary> /// <param name="msg"></param> private void WriteLog(string msg) { //string path = @"C:\log.txt"; //该日志文件会存在windows服务程序目录下 string path = AppDomain.CurrentDomain.BaseDirectory + "\\log.txt"; FileInfo file = new FileInfo(path); if (!file.Exists) { FileStream fs; fs = File.Create(path); fs.Close(); } using (FileStream fs = new FileStream(path, FileMode.Append, FileAccess.Write)) { using (StreamWriter sw = new StreamWriter(fs)) { sw.WriteLine(DateTime.Now.ToString() + " " + msg); } } } #endregion }}5、编译生成,安装windows服务至Windows系统。
完成开发后,对整各项目进行编译生成。在windows服务开发文件夹“\bin\Debug”下。
步骤:
1。运行--〉cmd:打开cmd命令框
2。在命令行里定位到InstallUtil.exe所在的位置
InstallUtil.exe 默认的安装位置是在C:\Windows\Microsoft.NET\Framework\v4.0.30319里面,所以你要在cmd里通过cd定位到该位置(cd C:\Windows\Microsoft.NET\Framework\v4.0.30319)
3。操作命令:
1). 安装服务命令:在命令行里输入下面的命令:
InstallUtil.exe  F:\111\WindowsService1\WindowsService1\bin\Debug\WindowsService1.exe
回车即可,如下图:
2).  启动服务命令
net start Service1
ServiceName是真正的Service的名称(ServiceBase.ServiceName),跟.exe的名称可能一样,也可能不一样。如果不清楚,就到已安装的服务里面找到你的服务,右键属性里面看服务名称,如下图:

 此时可以看到服务已经在执行了
3). 停止服务命令
net stop Service1
4). 卸载服务命令:在命令行里输入下面的命令:
InstallUtil.exe /u  F:\111\WindowsService1\WindowsService1\bin\Debug\WindowsService1.exe
,回车即可实例代码:http://download.csdn.net/download/qq736150416/9947351


阅读全文
0 0
- C#创建Windows服务与安装-图解
- C#创建Windows服务与安装-图解
- C#创建Windows服务与安装-图解
- C#创建windows服务图解
- C#创建Windows服务与安装
- C#创建、安装一个Windows服务
- C#创建、安装一个Windows服务
- C#创建、安装一个Windows服务
- C#创建、安装一个Windows服务
- C# Windows服务程序之添加安装程序图解
- C#图解Windows服务的快速搭建与调试
- c# Windows 服务创建与操作
- C# windows服务的创建与调试
- C# windows服务的创建与调试
- C#创建Windows服务
- C#创建Windows服务
- C# 创建 Windows 服务
- C# 创建windows服务
- 一个人的旅行 HDU
- Hadoop常用shell命令
- [JAVA基础]异常、断言、日志和调试
- 【WebService】快速构建WebService示例
- leetcode(310). Minimum Height Trees
- C#创建Windows服务与安装-图解
- HDU 6166 Senior Pan spfa(顶点集间最短路)
- 1864: [Zjoi2006]三色二叉树
- Python中布尔类型
- 8月23日小结
- 为什么不能通过返回值类型区分重载?
- 模板
- USACO最长前缀(trie练习题)
- 【Zookeeper】概述