SSH(第四步)—— 单独配置Hibernate框架到web项目
来源:互联网 发布:蝴蝶折刀淘宝哪里买 编辑:程序博客网 时间:2024/05/20 11:46
From : blog.mwxu16.cn
注意:
点击即可下载:完整的SSH项目整合Demo
一、导包(在第0步导包环节已经导入)
二、创建实体类
这里创建两个实体类:
Customer实体
package cn.mwxu16.domain;public class Customer { private Long cust_id; private String cust_name; private String cust_source; private String cust_industry; private String cust_level; private String cust_linkman; private String cust_phone; private String cust_mobile; public Long getCust_id() { return cust_id; } public void setCust_id(Long cust_id) { this.cust_id = cust_id; } public String getCust_name() { return cust_name; } public void setCust_name(String cust_name) { this.cust_name = cust_name; } public String getCust_source() { return cust_source; } public void setCust_source(String cust_source) { this.cust_source = cust_source; } public String getCust_industry() { return cust_industry; } public void setCust_industry(String cust_industry) { this.cust_industry = cust_industry; } public String getCust_level() { return cust_level; } public void setCust_level(String cust_level) { this.cust_level = cust_level; } public String getCust_linkman() { return cust_linkman; } public void setCust_linkman(String cust_linkman) { this.cust_linkman = cust_linkman; } public String getCust_phone() { return cust_phone; } public void setCust_phone(String cust_phone) { this.cust_phone = cust_phone; } public String getCust_mobile() { return cust_mobile; } public void setCust_mobile(String cust_mobile) { this.cust_mobile = cust_mobile; } @Override public String toString() { return "Customer [cust_id=" + cust_id + ", cust_name=" + cust_name + "]"; }}LinkMan实体
package cn.mwxu16.domain;//联系人实体public class LinkMan { private Long lkm_id; private Character lkm_gender; private String lkm_name; private String lkm_phone; private String lkm_email; private String lkm_qq; private String lkm_mobile; private String lkm_memo; private String lkm_position; //表达多对一关系 private Customer customer ; //---------------------------------------------- //不与数据库中的列对应,只为了接收表单参数 private Long cust_id; public Long getCust_id() { return cust_id; } public void setCust_id(Long cust_id) { this.cust_id = cust_id; } public Customer getCustomer() { return customer; } public void setCustomer(Customer customer) { this.customer = customer; } public Long getLkm_id() { return lkm_id; } public void setLkm_id(Long lkm_id) { this.lkm_id = lkm_id; } public Character getLkm_gender() { return lkm_gender; } public void setLkm_gender(Character lkm_gender) { this.lkm_gender = lkm_gender; } public String getLkm_name() { return lkm_name; } public void setLkm_name(String lkm_name) { this.lkm_name = lkm_name; } public String getLkm_phone() { return lkm_phone; } public void setLkm_phone(String lkm_phone) { this.lkm_phone = lkm_phone; } public String getLkm_email() { return lkm_email; } public void setLkm_email(String lkm_email) { this.lkm_email = lkm_email; } public String getLkm_qq() { return lkm_qq; } public void setLkm_qq(String lkm_qq) { this.lkm_qq = lkm_qq; } public String getLkm_mobile() { return lkm_mobile; } public void setLkm_mobile(String lkm_mobile) { this.lkm_mobile = lkm_mobile; } public String getLkm_memo() { return lkm_memo; } public void setLkm_memo(String lkm_memo) { this.lkm_memo = lkm_memo; } public String getLkm_position() { return lkm_position; } public void setLkm_position(String lkm_position) { this.lkm_position = lkm_position; } }三、创建ORM元数据映射关系配置文件
Customer
<?xml version="1.0" encoding="UTF-8"?><!DOCTYPE hibernate-mapping PUBLIC "-//Hibernate/Hibernate Mapping DTD 3.0//EN" "http://www.hibernate.org/dtd/hibernate-mapping-3.0.dtd";> <!-- 配置表与实体对象的关系 --> <!-- package属性:填写一个包名.在元素内部凡是需要书写完整类名的属性,可以直接写简答类名了. --><hibernate-mapping package="cn.mwxu16.domain" > <!-- class元素: 配置实体与表的对应关系的 name: 完整类名 table:数据库表名 --> <class name="Customer" table="cst_customer" > <!-- id元素:配置主键映射的属性 name: 填写主键对应属性名 column(可选): 填写表中的主键列名.默认值:列名会默认使用属性名 type(可选):填写列(属性)的类型.hibernate会自动检测实体的属性类型. 每个类型有三种填法: java类型|hibernate类型|数据库类型 not-null(可选):配置该属性(列)是否不能为空. 默认值:false length(可选):配置数据库中列的长度. 默认值:使用数据库类型的最大长度 --> <id name="cust_id" > <!-- generator:主键生成策略(明天讲) --> <generator class="native"></generator> </id> <!-- property元素:除id之外的普通属性映射 name: 填写属性名 column(可选): 填写列名 type(可选):填写列(属性)的类型.hibernate会自动检测实体的属性类型. 每个类型有三种填法: java类型|hibernate类型|数据库类型 not-null(可选):配置该属性(列)是否不能为空. 默认值:false length(可选):配置数据库中列的长度. 默认值:使用数据库类型的最大长度 --> <property name="cust_name" column="cust_name" > <!-- <column name="cust_name" sql-type="varchar" ></column> --> </property> <property name="cust_source" column="cust_source" ></property> <property name="cust_industry" column="cust_industry" ></property> <property name="cust_level" column="cust_level" ></property> <property name="cust_linkman" column="cust_linkman" ></property> <property name="cust_phone" column="cust_phone" ></property> <property name="cust_mobile" column="cust_mobile" ></property> </class></hibernate-mapping>LinkMan
<?xml version="1.0" encoding="UTF-8"?><!DOCTYPE hibernate-mapping PUBLIC "-//Hibernate/Hibernate Mapping DTD 3.0//EN" "http://www.hibernate.org/dtd/hibernate-mapping-3.0.dtd";><hibernate-mapping package="cn.mwxu16.domain" > <class name="LinkMan" table="cst_linkman" > <id name="lkm_id" > <generator class="native"></generator> </id> <property name="lkm_gender" ></property> <property name="lkm_name" ></property> <property name="lkm_phone" ></property> <property name="lkm_email" ></property> <property name="lkm_qq" ></property> <property name="lkm_mobile" ></property> <property name="lkm_memo" ></property> <property name="lkm_position" ></property> <!-- 多对一 --> <!-- name属性:引用属性名 column属性: 外键列名 class属性: 与我关联的对象完整类名 --> <!-- 级联操作: cascade save-update: 级联保存更新 delete:级联删除 all:save-update+delete 级联操作: 简化操作.目的就是为了少些两行代码. --> <!-- 多的一方: 不能放弃维护关系的.外键字段就在多的一方. --> <many-to-one name="customer" column="lkm_cust_id" class="Customer" > </many-to-one> </class></hibernate-mapping>四、创建主配置文件
在src路径下创建hibernate.cfg.xml配置文件,并在主配置文件中引入上面的ORM元数据配置文件。
特别注意:
1、在hibernate的主配置文件中,不需要配置隔离级别,因为Spring中会配置。
2、在hibernate的主配置文件中,一定不能配置指定session与当前线程绑定,否则会跟Spring中的配置冲突。
下图所示的两个配置都不能要,必须删除 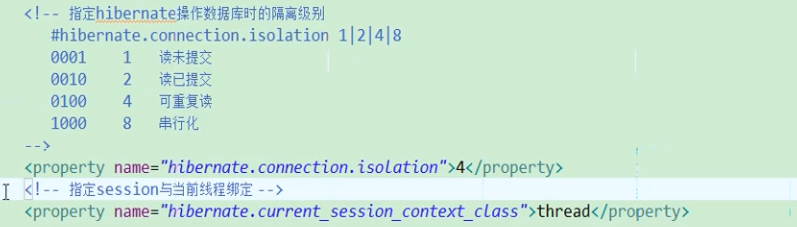
<?xml version="1.0" encoding="UTF-8"?><!DOCTYPE hibernate-configuration PUBLIC "-//Hibernate/Hibernate Configuration DTD 3.0//EN" "http://www.hibernate.org/dtd/hibernate-configuration-3.0.dtd";><hibernate-configuration> <session-factory> <!-- 数据库驱动 --> <property name="hibernate.connection.driver_class">com.mysql.jdbc.Driver</property> <!-- 数据库url --><property name="hibernate.connection.url">jdbc:mysql:///crm_32?characterEncoding=utf-8</property> <!-- 数据库连接用户名 --> <property name="hibernate.connection.username">root</property> <!-- 数据库连接密码 --> <property name="hibernate.connection.password">root</property> <!-- 数据库方言 注意: MYSQL在选择方言时,请选择最短的方言. --> <property name="hibernate.dialect">org.hibernate.dialect.MySQLDialect</property> <!-- 将hibernate生成的sql语句打印到控制台 --> <property name="hibernate.show_sql">true</property> <!-- 将hibernate生成的sql语句格式化(语法缩进) --> <property name="hibernate.format_sql">true</property> <!-- 自动导出表结构. 自动建表 --> <property name="hibernate.hbm2ddl.auto">update</property> <!-- 引入实体配置文件 --> <mapping resource="cn/mwxu16/domain/Customer.hbm.xml" /> <mapping resource="cn/mwxu16/domain/LinkMan.hbm.xml" /> <mapping resource="cn/mwxu16/domain/User.hbm.xml" /> </session-factory></hibernate-configuration>五、测试
创建一个测试类,通过Junit4测试。
测试类如下
package cn.mwxu16.test;import org.hibernate.Session;import org.hibernate.SessionFactory;import org.hibernate.Transaction;import org.hibernate.cfg.Configuration;import org.junit.Test;import cn.mwxu16.domain.User;public class TestHibernate { @Test public void fun1() { //加载配置文件 Configuration conf = new Configuration().configure(); //创建SessionFactoy SessionFactory sf = conf.buildSessionFactory(); //创建session对象 Session session = sf.openSession(); //开启事务 Transaction tx = session.beginTransaction(); User u = new User(); u.setUser_code("tom"); u.setUser_name("汤姆"); u.setUser_password("12345"); session.save(u); //提交事务 tx.commit(); //关闭资源 session.close(); sf.close(); }}运行测试,若成功的在crm_32数据库中,创建了3个数据表(主配置文件配置的是自动建表),并且在sys_user表中存储了一条记录(上面测试类存储的一个用户)。
则说明Hibernate框架配置成功了。
阅读全文
0 0
- SSH(第四步)—— 单独配置Hibernate框架到web项目
- SSH(第二步)—— 单独配置Struts2框架到web项目
- SSH(第一步)—— 单独配置Spring框架到web项目
- SSH与SSM学习之SSH整合05——单独配置Hibernate
- web项目 ehcache 单独配置
- SSH(第五步)—— 整合Hibernate和Spring
- SSH:Hibernate框架(Hibernate注解配置)
- flask web开发:主程序从单文件到多文件的转化——第四步
- SSH:Hibernate框架(Hibernate继承关系映射及配置)
- ssh框架web的配置
- Java Web学习总结(28)——Java Web项目MVC开源框架SSH和SSM比较
- SSH框架项目配置步骤
- SSH与SSM学习之SSH整合02——单独配置Spring容器
- SSH与SSM学习之SSH整合03——单独配置Struts2
- ssh学习:hibernate环境配置及开发步聚
- Java Web SSH-Hibernate框架复习
- SSH框架之Hibernate(1)——映射关系
- SSH框架——整合Demo(Struts、Spring、Hibernate)
- 通过Tomcat配置、启动Springboot项目war包程序
- SSH(第三步)—— 整合Struts2和Spring
- windows 根据HWND获取进程名字 和结束进程源码
- django一个project中使用多个数据库
- win10 hyper-v安装kali linux
- SSH(第四步)—— 单独配置Hibernate框架到web项目
- opengl从画三角形到画一个立方体(一)
- XCode9 拖入文件 不自动添加 compile sources
- 给定一个数组和滑动窗口的大小,找出所有滑动窗口里数值的最大值。
- Java面试题及解析
- python3类
- 学生信息管理系统总结
- 3、HTML 学习记录——元素、属性
- 允许部分页面横竖屏