【设计模式】服务定位器模式(Service Locator Pattern)
来源:互联网 发布:高考奇迹知乎 编辑:程序博客网 时间:2024/06/11 01:18
服务定位器模式
服务定位器模式(Service Locator Pattern)用在我们想使用 JNDI 查询定位各种服务的时候。考虑到为某个服务查找 JNDI 的代价很高,服务定位器模式充分利用了缓存技术。在首次请求某个服务时,服务定位器在 JNDI 中查找服务,并缓存该服务对象。当再次请求相同的服务时,服务定位器会在它的缓存中查找,这样可以在很大程度上提高应用程序的性能。以下是这种设计模式的实体。
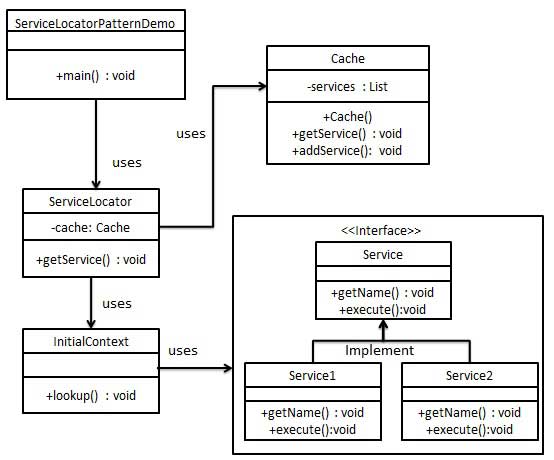
- 服务(Service) - 实际处理请求的服务。对这种服务的引用可以在 JNDI 服务器中查找到。
- Context / 初始的 Context - JNDI Context 带有对要查找的服务的引用。
- 服务定位器(Service Locator) - 服务定位器是通过 JNDI 查找和缓存服务来获取服务的单点接触。
- 缓存(Cache) - 缓存存储服务的引用,以便复用它们。
- 客户端(Client) - Client 是通过 ServiceLocator 调用服务的对象。
实现
我们将创建 ServiceLocator、InitialContext、Cache、Service 作为表示实体的各种对象。Service1 和 Service2 表示实体服务。
ServiceLocatorPatternDemo,我们的演示类在这里是作为一个客户端,将使用 ServiceLocator 来演示服务定位器设计模式。
步骤 1
创建服务接口 Service。
Service.java
public interface Service { public String getName(); public void execute();}步骤 2
创建实体服务。
Service1.java
public class Service1 implements Service { public void execute(){ System.out.println("Executing Service1"); } @Override public String getName() { return "Service1"; }}Service2.java
public class Service2 implements Service { public void execute(){ System.out.println("Executing Service2"); } @Override public String getName() { return "Service2"; }}步骤 3
为 JNDI 查询创建 InitialContext。
InitialContext.java
public class InitialContext { public Object lookup(String jndiName){ if(jndiName.equalsIgnoreCase("SERVICE1")){ System.out.println("Looking up and creating a new Service1 object"); return new Service1(); }else if (jndiName.equalsIgnoreCase("SERVICE2")){ System.out.println("Looking up and creating a new Service2 object"); return new Service2(); } return null; }}步骤 4
创建缓存 Cache。
Cache.java
import java.util.ArrayList;import java.util.List;public class Cache { private List<Service> services; public Cache(){ services = new ArrayList<Service>(); } public Service getService(String serviceName){ for (Service service : services) { if(service.getName().equalsIgnoreCase(serviceName)){ System.out.println("Returning cached "+serviceName+" object"); return service; } } return null; } public void addService(Service newService){ boolean exists = false; for (Service service : services) { if(service.getName().equalsIgnoreCase(newService.getName())){ exists = true; } } if(!exists){ services.add(newService); } }}步骤 5
创建服务定位器。
ServiceLocator.java
public class ServiceLocator { private static Cache cache; static { cache = new Cache(); } public static Service getService(String jndiName){ Service service = cache.getService(jndiName); if(service != null){ return service; } InitialContext context = new InitialContext(); Service service1 = (Service)context.lookup(jndiName); cache.addService(service1); return service1; }}步骤 6
使用 ServiceLocator 来演示服务定位器设计模式。
ServiceLocatorPatternDemo.java
public class ServiceLocatorPatternDemo { public static void main(String[] args) { Service service = ServiceLocator.getService("Service1"); service.execute(); service = ServiceLocator.getService("Service2"); service.execute(); service = ServiceLocator.getService("Service1"); service.execute(); service = ServiceLocator.getService("Service2"); service.execute(); }}步骤 7
验证输出。
Looking up and creating a new Service1 objectExecuting Service1Looking up and creating a new Service2 objectExecuting Service2Returning cached Service1 objectExecuting Service1Returning cached Service2 objectExecuting Service2
阅读全文
0 0
- 【设计模式】服务定位器模式(Service Locator Pattern)
- 服务定位器模式(service locator)
- 服务定位器模式(Service Locator Pattern)详解和代码示范
- (服务定位器)Service Locator
- Service Locator服务定位器
- 设计模式学习—服务定位模式(Service Locator Design Pattern)
- 设计模式【服务器定位模式Service Locator Pattern】
- Java Service Locator Pattern(服务器定位模式)
- 依赖注入 控制反转 服务定位器 模式 Dependency Injection Inversion of Control Service Locator Patterns | 超级经典
- 依赖注入 控制反转 服务定位器 模式 Dependency Injection Inversion of Control Service Locator Patterns | 超级经典
- 设计模式之服务定位器模式
- 设计模式学习笔记--服务定位器模式
- IOC控制反转 & DI依赖注入 & Service Locator服务定位器
- Java服务定位器模式
- Java服务定位器模式
- 用SERVICE LOCATOR 模式实现访问命名服务
- 用SERVICE LOCATOR 模式实现访问命名服务
- 服务定位器模式(C++实现)
- SQL中DateTime转换成Varchar样式
- 史上最简单的 SpringCloud 教程 | 终章
- python学习之List【列表】
- python 绘制nc格式源清单
- ASP.NET 添加日志记录功能
- 【设计模式】服务定位器模式(Service Locator Pattern)
- Spark应用的优化
- Arcgis for Android解决标注TextSymbol中文字体乱码的问题
- LeetCode-78. Subsets
- 【设计模式】享元模式(Flyweight Pattern)
- html5实现弹出提示框,并且伴随遮罩层并且可以关闭弹出框
- # FLume 自定义Channel使用中遇到的问题(1)
- c语言练习题(持续更新中)
- JavaWeb支付宝沙箱环境小记