计算机是如何启动的 How Computers Boot Up
来源:互联网 发布:如何拍摄一个淘宝商品 编辑:程序博客网 时间:2024/06/07 17:52
转载: http://duartes.org/gustavo/blog/post/how-computers-boot-up
今天翻译这位外国友人的系列文章第二篇
电脑是如何启动的 How Computers Boot Up
The previous post described motherboards and the memory map in Intel computers to set the scene for the initial phases of boot. Booting is an involved, hacky, multi-stage affair – fun stuff. Here’s an outline of the process:
上一篇介绍了intel计算机的主板和内存布局, 它为启动初始化做好了准备。 启动过程是复杂的,hacky,多个步骤,充满乐趣的。 下面是一个相关描述:
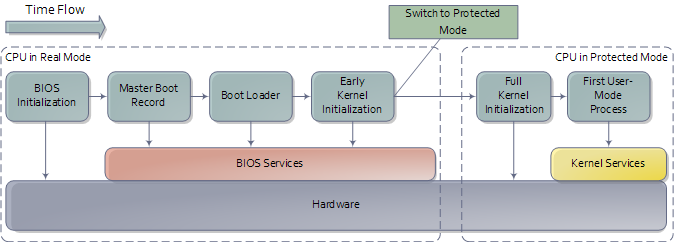
An outline of the boot sequence
Things start rolling when you press the power button on the computer (no! do tell!). Once the motherboard is powered up it initializes its own firmware – the chipset and other tidbits – and tries to get the CPU running. If things fail at this point (e.g., the CPU is busted or missing) then you will likely have a system that looks completely dead except for rotating fans. A few motherboards manage to emit beeps for an absent or faulty CPU, but the zombie-with-fans state is the most common scenario based on my experience. Sometimes USB or other devices can cause this to happen: unplugging all non-essential devices is a possible cure for a system that was working and suddenly appears dead like this. You can then single out the culprit device by elimination.
当你按下电脑上的电源键一切就开始了。 一旦主板上电之后,就会先初始化它自己的固件--芯片组和其它的组件-- 并且尝试启动CPU。如果在这个阶段发生问题了,那么你就会看到真个系统都不响应了,只有一个在旋转的风扇。一些主板会尝试发出嗡鸣以表示CPU出错,但是大部分情况都是只有一个风扇在那里旋转。 有时候USB或者其它的设备也会造成这种情况:唯一的方法,就是排除法,拔出所有其它设备,从而判断是哪一设备发生问题。
If all is well the CPU starts running. In a multi-processor or multi-core system one CPU is dynamically chosen to be the bootstrap processor (BSP) that runs all of the BIOS and kernel initialization code. The remaining processors, called application processors (AP) at this point, remain halted until later on when they are explicitly activated by the kernel. Intel CPUs have been evolving over the years but they’re fully backwards compatible, so modern CPUs can behave like the original 1978 Intel 8086, which is exactly what they do after power up. In this primitive power up state the processor is in real mode with memory paging disabled. This is like ancient MS-DOS where only 1 MB of memory can be addressed and any code can write to any place in memory – there’s no notion of protection or privilege.
如果一切都好,CPU也开始运转。 在一个多核后者多处理器的系统上,其中的一个CPU会被动态选择为bootstrap processor(BSP), 从而运行接下来的BIOS和内核初始化代码。 而剩下的处理器,这时候被称为application processors(AP),保持停止状态直到它们被内核明确的激活。新的intel的处理期都向前兼容,上电之初的行为会跟1978年的8086类似。处理器在刚开始的这个状态称为real mode,此时内存的分页机制是没有被启用的。这就像最初的MS-DOS只能够寻址1MB的内存空间并且任何代码都可以操作这1MB内存的任何地址--不存在任何的保护机制和权限控制。
Most registers in the CPU have well-defined values after power up, including the instruction pointer (EIP) which holds the memory address for the instruction being executed by the CPU. Intel CPUs use a hack whereby even though only 1MB of memory can be addressed at power up, a hidden base address (an offset, essentially) is applied to EIP so that the first instruction executed is at address 0xFFFFFFF0 (16 bytes short of the end of 4 gigs of memory and well above one megabyte). This magical address is called the reset vector and is standard for modern Intel CPUs.
在上电后,CPU中的大部分寄存器都会被初始化为合适的值, 包括instruction pointer(EIP),它持有将要被CPU执行的指定的内存地址。Intel CPU可以使用一个hack的手段,即使只有1MB的内存可以被寻址,但是可以通过给EIP一个隐藏的基址(它是一个偏移),这样就可以使第一条被执行的指令的地址落在0xFFFFFFF0(4GB内存的最后16个字节可被EIP寻址滨并且高于1 MB)。这个魔术地址被叫做reset vector并且是现代intel CPU的标准。
The motherboard ensures that the instruction at the reset vector is a jump to the memory location mapped to the BIOS entry point. This jump implicitly clears the hidden base address present at power up. All of these memory locations have the right contents needed by the CPU thanks to the memory map kept by the chipset. They are all mapped to flash memory containing the BIOS since at this point the RAM modules have random crap in them. An example of the relevant memory regions is shown below:
主板确保在reset vector中的这条指令是一个jump指令,它能够jump到一个对应到BIOS entry point的内存位置。 这次jump隐式的清除了在上电初始时设定的那个基址。 要感谢由芯片组所保有的内存布局(memory map),这使得所有被CPU所需要的内存地址都有了合适的内容。 它们都对应到包含BIOS的flash memory的内容,而从这开始就是RAM module可以随意使用的地址了。下面就是一个概念图:
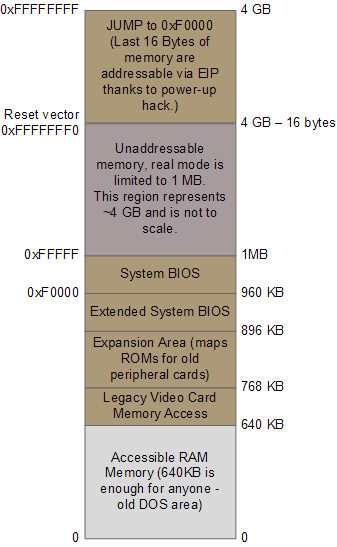
Important memory regions during boot
The CPU then starts executing BIOS code, which initializes some of the hardware in the machine. Afterwards the BIOS kicks off the Power-on Self Test (POST) which tests various components in the computer. Lack of a working video card fails the POST and causes the BIOS to halt and emit beeps to let you know what’s wrong, since messages on the screen aren’t an option. A working video card takes us to a stage where the computer looks alive: manufacturer logos are printed, memory starts to be tested, angels blare their horns. Other POST failures, like a missing keyboard, lead to halts with an error message on the screen. The POST involves a mixture of testing and initialization, including sorting out all the resources – interrupts, memory ranges, I/O ports – for PCI devices. Modern BIOSes that follow the Advanced Configuration and Power Interface build a number of data tables that describe the devices in the computer; these tables are later used by the kernel.
此时,CPU开始执行BIOS的代码,它会初始化计算机内的一些硬件。接着BIOS会执行开机自检(POST)来测试计算机内的各个组件。如果显卡出错,也会导致嗡鸣。如果显卡工作正常,就会进入下一个阶段:生产厂商的Logo会被显示出来,进行内存自检等等。其它的POST失败,例如缺少键盘,会在屏幕上输出错误信息并当机。POST包括了自检和初始化,包括找出各种PCI设备的资源--中断,内存域,I/O端口。现代的BIOS会根据Advanced Configuration and Power Interface(ACPI)来建立一些数据表,这些表描述了计算机中的所有设备。而后,kernel会用到这些表中的信息。
After the POST the BIOS wants to boot up an operating system, which must be found somewhere: hard drives, CD-ROM drives, floppy disks, etc. The actual order in which the BIOS seeks a boot device is user configurable. If there is no suitable boot device the BIOS halts with a complaint like “Non-System Disk or Disk Error.” A dead hard drive might present with this symptom. Hopefully this doesn’t happen and the BIOS finds a working disk allowing the boot to proceed.
POST之后,BIOS就尝试启动操作系统,它必须先要确定在操作系统在哪里:硬盘,CD-ROM,软盘等等。实际查找顺序是受用户控制的。如果没有合适的启动设备,则会当机并显示类似于"Non-System Disk or Disk Error"的错误信息。比如,一个损坏的硬盘就会导致这样的事情发生。幸运的是,很少发生这样的事情,通常BIOS都会找到合适的设备,并且继续启动过程。
The BIOS now reads the first 512-byte sector (sector zero) of the hard disk. This is called the Master Boot Record and it normally contains two vital components: a tiny OS-specific bootstrapping program at the start of the MBR followed by a partition table for the disk. The BIOS however does not care about any of this: it simply loads the contents of the MBR into memory location 0x7c00 and jumps to that location to start executing whatever code is in the MBR.
此时BIOS会读取找到的硬盘的前512-byte的扇区。这被叫做Master Boot Record(MBR)并且它通常包含两个组件:一个微型的特定操作系统的bootstrapping program,其后跟着一个硬盘的分区表。然而,BIOS不会关心这些:它只是简单把MBR的内容读入到0x7c00的内存位置并且跳转到该位置来开始执行该地址内的MBR指令。
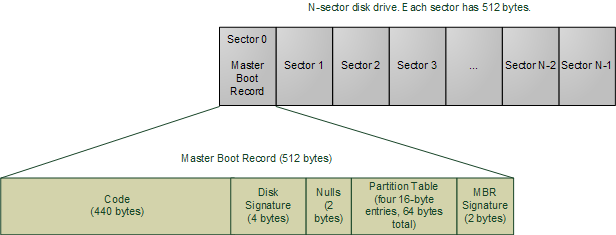
Master Boot Record
The specific code in the MBR could be a Windows MBR loader, code from Linux loaders such as LILO or GRUB, or even a virus. In contrast the partition table is standardized: it is a 64-byte area with four 16-byte entries describing how the disk has been divided up (so you can run multiple operating systems or have separate volumes in the same disk). Traditionally Microsoft MBR code takes a look at the partition table, finds the (only) partition marked as active, loads the boot sector for that partition, and runs that code. The boot sector is the first sector of a partition, as opposed to the first sector for the whole disk. If something is wrong with the partition table you would get messages like “Invalid Partition Table” or “Missing Operating System.” This message does not come from the BIOS but rather from the MBR code loaded from disk. Thus the specific message depends on the MBR flavor.
MBR中的特殊代码可能是一个Window MBR Loader, 这些代码可能是诸如LILO或者GRUB的Linux loaders,也可能是病毒。 相反,这里的分区表是有明确标准的:它是一个64字节的区域,其中4个16字节的项描述了磁盘是如何被划分的(所以你才可以进行多系统启动或者可以在一个磁盘上有多个分区)。 通常Microsoft MBR代码会查找分区表,找到唯一的一个标识为活动的分区,然后读取这个分区的boot扇区,接着运行该boot扇区中的代码。 boot扇区是这个分区的第一个扇区,与此对应的是整个磁盘的第一个分区。 如果分区表发生了错误, 你就会得到类似“Invalid Partition Table”或者“Missing Operating System”的信息。这些信息不是从BIOS来的,而是由从磁盘上的MBR code中产生的。 因此,这种类型的信息完全依赖与你所使用的MBR。
Boot loading has gotten more sophisticated and flexible over time. The Linux boot loaders Lilo and GRUB can handle a wide variety of operating systems, file systems, and boot configurations. Their MBR code does not necessarily follow the “boot the active partition” approach described above. But functionally the process goes like this:
Boot 启动过程已经越来越成熟和灵活了。 Linux的boot loader LiLo和GRUB已经能够处理很多种的操作系统(嵌入式上,uboot则比较普遍),文件系统和各种启动选项。它们的MBR代码不许要遵从“从活动的分区启动”。 但是,通常情况下会像如下描述的一样工作:
- The MBR itself contains the first stage of the boot loader. GRUB calls this stage 1.
- Due to its tiny size, the code in the MBR does just enough to load another sector from disk that contains additional boostrap code. This sector might be the boot sector for a partition, but could also be a sector that was hard-coded into the MBR code when the MBR was installed.
- The MBR code plus code loaded in step 2 then read a file containing the second stage of the boot loader. In GRUB this is GRUB Stage 2, and in Windows Server this is c:\NTLDR. If step 2 fails in Windows you’d get a message like “NTLDR is missing”. The stage 2 code then reads a boot configuration file (e.g., grub.conf in GRUB, boot.ini in Windows). It then presents boot choices to the user or simply goes ahead in a single-boot system.
- At this point the boot loader code needs to fire up a kernel. It must know enough about file systems to read the kernel from the boot partition. In Linux this means reading a file like “vmlinuz-2.6.22-14-server” containing the kernel, loading the file into memory and jumping to the kernel bootstrap code. In Windows Server 2003 some of the kernel start-up code is separate from the kernel image itself and is actually embedded into NTLDR. After performing several initializations, NTDLR loads the kernel image from file c:\Windows\System32\ntoskrnl.exe and, just as GRUB does, jumps to the kernel entry point.
There’s a complication worth mentioning (aka, I told you this thing is hacky). The image for a current Linux kernel, even compressed, does not fit into the 640K of RAM available in real mode. My vanilla Ubuntu kernel is 1.7 MB compressed. Yet the boot loader must run in real mode in order to call the BIOS routines for reading from the disk, since the kernel is clearly not available at that point. The solution is the venerable unreal mode. This is not a true processor mode (I wish the engineers at Intel were allowed to have fun like that), but rather a technique where a program switches back and forth between real mode and protected mode in order to access memory above 1MB while still using the BIOS. If you read GRUB source code, you’ll see these transitions all over the place (look under stage2/ for calls to real_to_prot and prot_to_real). At the end of this sticky process the loader has stuffed the kernel in memory, by hook or by crook, but it leaves the processor in real mode when it’s done.
有一个很复杂的事情值得注意(这里称这些事情为hacky)。 Linux内核的image是压缩过的, 它不能放在实模式下的640 RAM中。 我的vanilla ubuntu kernel image是1.7MB的压缩文件。 然而,boot loader必须运行在实模式下, 从而能够和BIOS进行交互来从磁盘读取数据, 而不是依赖内核。因为这时候完整的内核是还没能被完全启动好。 解决方法是引入了一个叫做unreal mode的模式。 这虽然不是一个真正的处理器模式,但是是一个用来使得一个程序在使用BIOS的时候依然能够在实模式和保护模式之间切换,从而能够方位高于1MB空间的技术。 如果你阅读过GRUB的源代码, 你就会发现很多地方都会使用这种切换(参看stage2/下的调用real_to_prot和prot_to_real的函数)。 在这个精巧的程序把所有的kernel都载入内存后, 它就把处理器切换出实模式。
We’re now at the jump from “Boot Loader” to “Early Kernel Initialization” as shown in the first diagram. That’s when things heat up as the kernel starts to unfold and set things in motion. The next post will be a guided tour through the Linux Kernel initialization with links to sources at the Linux Cross Reference. I can’t do the same for Windows ![]() but I’ll point out the highlights.
but I’ll point out the highlights.
现在,我们就从boot loader进入到内核初始化的最开始阶段。 这时,就是内核开始展开并进行各种设定的工作了。 下一篇文章我们将会结合Linux Cross Reference讲述Linux内核的初始化。
- 计算机是如何启动的 How Computers Boot Up
- How Computers Boot Up -- 计算机是如何启动的
- 计算机如何启动(How Computers Boot Up)
- How Computers Boot Up
- How Computers Boot Up
- How Computers Boot Up
- How Computers Boot Up
- How Computers Boot Up
- 计算机是如何启动的
- 计算机是如何启动的?
- 计算机是如何启动的?
- 计算机是如何启动的
- 计算机是如何启动的?
- 计算机是如何启动的
- 计算机是如何启动的?
- 计算机是如何启动的?
- 计算机是如何启动的?
- 计算机是如何启动的?
- android笔记 蓝牙操作2
- quickSort学习
- 个人实现的大数模板(加、乘)
- c#使用开源控件读卡excel
- hdu 3829(二分图 有待复习)
- 计算机是如何启动的 How Computers Boot Up
- jdk环境变量配置
- printf与scanf
- MySql忘记root密码怎么解决
- 一个小技巧
- 三个数排序的程序
- “天河一号”创造分子模拟计算世界纪录
- 【单位圆覆盖最多点】POJ 1981
- 数组和指针