Android与人人网连接实例:我在听
来源:互联网 发布:网络计划图在哪里画 编辑:程序博客网 时间:2024/05/01 05:49
作者:裘德超
目前,社交网络概念正火。而手机最初设计的目的正是让人们进行通信。人人网作为中国最大的社交网站,用户数量众多,本文通过一个简单的小程序:“我在听”向大家展示renren api的使用。
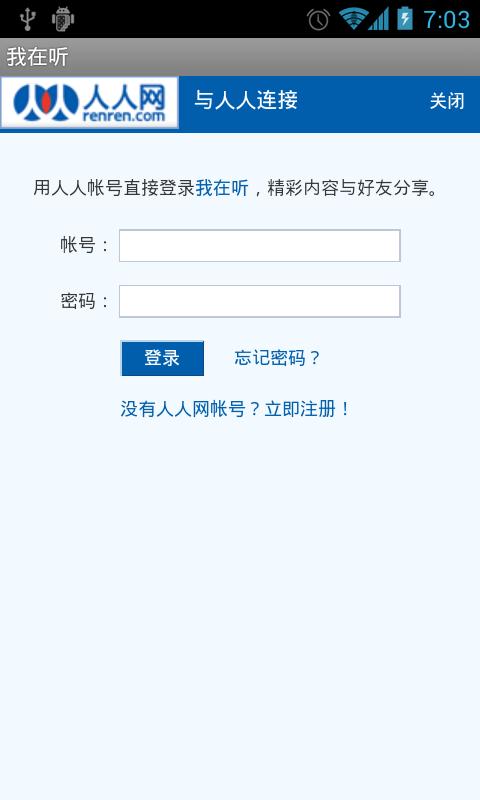
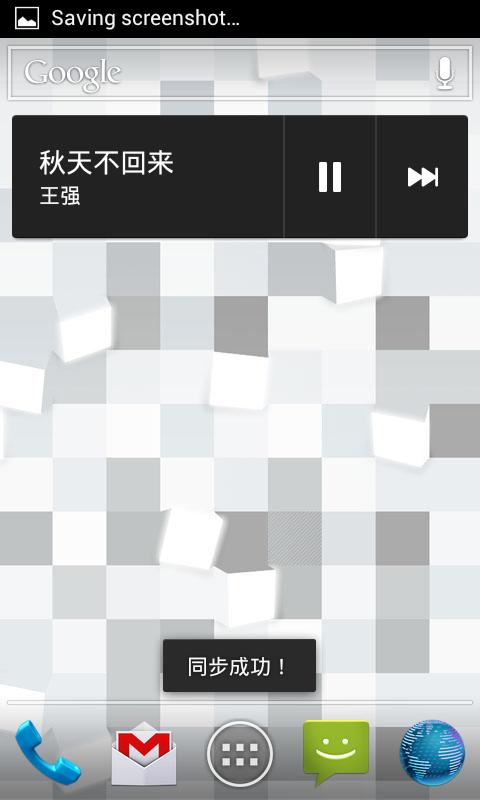
首先介绍一下“我在听”。功能:在用户听歌时,在不需要用户进行额外操作的情况下,根据用户正在听的曲目,以发状态的形式同步至人人网。在安装完“我在听”之后,点击使用人人网登录,输入账号密码,登录成功后,选择是否自动同步,如果此时用户打开了网络,那么只要用户通过自带的播放器听歌,就会自动发布状态,例如:我在听张国荣的《倩女幽魂》。
下面开始介绍开发过程;
首先,在人人 api页面http://dev.renren.com/ 里先登录,然后创建一个android应用。填写完表单,创建完成后,可以获得人人给你的唯一标志:
应用ID:xxxxxxx
API Key:xxxxxxxxxxxxxxxxxxxxxxx
Secret Key:xxxxxxxxxxxxxxxxxxxxxx
这三串字符串用于标志你的应用。
下面介绍如何获取用户当前正在听的歌的信息:
当系统默认的播放器开始播放下一首歌时,会发出一个广播(intent中包含歌曲名,艺术家等信息),我们只要定义一个接收这个广播的广播接收器,并且从intent中抽取出需要的信息即可。
AndroidManifest.xml
<?xml version="1.0" encoding="utf-8"?><manifest xmlns:android="http://schemas.android.com/apk/res/android" package="com.renoqiu" android:versionCode="1" android:versionName="1.0" > <uses-sdk android:minSdkVersion="10" /><uses-permission android:name="android.permission.INTERNET" /><uses-permission android:name="android.permission.ACCESS_NETWORK_STATE"/> <application android:icon="@drawable/ic_launcher" android:label="@string/app_name" > <activity android:name=".IamListenActivity" android:label="@string/app_name" > </activity> <activity android:name=".SettingActivity" android:label="@string/app_name" > <intent-filter> <action android:name="android.intent.action.MAIN" /> <category android:name="android.intent.category.LAUNCHER" /> </intent-filter> </activity> <receiver android:name=".MusicBroadcastReceiver"><intent-filter> <action android:name="com.android.music.metachanged"></action></intent-filter> </receiver> <service android:name=".PushStatusService" > <intent-filter> <action android:name="com.renoqiu.pushstatus" /> </intent-filter> </service> </application></manifest>根据main.xml可知,我们定义了类MusicBroadcastReceiver捕捉action名为com.android.music.metachanged的广播。
src/com/renoqiu/ MusicBroadcastReceiver.java
package com.renoqiu;import android.content.BroadcastReceiver;import android.content.Context;import android.content.Intent;import android.os.Bundle;public class MusicBroadcastReceiver extends BroadcastReceiver {private static final Object SMSRECEIVED = "com.android.music.metachanged";@Overridepublic void onReceive(Context context, Intent intent) {if(intent.getAction().equals(SMSRECEIVED)){String trackName=intent.getStringExtra("track");String artist=intent.getStringExtra("artist");Intent pushStatusIntent = new Intent();pushStatusIntent.setAction("com.renoqiu.pushstatus"); Bundle myBundle = new Bundle(); myBundle.putString("trackName", trackName); myBundle.putString("artist", artist); pushStatusIntent.putExtras(myBundle);context.startService(pushStatusIntent);}}}在类MusicBroadcastReceiver中我们抽取了歌曲名和艺术家名,并且调用context.startService()方法创建了一个service。
src/com/renoqiu/ PushStatusService.java
package com.renoqiu;import android.app.Service;import android.content.Context;import android.content.Intent;import android.content.SharedPreferences;import android.net.ConnectivityManager;import android.net.NetworkInfo;import android.os.Bundle;import android.os.Handler;import android.os.IBinder;import android.os.Message;import android.widget.Toast;public class PushStatusService extends Service {private Handler handler;private com.renoqiu.LooperThread thread;private SharedPreferences sharedPreferences;private boolean syncFlag;private ConnectivityManager cm;private NetworkInfo ni;@Overridepublic IBinder onBind(Intent arg0) {return null;}private boolean checkNet() {cm = (ConnectivityManager)getSystemService(Context.CONNECTIVITY_SERVICE);if (cm == null) {return false; }ni = cm.getActiveNetworkInfo();if (ni == null || !ni.isAvailable()) { return false; } return true; } @Overridepublic void onStart(Intent intent, int startId) {super.onStart(intent, startId);syncFlag = sharedPreferences.getBoolean("syncFlag",false);if(syncFlag && checkNet()){if(intent != null){Bundle myBundle = intent.getExtras();String trackName = myBundle.getString("trackName");String artist = myBundle.getString("artist");String accessToken = sharedPreferences.getString("accessToken","");if(accessToken != null && !accessToken.equals("")){String requestMethod = "status.set";//接口名称 String url = StatusPublishHelper.API_URL;String secretKey = StatusPublishHelper.SECRET_KEY;if(artist == null || artist.equals("")){artist = "xxx";}if(trackName == null || trackName.equals("")){trackName = "xxx";}String message = "我在听" + artist + "的《" + trackName + "》。\r\n 通过我在听发布!";thread = new LooperThread(handler, requestMethod, "1.0", url, accessToken, message, secretKey);thread.start(); /* 启动线程 */}else{Toast.makeText(PushStatusService.this, "请登陆!", Toast.LENGTH_SHORT).show();SharedPreferences.Editor editor = sharedPreferences.edit();editor.putBoolean("syncFlag", false);editor.commit();}}}}@Overridepublic void onCreate() {super.onCreate();sharedPreferences = getSharedPreferences("shared", MODE_PRIVATE);handler = new Handler() {@Overridepublic void handleMessage(Message msg) {switch (msg.what) {case 0:if((Integer)msg.obj != 1){Toast.makeText(PushStatusService.this, "同步失败!请检查网络是否打开...", Toast.LENGTH_SHORT).show();}else{Toast.makeText(PushStatusService.this, "同步成功!", Toast.LENGTH_SHORT).show();}break;}}};}}在PushStatusService中,首先进行一系列检查,例如:网络是否已经打开,用户是否已经登录,是否开启同步等信息。其中用到了sharedPreferences保存信息。如果条件都满足那么将新建一个线程去通过人人api发状态,其中就需要使用到之前创建应用时所得到的key,在介绍具体如何状态之前先接着介绍一下人人的api。要通过人人发送状态首先必须通过人人的登录认证:OAuth2.0,详情见:http://wiki.dev.renren.com/wiki/Authentication
我们的登录流程开始于通过内嵌在IamListenActivity中的Webkit访问人人OAuth 2.0的Authorize Endpoint:
https://graph.renren.com/oauth/authorize?client_id=YOUR_API_KEY&response_type=token&redirect_uri=YOUR_CALLBACK_URL&display=touch&scope=status_update。
client_id:必须参数。在开发者中心注册应用时获得的API Key。
response_type:必须参数。客户端流程,此值固定为“token”。当用户登录成功,浏览器会被重定向到YOUR_CALLBACK_URL,并且带有参数Access Token。这个Access Token可以标志登录用户,避免需要多次输入用户名密码。此处我们会把accesstoken保存在sharedPreferences中,下次需要使用时,直接从sharedPreferences中获取。
redirect_uri:登录成功,流程结束后要跳转回得URL。redirect_uri所在的域名必须在开发者中心注册应用后,填写在编辑属性选项卡中填写到服务器域名中,人人OAuth2.0用以检查跳转的合法性。
如果用户已经登录,人人OAuth 2.0会校验存储在用户浏览器中的Cookie。如果用户没有登录,人人OAuth 2.0会为用户展示登录页面,让用户输入用户名和密码:
display=touch:一般的智能手机都是这个选项,
scope=status_update:表示我们会用到更新状态的功能。
src/com/renoqiu/ IamListenActivity.java
package com.renoqiu;import java.net.URLDecoder;import android.app.Activity;import android.content.SharedPreferences;import android.os.Bundle;import android.webkit.WebSettings;import android.webkit.WebView;import android.webkit.WebViewClient;import android.widget.Toast;public class IamListenActivity extends Activity {private WebView webView; private String accessToken = null; public void onCreate(Bundle savedInstanceState) {super.onCreate(savedInstanceState);setContentView(R.layout.main);webView = (WebView) findViewById(R.id.web);WebSettings settings = webView.getSettings(); settings.setJavaScriptEnabled(true); settings.setSupportZoom(true); settings.setBuiltInZoomControls(true); webView.loadUrl(StatusPublishHelper.AUTHURL); webView.requestFocusFromTouch(); WebViewClient wvc = new WebViewClient() { @Override public void onPageFinished(WebView view, String url) { super.onPageFinished(view, url); //人人网用户名和密码验证通过后,刷新页面时即可返回accessToken String reUrl = webView.getUrl(); if (reUrl != null && reUrl.indexOf("access_token") != -1) { //截取url中的accessToken int startPos = reUrl.indexOf("token=") + 6; int endPos = reUrl.indexOf("&expires_in"); accessToken = URLDecoder.decode(reUrl.substring(startPos, endPos)); //保存获取到的accessToken //share.saveRenrenToken(accessToken); Toast.makeText(IamListenActivity.this, "验证成功,设置同步后。\n听歌时就能自动传状态哦。:)", Toast.LENGTH_SHORT).show(); SharedPreferences settings = (SharedPreferences)getSharedPreferences("shared", MODE_PRIVATE); SharedPreferences.Editor editor = settings.edit(); editor.putString("accessToken", accessToken); editor.putBoolean("syncFlag", false); editor.commit(); finish(); } } }; webView.setWebViewClient(wvc);}}res/layout/main.xml
<?xml version="1.0" encoding="utf-8"?><LinearLayout xmlns:android="http://schemas.android.com/apk/res/android" android:layout_width="fill_parent" android:layout_height="fill_parent" android:orientation="vertical" ><WebView android:id="@+id/web" android:layout_width="match_parent" android:layout_height="match_parent" /></LinearLayout>由代码可知,我们通过webkit访问Authorize Endpoint后,从返回的链接中抽取了accesstoken,并且保存起来了。有了access token之后,我们就可以通过renren的api,进行更新状态的操作了,下面的LooperThread就是用于更新状态,并且给出用户反馈的类。
“为了确保应用与人人API 服务器之间的安全通信,防止Secret Key盗用,数据篡改等恶意攻击,人人API服务器使用了签名机制(即sig参数)来认证应用。签名是由请求参数和应用的私钥Secret Key经过MD5加密后生成的字符串。应用在调用人人API之前,要计算出签名,并追加到请求参数中。“(关于签名的计算规则参见:http://wiki.dev.renren.com/wiki/Calculate_signature)
src/com/renoqiu/ LooperThread.java
package com.renoqiu;import java.util.ArrayList;import java.util.List;import org.apache.http.HttpResponse;import org.apache.http.NameValuePair;import org.apache.http.client.entity.UrlEncodedFormEntity;import org.apache.http.client.methods.HttpPost;import org.apache.http.impl.client.DefaultHttpClient;import org.apache.http.message.BasicNameValuePair;import org.apache.http.protocol.HTTP;import org.apache.http.util.EntityUtils;import org.json.JSONObject;import android.os.Handler;import android.os.Message;import android.util.Log;public class LooperThread extends Thread{private String requestMethod;private String v;private String url;private String accessToken;private String status;private String secretKey;private Handler fatherHandler;public LooperThread(Handler fatherHandler, String requestMethod, String v, String url, String accessToken, String message, String secretKey) {this.requestMethod = requestMethod;this.v = v;this.url = url;this.accessToken = accessToken;this.status = message; this.secretKey = secretKey;this.fatherHandler = fatherHandler;}public void run() {Message msg = new Message();msg.obj = updateStatus(status);msg.what = 0;fatherHandler.sendMessage(msg);}public int updateStatus(String status) { int success = 0; //生成签名 字典序排列 StringBuilder sb = new StringBuilder(); sb.append("access_token=").append(accessToken) .append("format=").append("JSON") .append("method=").append(requestMethod) .append("status=").append(status) .append("v=").append(v) .append(secretKey); String sig = StatusPublishHelper.getMD5(sb.toString()); HttpPost httpRequest = new HttpPost(url);List<NameValuePair> params = new ArrayList<NameValuePair>();params.add(new BasicNameValuePair("access_token", accessToken));params.add(new BasicNameValuePair("method", requestMethod)); params.add(new BasicNameValuePair("v", v)); params.add(new BasicNameValuePair("status", status)); params.add(new BasicNameValuePair("format", "JSON"));params.add(new BasicNameValuePair("sig", sig)); try { httpRequest.setEntity(new UrlEncodedFormEntity(params, HTTP.UTF_8));HttpResponse httpResponse = new DefaultHttpClient().execute(httpRequest);if (httpResponse.getStatusLine().getStatusCode() == 200){String result = EntityUtils.toString(httpResponse .getEntity()); JSONObject json = new JSONObject(result); success = (Integer)json.get("result"); Log.v("org.reno", result);} }catch (Exception e){return success;} return success; }}上面代码中,首先计算出所有参数以字典序升序排列后,拼接在一起后的md5值作为签名。然后向http://api.renren.com/restserver.do发送post请求,其中包括之前获得的access_token,所调用的方法名(此处我们调用的是更新状态的方法名,关于各种api详见:http://wiki.dev.renren.com/wiki/API),及方法的参数,此处包括版本,状态内容,返回类型(此处为json),最后是签名。
params.add(newBasicNameValuePair("access_token", accessToken));
params.add(newBasicNameValuePair("method", requestMethod));
params.add(newBasicNameValuePair("v", v));
params.add(newBasicNameValuePair("status", status));
params.add(newBasicNameValuePair("format", "JSON"));
params.add(newBasicNameValuePair("sig", sig));
然后等待服务器的回复,并且解析json格式的数据,判断是否发送成功。
到此,基本的发状态的过程就结束了。
下面的类用于提供用户登陆以及让用户选择是否开启自动同步。
src/com/renoqiu/ SettingActivity.java
package com.renoqiu;import android.app.Activity;import android.content.Intent;import android.content.SharedPreferences;import android.os.Bundle;import android.view.View;import android.view.View.OnClickListener;import android.widget.Button;import android.widget.CompoundButton;import android.widget.Toast;import android.widget.CompoundButton.OnCheckedChangeListener;import android.widget.ToggleButton;public class SettingActivity extends Activity {private ToggleButton syncToggleButton;private Button loginBtn;private SharedPreferences sharedPreferences;@Overrideprotected void onCreate(Bundle savedInstanceState) {super.onCreate(savedInstanceState);setContentView(R.layout.setting);syncToggleButton = (ToggleButton)findViewById(R.id.syncToggleButton);sharedPreferences = (SharedPreferences)getSharedPreferences("shared", MODE_PRIVATE);boolean syncFlag = sharedPreferences.getBoolean("syncFlag",false);syncToggleButton.setChecked(syncFlag);syncToggleButton.setOnCheckedChangeListener(new OnCheckedChangeListener(){@Overridepublic void onCheckedChanged(CompoundButton buttonView,boolean isChecked) {if(isChecked == false){SharedPreferences.Editor editor = sharedPreferences.edit(); editor.putBoolean("syncFlag", isChecked); editor.commit();}else{String accessToken = sharedPreferences.getString("accessToken","");if(accessToken != null && !accessToken.equals("") ){SharedPreferences.Editor editor = sharedPreferences.edit(); editor.putBoolean("syncFlag", isChecked); editor.commit();}else{syncToggleButton.setChecked(false);Toast.makeText(SettingActivity.this, "请先登陆!", Toast.LENGTH_SHORT).show();}}}});loginBtn = (Button)findViewById(R.id.loginBtn);loginBtn.setOnClickListener(new OnClickListener(){@Overridepublic void onClick(View arg0) {Intent intent = new Intent(SettingActivity.this, IamListenActivity.class);startActivity(intent);}});}}res/layout/setting.xml
<?xml version="1.0" encoding="utf-8"?><LinearLayout xmlns:android="http://schemas.android.com/apk/res/android" android:layout_width="fill_parent" android:layout_height="fill_parent" android:orientation="vertical" > <Button android:id="@+id/loginBtn" android:layout_width="wrap_content" android:layout_height="wrap_content" android:text="" android:background="@drawable/btn_login" android:layout_marginTop="10dp"/> <RelativeLayout android:id="@+id/relativeLayout1" android:layout_width="match_parent" android:layout_height="wrap_content" > <TextView android:id="@+id/toggleTextView" android:layout_width="wrap_content" android:layout_height="wrap_content" android:layout_alignParentLeft="true" android:layout_alignParentTop="true" android:layout_marginTop="20dp" android:text="@string/toggleSync" /> <ToggleButton android:id="@+id/syncToggleButton" android:layout_width="wrap_content" android:layout_height="wrap_content" android:layout_alignParentTop="true" android:layout_marginTop="10dp" android:layout_marginLeft="10dp" android:layout_toRightOf="@+id/toggleTextView" /> </RelativeLayout></LinearLayout>最后一个类包含了各种链接常量,和把字符串转换为md5的方法:
src/com/renoqiu/ StatusPublishHelper.java
package com.renoqiu;import java.security.MessageDigest;public class StatusPublishHelper {// 你的应用IDpublic static final String APP_ID = "xxxxx";// 应用的API Keypublic static final String API_KEY = "xxxxxxxxxxxxxxxxxxxxxxx";// 应用的Secret Keypublic static final String SECRET_KEY = "xxxxxxxxxxxxxxxx";public static final String API_URL = "http://api.renren.com/restserver.do";public static final String AUTHURL = "https://graph.renren.com/oauth/authorize?client_id=" + API_KEY +"&response_type=token" + "&redirect_uri=http://www.renoqiu.com/iamlisten.html&display=touch" + "&scope=status_update"; public static String getMD5(String s) { try { MessageDigest md5 = MessageDigest.getInstance("MD5"); byte[] byteArray = s.getBytes("UTF-8"); byte[] md5Bytes = md5.digest(byteArray); StringBuffer hexValue = new StringBuffer(); for (int i = 0; i < md5Bytes.length; i++) { int val = ((int) md5Bytes[i]) & 0xff; if (val < 16) hexValue.append("0"); hexValue.append(Integer.toHexString(val)); } return hexValue.toString(); } catch (Exception e) { e.printStackTrace(); return null; } }}下图为测试使用的效果。

SourceCode下载链接:
https://github.com/renoqiu/IamListening
需要注意的是:下载的源代码并不能直接使用,读者需要自行修改IamListening/src/com/renoqiu/StatusPublishHelper.java类下的APP_ID, API_KEY, SECRET_KEY 这三个常量为你申请的应用的对应的值后,就可以正常使用了。
http://code.google.com/p/iamlisten/downloads/list可以从这里现在一个笔者编译好的apk文件,进行测试。
参考链接:
http://wiki.dev.renren.com/wiki/API
http://wiki.dev.renren.com/wiki/Calculate_signature
http://wiki.dev.renren.com/wiki/Authentication
- Android与人人网连接实例:我在听
- 我在听
- 我与人人网那些年
- XMPP连接人人网
- 为什么我不看好人人网在美国上市
- android高仿人人网
- 人人5功盖世时候,我在支持国产
- cocos2d-x for android:士兵听我的命令移动
- 我的Android平台“人人相册”客户端
- 我说你听
- 宝贝,听我说
- 请听我唱完这首歌
- 人人都玩开心网:Ext JS+Android+SSH整合开发Web与移动SNS
- 人人都玩开心网:Ext JS+Android+SSH整合开发Web与移动SNS
- 人人都玩开心网:Ext JS+Android+SSH整合开发Web与移动SNS
- 人人为我,我为人人
- 人人为我 我为人人
- 我为人人,人人为我。
- 可集成在XPage中的谷歌地图控件
- 详细AutoEventWireup <@ Page language=c# AutoEventWireup="false"和“True”>的研究
- 为什么要使用反射机制
- 如何通过SR(服务请求)提交问题
- ubuntu下ssh连接远程主机特别慢的解决办法
- Android与人人网连接实例:我在听
- 网络字节序与主机字节序
- 总结近一周学到的新知识
- 解决extjs中window拖动时控件透明的现象
- Java数据类型和MySql数据类型对应表
- 关口局--通信百科
- ACE拾遗
- 操作符重载手册(经典收藏)
- 如何自定义Struts2表单验证后的错误信息显示格式/样式_第二话