ALSA音频驱动研究(一)
来源:互联网 发布:申请域名需要多少钱 编辑:程序博客网 时间:2024/05/21 16:41
ALSA中的链表结构
在ALSA中设计到很多的链表结构,理解这些链表能更好的理解ALSA
a) card->devices
card->devices链表的建立方便了card相关设备的注册过程和设备的管理。通过这个链表,在注册设备的过程中,可以先将设备(包括设备编号,设备相应的操作指针等)添加进链表中,然后再遍历链表,各自的设备调用本身的注册函数将自身注册,完成card相关所有设备的注册过程。
b) snd_pcm_devices
该链表结构则是为了将已经存在了的PCM接口链接到该链表上,方便pcm的管理
c) snd_pcm_notify_list
此链表是为pcm注册的通用方法,如果只注册了一个snd_pcm_oss_notify
,则在遍历snd_pcm_devices时,查找到的pcm device均使用该notify的.n_register 进行PCM的注册。
d) card->controls
cadr->controls链表和card->devices链表类似,只不顾一个负责管设备,一个负责管控制接口,基本操作类似,不过PCM中没有相关寄存器,所以未应用.
e) snd_control_ioctls
与control有关的链表,如果在control中snd_ctl_add则是将control添加到此链表中。
f) timer->active_list_head
与timer有关的链表
九.驱动中各个结构体和各个模块的关系
a) soc_core所用到的各个结构体之间的关联图,可以说是体系中的CORE层。如下,

从上图中看,soc_core中多数函数以soc_device指针为函数参量的原因也很显然。
而遵循soc_core的调用关系,即cpu----àplatform----àcodec,在上述结构总很好的体现。
还有一个重要的结构就是runtime,该结构代表的是DAI runtime的信息。
b)上面的结构图是以snd_soc_device为主线的,即以设备驱动的创建过程分析所得。而下面的这个结构图,是以snd_pcm_substream为主线,主要是分析在open,hw_params,Write,read等操作中由substream得到所需结构的过程。

一. 概述
ALSA是Advanced Linux Sound Architecture 的缩写,目前已经成为了linux的主流音频体系结构,想了解更多的关于ALSA的这一开源项目的信息和知识,请查看以下网址:http://www.alsa-project.org/。
在内核设备驱动层,ALSA提供了alsa-driver,同时在应用层,ALSA为我们提供了alsa-lib,应用程序只要调用alsa-lib提供的API,即可以完成对底层音频硬件的控制。
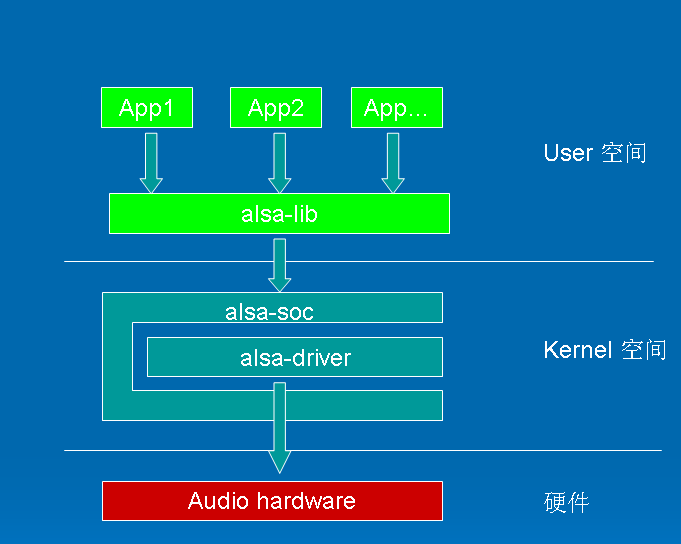
图 1.1 alsa的软件体系结构
由图1.1可以看出,用户空间的alsa-lib对应用程序提供统一的API接口,这样可以隐藏了驱动层的实现细节,简化了应用程序的实现难度。内核空间中,alsa-soc其实是对alsa-driver的进一步封装,他针对嵌入式设备提供了一些列增强的功能。本系列博文仅对嵌入式系统中的alsa-driver和alsa-soc进行讨论。
二. ALSA设备文件结构
我们从alsa在linux中的设备文件结构开始我们的alsa之旅. 看看我的电脑中的alsa驱动的设备文件结构:
$ cd /dev/snd
$ ls -l
crw-rw----+ 1 root audio 116, 8 2011-02-23 21:38 controlC0
crw-rw----+ 1 root audio 116, 4 2011-02-23 21:38 midiC0D0
crw-rw----+ 1 root audio 116, 7 2011-02-23 21:39 pcmC0D0c
crw-rw----+ 1 root audio 116, 6 2011-02-23 21:56 pcmC0D0p
crw-rw----+ 1 root audio 116, 5 2011-02-23 21:38 pcmC0D1p
crw-rw----+ 1 root audio 116, 3 2011-02-23 21:38 seq
crw-rw----+ 1 root audio 116, 2 2011-02-23 21:38 timer
$
我们可以看到以下设备文件:
- controlC0 --> 用于声卡的控制,例如通道选择,混音,麦克风的控制等
- midiC0D0 --> 用于播放midi音频
- pcmC0D0c --〉 用于录音的pcm设备
- pcmC0D0p --〉 用于播放的pcm设备
- seq --〉 音序器
- timer --〉 定时器
其中,C0D0代表的是声卡0中的设备0,pcmC0D0c最后一个c代表capture,pcmC0D0p最后一个p代表playback,这些都是alsa-driver中的命名规则。从上面的列表可以看出,我的声卡下挂了6个设备,根据声卡的实际能力,驱动实际上可以挂上更多种类的设备,在include/sound/core.h中,定义了以下设备类型:
- #define SNDRV_DEV_TOPLEVEL ((__force snd_device_type_t) 0)
- #define SNDRV_DEV_CONTROL ((__force snd_device_type_t) 1)
- #define SNDRV_DEV_LOWLEVEL_PRE ((__force snd_device_type_t) 2)
- #define SNDRV_DEV_LOWLEVEL_NORMAL ((__force snd_device_type_t) 0x1000)
- #define SNDRV_DEV_PCM ((__force snd_device_type_t) 0x1001)
- #define SNDRV_DEV_RAWMIDI ((__force snd_device_type_t) 0x1002)
- #define SNDRV_DEV_TIMER ((__force snd_device_type_t) 0x1003)
- #define SNDRV_DEV_SEQUENCER ((__force snd_device_type_t) 0x1004)
- #define SNDRV_DEV_HWDEP ((__force snd_device_type_t) 0x1005)
- #define SNDRV_DEV_INFO ((__force snd_device_type_t) 0x1006)
- #define SNDRV_DEV_BUS ((__force snd_device_type_t) 0x1007)
- #define SNDRV_DEV_CODEC ((__force snd_device_type_t) 0x1008)
- #define SNDRV_DEV_JACK ((__force snd_device_type_t) 0x1009)
- #define SNDRV_DEV_LOWLEVEL ((__force snd_device_type_t) 0x2000)
通常,我们更关心的是pcm和control这两种设备。
三. 驱动的代码文件结构
在Linux2.6代码树中,Alsa的代码文件结构如下:
sound
/core
/oss
/seq
/ioctl32
/include
/drivers
/i2c
/synth
/emux
/pci
/(cards)
/isa
/(cards)
/arm
/ppc
/sparc
/usb
/pcmcia /(cards)
/oss
/soc
/codecs
- core 该目录包含了ALSA驱动的中间层,它是整个ALSA驱动的核心部分
- core/oss 包含模拟旧的OSS架构的PCM和Mixer模块
- core/seq 有关音序器相关的代码
- include ALSA驱动的公共头文件目录,该目录的头文件需要导出给用户空间的应用程序使用,通常,驱动模块私有的头文件不应放置在这里
- drivers 放置一些与CPU、BUS架构无关的公用代码
- i2c ALSA自己的I2C控制代码
- pci pci声卡的顶层目录,子目录包含各种pci声卡的代码
- isa isa声卡的顶层目录,子目录包含各种isa声卡的代码
- soc 针对system-on-chip体系的中间层代码
- soc/codecs 针对soc体系的各种codec的代码,与平台无关
1. struct snd_card
1.1. snd_card是什么
snd_card可以说是整个ALSA音频驱动最顶层的一个结构,整个声卡的软件逻辑结构开始于该结构,几乎所有与声音相关的逻辑设备都是在snd_card的管理之下,声卡驱动的第一个动作通常就是创建一个snd_card结构体。正因为如此,本节中,我们也从 struct cnd_card开始吧。
1.2. snd_card的定义
snd_card的定义位于改头文件中:include/sound/core.h
- /* main structure for soundcard */
- struct snd_card {
- int number; /* number of soundcard (index to
- snd_cards) */
- char id[16]; /* id string of this card */
- char driver[16]; /* driver name */
- char shortname[32]; /* short name of this soundcard */
- char longname[80]; /* name of this soundcard */
- char mixername[80]; /* mixer name */
- char components[128]; /* card components delimited with
- space */
- struct module *module; /* top-level module */
- void *private_data; /* private data for soundcard */
- void (*private_free) (struct snd_card *card); /* callback for freeing of
- private data */
- struct list_head devices; /* devices */
- unsigned int last_numid; /* last used numeric ID */
- struct rw_semaphore controls_rwsem; /* controls list lock */
- rwlock_t ctl_files_rwlock; /* ctl_files list lock */
- int controls_count; /* count of all controls */
- int user_ctl_count; /* count of all user controls */
- struct list_head controls; /* all controls for this card */
- struct list_head ctl_files; /* active control files */
- struct snd_info_entry *proc_root; /* root for soundcard specific files */
- struct snd_info_entry *proc_id; /* the card id */
- struct proc_dir_entry *proc_root_link; /* number link to real id */
- struct list_head files_list; /* all files associated to this card */
- struct snd_shutdown_f_ops *s_f_ops; /* file operations in the shutdown
- state */
- spinlock_t files_lock; /* lock the files for this card */
- int shutdown; /* this card is going down */
- int free_on_last_close; /* free in context of file_release */
- wait_queue_head_t shutdown_sleep;
- struct device *dev; /* device assigned to this card */
- #ifndef CONFIG_SYSFS_DEPRECATED
- struct device *card_dev; /* cardX object for sysfs */
- #endif
- #ifdef CONFIG_PM
- unsigned int power_state; /* power state */
- struct mutex power_lock; /* power lock */
- wait_queue_head_t power_sleep;
- #endif
- #if defined(CONFIG_SND_MIXER_OSS) || defined(CONFIG_SND_MIXER_OSS_MODULE)
- struct snd_mixer_oss *mixer_oss;
- int mixer_oss_change_count;
- #endif
- };
- struct list_head devices 记录该声卡下所有逻辑设备的链表
- struct list_head controls 记录该声卡下所有的控制单元的链表
- void *private_data 声卡的私有数据,可以在创建声卡时通过参数指定数据的大小
2. 声卡的建立流程
2.1.1. 第一步,创建snd_card的一个实例
- struct snd_card *card;
- int err;
- ....
- err = snd_card_create(index, id, THIS_MODULE, 0, &card);
- index 一个整数值,该声卡的编号
- id 字符串,声卡的标识符
- 第四个参数 该参数决定在创建snd_card实例时,需要同时额外分配的私有数据的大小,该数据的指针最终会赋值给snd_card的private_data数据成员
- card 返回所创建的snd_card实例的指针
2.1.2. 第二步,创建声卡的芯片专用数据
声卡的专用数据主要用于存放该声卡的一些资源信息,例如中断资源、io资源、dma资源等。可以有两种创建方法:
- 通过上一步中snd_card_create()中的第四个参数,让snd_card_create自己创建
- // struct mychip 用于保存专用数据
- err = snd_card_create(index, id, THIS_MODULE,
- sizeof(struct mychip), &card);
- // 从private_data中取出
- struct mychip *chip = card->private_data;
- 自己创建:
- struct mychip {
- struct snd_card *card;
- ....
- };
- struct snd_card *card;
- struct mychip *chip;
- err = snd_card_create(index[dev], id[dev], THIS_MODULE, 0, &card);
- // 专用数据记录snd_card实例
- chip->card = card;
- .....
- chip = kzalloc(sizeof(*chip), GFP_KERNEL);
然后,把芯片的专有数据注册为声卡的一个低阶设备:
- static int snd_mychip_dev_free(struct snd_device *device)
- {
- return snd_mychip_free(device->device_data);
- }
- static struct snd_device_ops ops = {
- .dev_free = snd_mychip_dev_free,
- };
- ....
- snd_device_new(card, SNDRV_DEV_LOWLEVEL, chip, &ops);
2.1.3. 第三步,设置Driver的ID和名字
- strcpy(card->driver, "My Chip");
- strcpy(card->shortname, "My Own Chip 123");
- sprintf(card->longname, "%s at 0x%lx irq %i",
- card->shortname, chip->ioport, chip->irq);
snd_card的driver字段保存着芯片的ID字符串,user空间的alsa-lib会使用到该字符串,所以必须要保证该ID的唯一性。shortname字段更多地用于打印信息,longname字段则会出现在/proc/asound/cards中。
2.1.4. 第四步,创建声卡的功能部件(逻辑设备),例如PCM,Mixer,MIDI等
这时候可以创建声卡的各种功能部件了,还记得开头的snd_card结构体的devices字段吗?每一种部件的创建最终会调用snd_device_new()来生成一个snd_device实例,并把该实例链接到snd_card的devices链表中。
通常,alsa-driver的已经提供了一些常用的部件的创建函数,而不必直接调用snd_device_new(),比如:
PCM ---- snd_pcm_new()
RAWMIDI -- snd_rawmidi_new()
CONTROL -- snd_ctl_create()
TIMER -- snd_timer_new()
INFO -- snd_card_proc_new()
JACK -- snd_jack_new()
2.1.5. 第五步,注册声卡
- err = snd_card_register(card);
- if (err < 0) {
- snd_card_free(card);
- return err;
- }
2.2. 一个实际的例子
我把/sound/arm/pxa2xx-ac97.c的部分代码贴上来:
- static int __devinit pxa2xx_ac97_probe(struct platform_device *dev)
- {
- struct snd_card *card;
- struct snd_ac97_bus *ac97_bus;
- struct snd_ac97_template ac97_template;
- int ret;
- pxa2xx_audio_ops_t *pdata = dev->dev.platform_data;
- if (dev->id >= 0) {
- dev_err(&dev->dev, "PXA2xx has only one AC97 port./n");
- ret = -ENXIO;
- goto err_dev;
- }
- ////(1)////
- ret = snd_card_create(SNDRV_DEFAULT_IDX1, SNDRV_DEFAULT_STR1,
- THIS_MODULE, 0, &card);
- if (ret < 0)
- goto err;
- card->dev = &dev->dev;
- ////(3)////
- strncpy(card->driver, dev->dev.driver->name, sizeof(card->driver));
- ////(4)////
- ret = pxa2xx_pcm_new(card, &pxa2xx_ac97_pcm_client, &pxa2xx_ac97_pcm);
- if (ret)
- goto err;
- ////(2)////
- ret = pxa2xx_ac97_hw_probe(dev);
- if (ret)
- goto err;
- ////(4)////
- ret = snd_ac97_bus(card, 0, &pxa2xx_ac97_ops, NULL, &ac97_bus);
- if (ret)
- goto err_remove;
- memset(&ac97_template, 0, sizeof(ac97_template));
- ret = snd_ac97_mixer(ac97_bus, &ac97_template, &pxa2xx_ac97_ac97);
- if (ret)
- goto err_remove;
- ////(3)////
- snprintf(card->shortname, sizeof(card->shortname),
- "%s", snd_ac97_get_short_name(pxa2xx_ac97_ac97));
- snprintf(card->longname, sizeof(card->longname),
- "%s (%s)", dev->dev.driver->name, card->mixername);
- if (pdata && pdata->codec_pdata[0])
- snd_ac97_dev_add_pdata(ac97_bus->codec[0], pdata->codec_pdata[0]);
- snd_card_set_dev(card, &dev->dev);
- ////(5)////
- ret = snd_card_register(card);
- if (ret == 0) {
- platform_set_drvdata(dev, card);
- return 0;
- }
- err_remove:
- pxa2xx_ac97_hw_remove(dev);
- err:
- if (card)
- snd_card_free(card);
- err_dev:
- return ret;
- }
- static int __devexit pxa2xx_ac97_remove(struct platform_device *dev)
- {
- struct snd_card *card = platform_get_drvdata(dev);
- if (card) {
- snd_card_free(card);
- platform_set_drvdata(dev, NULL);
- pxa2xx_ac97_hw_remove(dev);
- }
- return 0;
- }
- static struct platform_driver pxa2xx_ac97_driver = {
- .probe = pxa2xx_ac97_probe,
- .remove = __devexit_p(pxa2xx_ac97_remove),
- .driver = {
- .name = "pxa2xx-ac97",
- .owner = THIS_MODULE,
- #ifdef CONFIG_PM
- .pm = &pxa2xx_ac97_pm_ops,
- #endif
- },
- };
- static int __init pxa2xx_ac97_init(void)
- {
- return platform_driver_register(&pxa2xx_ac97_driver);
- }
- static void __exit pxa2xx_ac97_exit(void)
- {
- platform_driver_unregister(&pxa2xx_ac97_driver);
- }
- module_init(pxa2xx_ac97_init);
- module_exit(pxa2xx_ac97_exit);
- MODULE_AUTHOR("Nicolas Pitre");
- MODULE_DESCRIPTION("AC97 driver for the Intel PXA2xx chip");
驱动程序通常由probe回调函数开始,对一下2.1中的步骤,是否有相似之处?
经过以上的创建步骤之后,声卡的逻辑结构如下图所示:

图 2.2.1 声卡的软件逻辑结构
下面的章节里我们分别讨论一下snd_card_create()和snd_card_register()这两个函数。
3. snd_card_create()
snd_card_create()在/sound/core/init.c中定义。
- /**
- * snd_card_create - create and initialize a soundcard structure
- * @idx: card index (address) [0 ... (SNDRV_CARDS-1)]
- * @xid: card identification (ASCII string)
- * @module: top level module for locking
- * @extra_size: allocate this extra size after the main soundcard structure
- * @card_ret: the pointer to store the created card instance
- *
- * Creates and initializes a soundcard structure.
- *
- * The function allocates snd_card instance via kzalloc with the given
- * space for the driver to use freely. The allocated struct is stored
- * in the given card_ret pointer.
- *
- * Returns zero if successful or a negative error code.
- */
- int snd_card_create(int idx, const char *xid,
- struct module *module, int extra_size,
- struct snd_card **card_ret)
首先,根据extra_size参数的大小分配内存,该内存区可以作为芯片的专有数据使用(见前面的介绍):
- card = kzalloc(sizeof(*card) + extra_size, GFP_KERNEL);
- if (!card)
- return -ENOMEM;
拷贝声卡的ID字符串:
- if (xid)
- strlcpy(card->id, xid, sizeof(card->id));
如果传入的声卡编号为-1,自动分配一个索引编号:
- if (idx < 0) {
- for (idx2 = 0; idx2 < SNDRV_CARDS; idx2++)
- /* idx == -1 == 0xffff means: take any free slot */
- if (~snd_cards_lock & idx & 1<<idx2) {
- if (module_slot_match(module, idx2)) {
- idx = idx2;
- break;
- }
- }
- }
- if (idx < 0) {
- for (idx2 = 0; idx2 < SNDRV_CARDS; idx2++)
- /* idx == -1 == 0xffff means: take any free slot */
- if (~snd_cards_lock & idx & 1<<idx2) {
- if (!slots[idx2] || !*slots[idx2]) {
- idx = idx2;
- break;
- }
- }
- }
初始化snd_card结构中必要的字段:
- card->number = idx;
- card->module = module;
- INIT_LIST_HEAD(&card->devices);
- init_rwsem(&card->controls_rwsem);
- rwlock_init(&card->ctl_files_rwlock);
- INIT_LIST_HEAD(&card->controls);
- INIT_LIST_HEAD(&card->ctl_files);
- spin_lock_init(&card->files_lock);
- INIT_LIST_HEAD(&card->files_list);
- init_waitqueue_head(&card->shutdown_sleep);
- #ifdef CONFIG_PM
- mutex_init(&card->power_lock);
- init_waitqueue_head(&card->power_sleep);
- #endif
建立逻辑设备:Control
- /* the control interface cannot be accessed from the user space until */
- /* snd_cards_bitmask and snd_cards are set with snd_card_register */
- err = snd_ctl_create(card);
建立proc文件中的info节点:通常就是/proc/asound/card0
- err = snd_info_card_create(card);
把第一步分配的内存指针放入private_data字段中:
- if (extra_size > 0)
- card->private_data = (char *)card + sizeof(struct snd_card);
4. snd_card_register()
snd_card_create()在/sound/core/init.c中定义。
- /**
- * snd_card_register - register the soundcard
- * @card: soundcard structure
- *
- * This function registers all the devices assigned to the soundcard.
- * Until calling this, the ALSA control interface is blocked from the
- * external accesses. Thus, you should call this function at the end
- * of the initialization of the card.
- *
- * Returns zero otherwise a negative error code if the registrain failed.
- */
- int snd_card_register(struct snd_card *card)
首先,创建sysfs下的设备:
- if (!card->card_dev) {
- card->card_dev = device_create(sound_class, card->dev,
- MKDEV(0, 0), card,
- "card%i", card->number);
- if (IS_ERR(card->card_dev))
- card->card_dev = NULL;
- }
其中,sound_class是在/sound/sound_core.c中创建的:
- static char *sound_devnode(struct device *dev, mode_t *mode)
- {
- if (MAJOR(dev->devt) == SOUND_MAJOR)
- return NULL;
- return kasprintf(GFP_KERNEL, "snd/%s", dev_name(dev));
- }
- static int __init init_soundcore(void)
- {
- int rc;
- rc = init_oss_soundcore();
- if (rc)
- return rc;
- sound_class = class_create(THIS_MODULE, "sound");
- if (IS_ERR(sound_class)) {
- cleanup_oss_soundcore();
- return PTR_ERR(sound_class);
- }
- sound_class->devnode = sound_devnode;
- return 0;
- }
由此可见,声卡的class将会出现在文件系统的/sys/class/sound/下面,并且,sound_devnode()也决定了相应的设备节点也将会出现在/dev/snd/下面。
接下来的步骤,通过snd_device_register_all()注册所有挂在该声卡下的逻辑设备,snd_device_register_all()实际上是通过snd_card的devices链表,遍历所有的snd_device,并且调用snd_device的ops->dev_register()来实现各自设备的注册的。
- if ((err = snd_device_register_all(card)) < 0)
- return err;
最后就是建立一些相应的proc和sysfs下的文件或属性节点,代码就不贴了。
至此,整个声卡完成了建立过程。
1. PCM是什么
PCM是英文Pulse-code modulation的缩写,中文译名是脉冲编码调制。我们知道在现实生活中,人耳听到的声音是模拟信号,PCM就是要把声音从模拟转换成数字信号的一种技术,他的原理简单地说就是利用一个固定的频率对模拟信号进行采样,采样后的信号在波形上看就像一串连续的幅值不一的脉冲,把这些脉冲的幅值按一定的精度进行量化,这些量化后的数值被连续地输出、传输、处理或记录到存储介质中,所有这些组成了数字音频的产生过程。
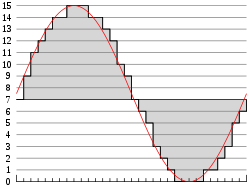
图1.1 模拟音频的采样、量化
PCM信号的两个重要指标是采样频率和量化精度,目前,CD音频的采样频率通常为44100Hz,量化精度是16bit。通常,播放音乐时,应用程序从存储介质中读取音频数据(MP3、WMA、AAC......),经过解码后,最终送到音频驱动程序中的就是PCM数据,反过来,在录音时,音频驱动不停地把采样所得的PCM数据送回给应用程序,由应用程序完成压缩、存储等任务。所以,音频驱动的两大核心任务就是:
- playback 如何把用户空间的应用程序发过来的PCM数据,转化为人耳可以辨别的模拟音频
- capture 把mic拾取到得模拟信号,经过采样、量化,转换为PCM信号送回给用户空间的应用程序
2. alsa-driver中的PCM中间层
ALSA已经为我们实现了功能强劲的PCM中间层,自己的驱动中只要实现一些底层的需要访问硬件的函数即可。
要访问PCM的中间层代码,你首先要包含头文件<sound/pcm.h>,另外,如果需要访问一些与 hw_param相关的函数,可能也要包含<sound/pcm_params.h>。
每个声卡最多可以包含4个pcm的实例,每个pcm实例对应一个pcm设备文件。pcm实例数量的这种限制源于linux设备号所占用的位大小,如果以后使用64位的设备号,我们将可以创建更多的pcm实例。不过大多数情况下,在嵌入式设备中,一个pcm实例已经足够了。
一个pcm实例由一个playback stream和一个capture stream组成,这两个stream又分别有一个或多个substreams组成。

图2.1 声卡中的pcm结构
在嵌入式系统中,通常不会像图2.1中这么复杂,大多数情况下是一个声卡,一个pcm实例,pcm下面有一个playback和capture stream,playback和capture下面各自有一个substream。
下面一张图列出了pcm中间层几个重要的结构,他可以让我们从uml的角度看一看这列结构的关系,理清他们之间的关系,对我们理解pcm中间层的实现方式。
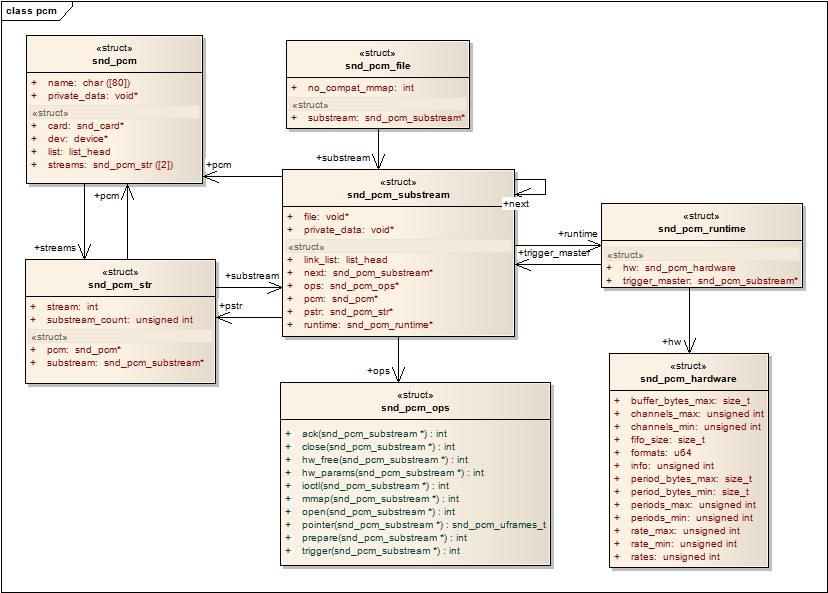
图2.2 pcm中间层的几个重要的结构体的关系图
- snd_pcm是挂在snd_card下面的一个snd_device
- snd_pcm中的字段:streams[2],该数组中的两个元素指向两个snd_pcm_str结构,分别代表playback stream和capture stream
- snd_pcm_str中的substream字段,指向snd_pcm_substream结构
- snd_pcm_substream是pcm中间层的核心,绝大部分任务都是在substream中处理,尤其是他的ops(snd_pcm_ops)字段,许多user空间的应用程序通过alsa-lib对驱动程序的请求都是由该结构中的函数处理。它的runtime字段则指向snd_pcm_runtime结构,snd_pcm_runtime记录这substream的一些重要的软件和硬件运行环境和参数。
3. 新建一个pcm
alsa-driver的中间层已经为我们提供了新建pcm的api:
int snd_pcm_new(struct snd_card *card, const char *id, int device, int playback_count, int capture_count,
struct snd_pcm ** rpcm);
参数device 表示目前创建的是该声卡下的第几个pcm,第一个pcm设备从0开始。
参数playback_count 表示该pcm将会有几个playback substream。
参数capture_count 表示该pcm将会有几个capture substream。
另一个用于设置pcm操作函数接口的api:
void snd_pcm_set_ops(struct snd_pcm *pcm, int direction, struct snd_pcm_ops *ops);
新建一个pcm可以用下面一张新建pcm的调用的序列图进行描述:
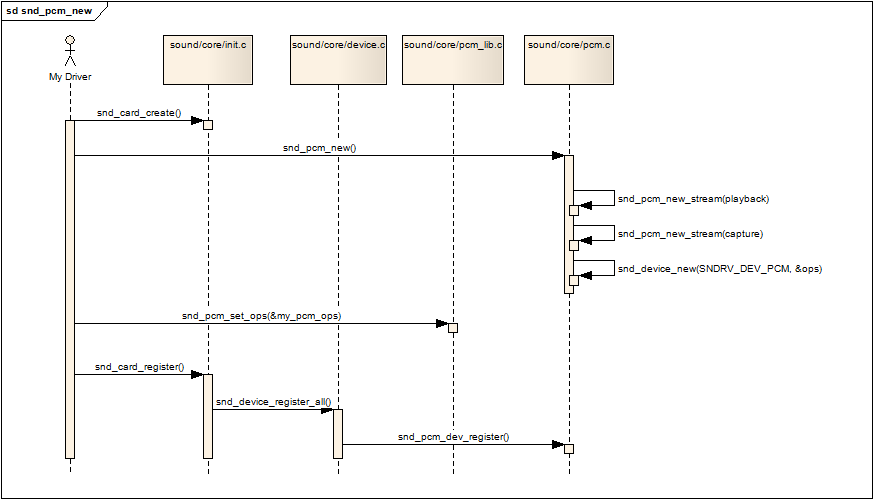
图3.1 新建pcm的序列图
- snd_card_create pcm是声卡下的一个设备(部件),所以第一步是要创建一个声卡
- snd_pcm_new 调用该api创建一个pcm,才该api中会做以下事情
- 如果有,建立playback stream,相应的substream也同时建立
- 如果有,建立capture stream,相应的substream也同时建立
- 调用snd_device_new()把该pcm挂到声卡中,参数ops中的dev_register字段指向了函数snd_pcm_dev_register,这个回调函数会在声卡的注册阶段被调用。
- snd_pcm_set_ops 设置操作该pcm的控制/操作接口函数,参数中的snd_pcm_ops结构中的函数通常就是我们驱动要实现的函数
- snd_card_register 注册声卡,在这个阶段会遍历声卡下的所有逻辑设备,并且调用各设备的注册回调函数,对于pcm,就是第二步提到的snd_pcm_dev_register函数,该回调函数建立了和用户空间应用程序(alsa-lib)通信所用的设备文件节点:/dev/snd/pcmCxxDxxp和/dev/snd/pcmCxxDxxc
4. 设备文件节点的建立(dev/snd/pcmCxxDxxp、pcmCxxDxxc)
4.1 struct snd_minor
每个snd_minor结构体保存了声卡下某个逻辑设备的上下文信息,他在逻辑设备建立阶段被填充,在逻辑设备被使用时就可以从该结构体中得到相应的信息。pcm设备也不例外,也需要使用该结构体。该结构体在include/sound/core.h中定义。
- struct snd_minor {
- int type; /* SNDRV_DEVICE_TYPE_XXX */
- int card; /* card number */
- int device; /* device number */
- const struct file_operations *f_ops; /* file operations */
- void *private_data; /* private data for f_ops->open */
- struct device *dev; /* device for sysfs */
- };
在sound/sound.c中定义了一个snd_minor指针的全局数组:
- static struct snd_minor *snd_minors[256];
前面说过,在声卡的注册阶段(snd_card_register),会调用pcm的回调函数snd_pcm_dev_register(),这个函数里会调用函数snd_register_device_for_dev():
- static int snd_pcm_dev_register(struct snd_device *device)
- {
- ......
- /* register pcm */
- err = snd_register_device_for_dev(devtype, pcm->card,
- pcm->device,
- &snd_pcm_f_ops[cidx],
- pcm, str, dev);
- ......
- }
我们再进入snd_register_device_for_dev():
- int snd_register_device_for_dev(int type, struct snd_card *card, int dev,
- const struct file_operations *f_ops,
- void *private_data,
- const char *name, struct device *device)
- {
- int minor;
- struct snd_minor *preg;
- if (snd_BUG_ON(!name))
- return -EINVAL;
- preg = kmalloc(sizeof *preg, GFP_KERNEL);
- if (preg == NULL)
- return -ENOMEM;
- preg->type = type;
- preg->card = card ? card->number : -1;
- preg->device = dev;
- preg->f_ops = f_ops;
- preg->private_data = private_data;
- mutex_lock(&sound_mutex);
- #ifdef CONFIG_SND_DYNAMIC_MINORS
- minor = snd_find_free_minor();
- #else
- minor = snd_kernel_minor(type, card, dev);
- if (minor >= 0 && snd_minors[minor])
- minor = -EBUSY;
- #endif
- if (minor < 0) {
- mutex_unlock(&sound_mutex);
- kfree(preg);
- return minor;
- }
- snd_minors[minor] = preg;
- preg->dev = device_create(sound_class, device, MKDEV(major, minor),
- private_data, "%s", name);
- if (IS_ERR(preg->dev)) {
- snd_minors[minor] = NULL;
- mutex_unlock(&sound_mutex);
- minor = PTR_ERR(preg->dev);
- kfree(preg);
- return minor;
- }
- mutex_unlock(&sound_mutex);
- return 0;
- }
- 首先,分配并初始化一个snd_minor结构中的各字段
- type:SNDRV_DEVICE_TYPE_PCM_PLAYBACK/SNDRV_DEVICE_TYPE_PCM_CAPTURE
- card: card的编号
- device:pcm实例的编号,大多数情况为0
- f_ops:snd_pcm_f_ops
- private_data:指向该pcm的实例
- 根据type,card和pcm的编号,确定数组的索引值minor,minor也作为pcm设备的此设备号
- 把该snd_minor结构的地址放入全局数组snd_minors[minor]中
- 最后,调用device_create创建设备节点
4.2 设备文件的建立
在4.1节的最后,设备文件已经建立,不过4.1节的重点在于snd_minors数组的赋值过程,在本节中,我们把重点放在设备文件中。
回到pcm的回调函数snd_pcm_dev_register()中:
- static int snd_pcm_dev_register(struct snd_device *device)
- {
- int cidx, err;
- char str[16];
- struct snd_pcm *pcm;
- struct device *dev;
- pcm = device->device_data;
- ......
- for (cidx = 0; cidx < 2; cidx++) {
- ......
- switch (cidx) {
- case SNDRV_PCM_STREAM_PLAYBACK:
- sprintf(str, "pcmC%iD%ip", pcm->card->number, pcm->device);
- devtype = SNDRV_DEVICE_TYPE_PCM_PLAYBACK;
- break;
- case SNDRV_PCM_STREAM_CAPTURE:
- sprintf(str, "pcmC%iD%ic", pcm->card->number, pcm->device);
- devtype = SNDRV_DEVICE_TYPE_PCM_CAPTURE;
- break;
- }
- /* device pointer to use, pcm->dev takes precedence if
- * it is assigned, otherwise fall back to card's device
- * if possible */
- dev = pcm->dev;
- if (!dev)
- dev = snd_card_get_device_link(pcm->card);
- /* register pcm */
- err = snd_register_device_for_dev(devtype, pcm->card,
- pcm->device,
- &snd_pcm_f_ops[cidx],
- pcm, str, dev);
- ......
- }
- ......
- }
以上代码我们可以看出,对于一个pcm设备,可以生成两个设备文件,一个用于playback,一个用于capture,代码中也确定了他们的命名规则:
- playback -- pcmCxDxp,通常系统中只有一各声卡和一个pcm,它就是pcmC0D0p
- capture -- pcmCxDxc,通常系统中只有一各声卡和一个pcm,它就是pcmC0D0c
snd_pcm_f_ops
snd_pcm_f_ops是一个标准的文件系统file_operations结构数组,它的定义在sound/core/pcm_native.c中:
- const struct file_operations snd_pcm_f_ops[2] = {
- {
- .owner = THIS_MODULE,
- .write = snd_pcm_write,
- .aio_write = snd_pcm_aio_write,
- .open = snd_pcm_playback_open,
- .release = snd_pcm_release,
- .llseek = no_llseek,
- .poll = snd_pcm_playback_poll,
- .unlocked_ioctl = snd_pcm_playback_ioctl,
- .compat_ioctl = snd_pcm_ioctl_compat,
- .mmap = snd_pcm_mmap,
- .fasync = snd_pcm_fasync,
- .get_unmapped_area = snd_pcm_get_unmapped_area,
- },
- {
- .owner = THIS_MODULE,
- .read = snd_pcm_read,
- .aio_read = snd_pcm_aio_read,
- .open = snd_pcm_capture_open,
- .release = snd_pcm_release,
- .llseek = no_llseek,
- .poll = snd_pcm_capture_poll,
- .unlocked_ioctl = snd_pcm_capture_ioctl,
- .compat_ioctl = snd_pcm_ioctl_compat,
- .mmap = snd_pcm_mmap,
- .fasync = snd_pcm_fasync,
- .get_unmapped_area = snd_pcm_get_unmapped_area,
- }
- };
snd_pcm_f_ops作为snd_register_device_for_dev的参数被传入,并被记录在snd_minors[minor]中的字段f_ops中。最后,在snd_register_device_for_dev中创建设备节点:
- snd_minors[minor] = preg;
- preg->dev = device_create(sound_class, device, MKDEV(major, minor),
- private_data, "%s", name);
4.3 层层深入,从应用程序到驱动层pcm
4.3.1 字符设备注册
在sound/core/sound.c中有alsa_sound_init()函数,定义如下:
- static int __init alsa_sound_init(void)
- {
- snd_major = major;
- snd_ecards_limit = cards_limit;
- if (register_chrdev(major, "alsa", &snd_fops)) {
- snd_printk(KERN_ERR "unable to register native major device number %d/n", major);
- return -EIO;
- }
- if (snd_info_init() < 0) {
- unregister_chrdev(major, "alsa");
- return -ENOMEM;
- }
- snd_info_minor_register();
- return 0;
- }
register_chrdev中的参数major与之前创建pcm设备是device_create时的major是同一个,这样的结果是,当应用程序open设备文件/dev/snd/pcmCxDxp时,会进入snd_fops的open回调函数,我们将在下一节中讲述open的过程。
4.3.2 打开pcm设备
从上一节中我们得知,open一个pcm设备时,将会调用snd_fops的open回调函数,我们先看看snd_fops的定义:
- static const struct file_operations snd_fops =
- {
- .owner = THIS_MODULE,
- .open = snd_open
- };
跟入snd_open函数,它首先从inode中取出此设备号,然后以次设备号为索引,从snd_minors全局数组中取出当初注册pcm设备时填充的snd_minor结构(参看4.1节的内容),然后从snd_minor结构中取出pcm设备的f_ops,并且把file->f_op替换为pcm设备的f_ops,紧接着直接调用pcm设备的f_ops->open(),然后返回。因为file->f_op已经被替换,以后,应用程序的所有read/write/ioctl调用都会进入pcm设备自己的回调函数中,也就是4.2节中提到的snd_pcm_f_ops结构中定义的回调。
- static int snd_open(struct inode *inode, struct file *file)
- {
- unsigned int minor = iminor(inode);
- struct snd_minor *mptr = NULL;
- const struct file_operations *old_fops;
- int err = 0;
- if (minor >= ARRAY_SIZE(snd_minors))
- return -ENODEV;
- mutex_lock(&sound_mutex);
- mptr = snd_minors[minor];
- if (mptr == NULL) {
- mptr = autoload_device(minor);
- if (!mptr) {
- mutex_unlock(&sound_mutex);
- return -ENODEV;
- }
- }
- old_fops = file->f_op;
- file->f_op = fops_get(mptr->f_ops);
- if (file->f_op == NULL) {
- file->f_op = old_fops;
- err = -ENODEV;
- }
- mutex_unlock(&sound_mutex);
- if (err < 0)
- return err;
- if (file->f_op->open) {
- err = file->f_op->open(inode, file);
- if (err) {
- fops_put(file->f_op);
- file->f_op = fops_get(old_fops);
- }
- }
- fops_put(old_fops);
- return err;
- }
下面的序列图展示了应用程序如何最终调用到snd_pcm_f_ops结构中的回调函数:
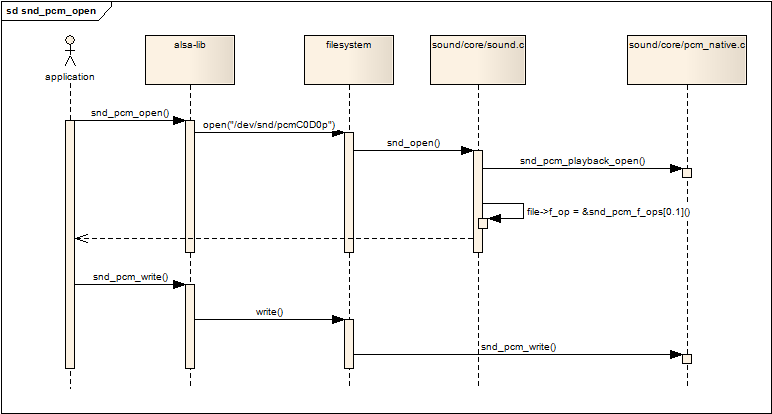
图4.3.2.1 应用程序操作pcm设备
- ALSA音频驱动研究(一)
- ALSA音频驱动研究(一)
- ALSA音频驱动研究
- ALSA音频驱动研究(二)
- ALSA音频驱动研究(三)
- ALSA音频驱动研究(二)
- ALSA音频驱动研究(三)
- linux驱动:音频驱动(一)ALSA
- Linux ALSA音频驱动(一)
- Linux ALSA音频驱动(二)
- alsa音频驱动相关
- Alsa 音频编程小结(一)
- ALSA Soc音频驱动分析
- ALSA Soc音频驱动分析
- linux ALSA音频驱动框架
- ALSA 音频驱动简要解析
- ALSA Soc音频驱动分析
- Alsa音频驱动学习笔记
- QT:我自己封装的一个简易的二维表类SimpleTable
- PostgreSQL启动过程中的那些事十六:启动进程一
- 2.CSS文字颜色定义,背景色定义
- 深度剖析C++模型对象
- 黑马程序员--线程及共享变量
- ALSA音频驱动研究(一)
- 24、25岁的年龄,是时候成熟些,做些该该做的事,想些着边际的事了。
- 基数排序
- SqlDataReader的Read方法
- CSS样式背景图片
- Android Unable to open sync connection
- 编译Hadoop的Eclipse插件(Windows)
- 五年程序员人生的点点滴滴
- 三分查找的时间复杂度分析