PhantomJS 服务端渲染网页,记录各个请求信息
来源:互联网 发布:协同过滤算法实现 编辑:程序博客网 时间:2024/05/22 10:40
from: http://phantomjs.org
from : http://bluehua.org/tag/phantomjs
Applies to: PhantomJS 1.6.
This instruction assumes that PhantomJS is built and its executable is place somewhere in the PATH.
All of the examples given here are available in the code repository under the sub-directory examples/. For each example, there is two version for each JavaScript and CoffeeScript.
Consult also the API reference.
Hello, world!
Create a new text file that contains the following two lines:
console.log('Hello, world!');phantom.exit();
Save it as hello.js and the run it:
phantomjs hello.js
The output is:
Hello, world!
In the first line, console.log will print the passed string to the terminal. In the second line,phantom.exit terminates the execution.
It is very important to call phantom.exit at some point in the script, otherwise PhantomJS will not be terminated at all.
Delay
To have an asynchronous (non-blocking) delay, use the usual window.setTimeout or window.setInterval function. This fibo.js example prints the Fibonacci sequence with each new number showing up every 300 ms.
var fibs = [0, 1];var ticker = window.setInterval(function () { console.log(fibs[fibs.length - 1]); fibs.push(fibs[fibs.length - 1] + fibs[fibs.length - 2]); if (fibs.length > 10) { window.clearInterval(ticker); phantom.exit(); }}, 300);
Because setTimeout/setInterval is non-blocking, do not call phantom.exit right after that. Doing so will cause the script to terminate immediately.
Script Arguments
Using the args array from the System module, the script can obtain the list of command-line arguments.
Consider the following arguments.js example:
var system = require('system');if (system.args.length === 1) { console.log('Try to pass some args when invoking this script!');} else { system.args.forEach(function (arg, i) { console.log(i + ': ' + arg); });}phantom.exit();
If it is invoked using the following command:
phantomjs argument.js The quick brown fox
then the output will be:
0: arguments.js 1: The 2: quick 3: brown 4: fox
Loading
The script invoked by PhantomJS initially runs on an empty web page. This is not so useful, thus PhantomJS offers the possibility of loading arbitrary URL viaphantom.open function on a web page. To encapsulate a web page, instantiate aWebPage object.
A specific URL can be loaded using its open() function. A typical usage is:
var page = require('webpage').create();page.open(url, function (status) { // do something});
The callback in the open() is executed when the page loading is completed, with status equals to "success" if there is no error and "failed" is error has occurred.
The above construct is a convenient version of the following:
var page = require('webpage').create();page.onLoadFinished = function (status) { // do something};page.open(url);
Beside onLoadFinished, there is also onLoadStarted which is invoked when page loading starts for the first time:
var page = require('webpage').create();page.onLoadStarted = function () { console.log('Start loading...');};page.onLoadFinished = function (status) { console.log('Loading finished.');};page.open(url);
The following loadspeed.js script loads a specified URL (do not forget the http protocol) and measures the time it takes to load it.
var page = require('webpage').create(), t, address;if (phantom.args.length === 0) { console.log('Usage: loadspeed.js <some URL>'); phantom.exit();} else { t = Date.now(); address = phantom.args[0]; page.open(address, function (status) { if (status !== 'success') { console.log('FAIL to load the address'); } else { t = Date.now() - t; console.log('Loading time ' + t + ' msec'); } phantom.exit(); });}
Run the script with the command:
phantomjs loadspeed.js http://www.google.com
It outputs something like:
Loading http://www.google.comLoading time 719 msec
Page settings
The behavior of the web page can be set via its settings object which can contain properties such as:
- loadImages defines whether to load inline images or not (default to true)
- userAgent defines the user agent string passed to the server
For the full list, refer to the complete page settings reference.
The initial values for the settings are from the command-line options specified when invoking the script.
As an example, here is how to change the user agent:
var page = require('webpage').create();page.settings.userAgent = 'Dragonless Phantom';page.open(url, function (status) { // do something});
Rendering
A web page can be rasterized to an image or a PDF file using `render()` function.
This rasterize.js is all it takes to capture a web site.
var page = require('webpage').create(), address, output, size;if (phantom.args.length < 2 || phantom.args.length > 3) { console.log('Usage: rasterize.js URL filename'); phantom.exit();} else { address = phantom.args[0]; output = phantom.args[1]; page.viewportSize = { width: 600, height: 600 }; page.open(address, function (status) { if (status !== 'success') { console.log('Unable to load the address!'); } else { window.setTimeout(function () { page.render(output); phantom.exit(); }, 200); } });}
An example to produce the rendering of the famous Tiger (from SVG):
phantomjs rasterize.js http://ariya.github.com/svg/tiger.svg tiger.png
which gives the following tiger.png:

Another example: show the polar clock (from RaphaelJS):
phantomjs rasterize.js http://raphaeljs.com/polar-clock.html clock.png

Producing PDF output is also possible, e.g. from a Wikipedia article:
phantomjs rasterize.js 'http://en.wikipedia.org/w/index.php?title=Jakarta&printable=yes' jakarta.pdf
or when creating printer-ready cheat sheet:
phantomjs rasterize.js http://www.nihilogic.dk/labs/webgl_cheat_sheet/WebGL_Cheat_Sheet.htm webgl.pdf
Code Evaluation
To evaluate JavaScript or CoffeeScript code in the context of the web page, useevaluate() function. The execution is sandboxed, there is no way for the code to access any JavaScript objects and variables outside its own page context. An object can be returned fromevaluate(), however it is limited to simple objects and can't contain functions or closures.
Here is an example to show the title of a web page:
var page = require('webpage').create();page.open(url, function (status) { var title = page.evaluate(function () { return document.title; }); console.log('Page title is ' + title);});
Any console message from a web page, including from the code inside evaluate(), will not be displayed by default. To override this behavior, use theonConsoleMessage callback. The previous example can be rewritten to:
var page = require('webpage').create();page.onConsoleMessage = function (msg) { console.log('Page title is ' + msg);};page.open(url, function (status) { page.evaluate(function () { console.log(document.title); });});
Canvas
Canvas can be easily constructed and utilized. The following colorwheel.js produces the color wheel.
var page = new WebPage;page.viewportSize = { width: 400, height : 400 };page.content = '<html><body><canvas id="surface"></canvas></body></html>';page.evaluate(function() { var el = document.getElementById('surface'), context = el.getContext('2d'), width = window.innerWidth, height = window.innerHeight, cx = width / 2, cy = height / 2, radius = width / 2.3, imageData, pixels, hue, sat, value, i = 0, x, y, rx, ry, d, f, g, p, u, v, w, rgb; el.width = width; el.height = height; imageData = context.createImageData(width, height); pixels = imageData.data; for (y = 0; y < height; y = y + 1) { for (x = 0; x < width; x = x + 1, i = i + 4) { rx = x - cx; ry = y - cy; d = rx * rx + ry * ry; if (d < radius * radius) { hue = 6 * (Math.atan2(ry, rx) + Math.PI) / (2 * Math.PI); sat = Math.sqrt(d) / radius; g = Math.floor(hue); f = hue - g; u = 255 * (1 - sat); v = 255 * (1 - sat * f); w = 255 * (1 - sat * (1 - f)); pixels[i] = [255, v, u, u, w, 255, 255][g]; pixels[i + 1] = [w, 255, 255, v, u, u, w][g]; pixels[i + 2] = [u, u, w, 255, 255, v, u][g]; pixels[i + 3] = 255; } } } context.putImageData(imageData, 0, 0); document.body.style.backgroundColor = 'white'; document.body.style.margin = '0px';});page.render('colorwheel.png');phantom.exit();

DOM Manipulation
Since the script is executed as if it is running on a web browser, standard DOM scripting and CSS selectors work just fine.
The following useragent.js example demonstrates reading the innerText property of the element whose id ismyagent:
var page = require('webpage').create();console.log('The default user agent is ' + page.settings.userAgent);page.settings.userAgent = 'SpecialAgent';page.open('http://www.httpuseragent.org', function (status) { if (status !== 'success') { console.log('Unable to access network'); } else { var ua = page.evaluate(function () { return document.getElementById('myagent').innerText; }); console.log(ua); } phantom.exit();});
The above example also demonstrates the use of phantom.userAgent to customize the user agent sent to the web server.
Here is another example: finding pizza in Mountain View.
var page = require('webpage').create(), url = 'http://lite.yelp.com/search?find_desc=pizza&find_loc=94040&find_submit=Search';page.open(url, function (status) { if (status !== 'success') { console.log('Unable to access network'); } else { var results = page.evaluate(function() { var list = document.querySelectorAll('span.address'), pizza = [], i; for (i = 0; i < list.length; i++) { pizza.push(list[i].innerText); } return pizza; }); console.log(results.join('\n')); } phantom.exit();});
An illustration of the use of document.querySelectorAll is given here: show the recent twitter status:
var page = require('webpage').create();page.onConsoleMessage = function(msg) { console.log(msg);};page.open(encodeURI("http://mobile.twitter.com/Sencha"), function (status) { if (status !== "success") { console.log("Unable to access network"); } else { page.evaluate(function() { var list = document.querySelectorAll('span.status'); for (var i = 0; i < list.length; ++i) { console.log((i + 1) + ": " + list[i].innerHTML.replace(/<.*?>/g, '')); } }); } phantom.exit();});
Network traffic
All the resource requests and responses can be sniffed using the onResourceRequested andonResourceReceived. An example to dump everything is:
var page = require('webpage').create();page.onResourceRequested = function (request) { console.log('Request ' + JSON.stringify(request, undefined, 4));};page.onResourceReceived = function (response) { console.log('Receive ' + JSON.stringify(response, undefined, 4));};page.open(url);
The included examples/netsniff.js shows how to capture and process all the resource requests and responses and export the result inHAR format.
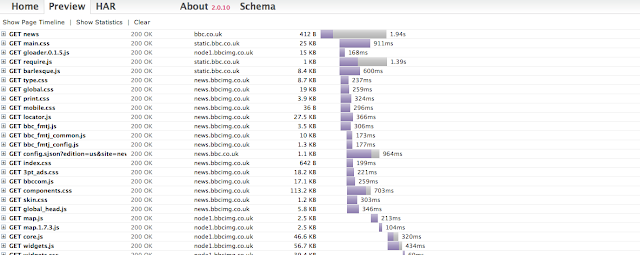
The following shows the waterfall diagram obtained from BBC website:
- PhantomJS 服务端渲染网页,记录各个请求信息
- socket服务端,记录接受客户端发送的请求信息
- selenium 和 phantomJS或chrome浏览器抓取渲染网页
- selenium设置chrome和phantomjs的请求头信息
- PhantomJS(webkit)/SlimerJS (Gecko) + CasperJS获取JavaScript渲染后的网页内容
- PhantomJS(webkit)/SlimerJS (Gecko) + CasperJS获取JavaScript渲染后的网页内容
- php结合phantomjs实现网页截屏、抓取js渲染的页面
- 网页整页截屏利器phantomjs
- 网页整页截屏利器phantomjs
- phantomjs 抓取网页
- php phantomjs 网页截图
- PhantomJS网页截图
- Java PhantomJs下载网页
- phantomjs 抓取网页
- Python网页信息采集:使用PhantomJS采集淘宝天猫商品内容
- 网页前端ajax请求与.net服务端的交互
- 服务端渲染 vs 客户端渲染
- 网页上传的不完整信息更改服务端数据
- 数塔
- DP---矩阵连乘
- 关于spring定时器一次调用却触发了两次trigger的问题分析
- python中做层次聚类,使用scipy.cluster.hierarchy.fclusterdata方法
- A/Gb mode, lu mode
- PhantomJS 服务端渲染网页,记录各个请求信息
- html 图片底端对齐
- Struts2配置文件
- 重新安装apahce2 服务器
- 多态和重载
- DP---最长公共子序列
- ZOJ 3627 Treasure Hunt II
- DP---动态规划
- File.separatorChar