ExtAspNet应用技巧(二十二) - Ext4JSLint之JSON文件创建树控件
来源:互联网 发布:尘埃3 windows live 编辑:程序博客网 时间:2024/06/01 07:40
引子
Ext4JSLint是使用ExtAspNet来展示JSLint-Toolkit检查结果的开源项目。
JSLint-Toolkit是一个使用Rhino和JSLint的开源项目,可以对一个文件夹中的所有JavaScript进行语法检查,并显示友好的检查结果。
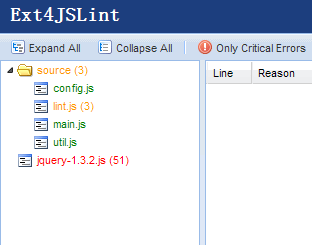
下面是JSLint-Toolkit生成的检查结果:
[{ "name": "source", "type": "folder", "kids": [ { "name": "config.js", "type": "file", "errors": [0, 0, 0] }, { "name": "lint.js", "type": "file", "errors": [3, 0, 3] }, { "name": "main.js", "type": "file", "errors": [0, 0, 0] }, { "name": "util.js", "type": "file", "errors": [0, 0, 0] } ], "basePath": "scripts/source", "fileCount": 4, "errors": [3, 0, 3] }, { "name": "jquery-1.3.2.js", "type": "file", "basePath": "scripts/jquery-1.3.2.js", "errors": [51, 43, 8] }] 这样一个JSON字符串其实描述了一个如下的文件结构:
+scripts/source -config.js -lint.js -main.js -util.js -scripts/jquery-1.3.2.js
特别注意的是,根节点多了一个属性basePath用来表示根路径。
errors表示此JavaScript文件中的错误数(这是一个数组,第一个表示总数,第二个表示严重错误的个数)。
页面效果:
ASPX标签定义
<ext:Tree runat="server" ID="Tree1" ShowBorder="false" ShowHeader="false" AutoScroll="true" EnableArrows="true" OnNodeCommand="Tree1_NodeCommand"> </ext:Tree>
标签定义非常简单,因为所有的逻辑都在后台实现了。
同时定义了点击树节点的事件处理OnNodeCommand="Tree1_NodeCommand",因为我们要在点击树节点时更新中间的Grid,也即是当前JavaScript的错误列表。
树与递归
只要有树的地方就少不了递归函数,因此这段代码对于我们理解递归也很有帮助。
首先看看页面初始化代码:
protected void Page_Load(object sender, EventArgs e) { if (!IsPostBack) { LoadData(true); } } #region LoadData private void LoadData(bool showAllErrors) { btnExpandAll.OnClientClick = Tree1.GetExpandAllNodesReference(); btnCollapseAll.OnClientClick = Tree1.GetCollapseAllNodesReference(); string treestr = GetFileContent("~/data/json/tree.json"); List<string> treePathList = new List<string>(); ResolveMenuTree(new JSONArray(treestr), treePathList, showAllErrors, Tree1.Nodes); } private string GetFileContent(string path) { string treestr = String.Empty; using (StreamReader sr = new StreamReader(Server.MapPath(path))) { treestr = sr.ReadToEnd(); } return treestr; } private void ResolveMenuTree(JSONArray ja, List<string> treePathList, bool showAllErrors, ExtAspNet.TreeNodeCollection nodes) { // TODO 递归生成树 } private string GetTreePath(List<string> treePath) { string path = String.Empty; foreach (string node in treePath) { path += node + "/"; } return path.TrimEnd('/'); } 我们通过Nii.JSON这个开源类库(已经包含在ExtAspNet中),来将JSON字符串转换为JSONArray对象,以便在递归中使用:
JSONArray ja = new JSONArray(treestr);
递归生成树
为了让大家看清问题的本质,我首先放出一个简单的递归,只完成基本功能:
private void ResolveMenuTree2(JSONArray ja, List<string> treePathList, bool showAllErrors, ExtAspNet.TreeNodeCollection nodes) { for (int i = 0; i < ja.Count; i++) { JSONObject kid = ja[i] as JSONObject; string name = kid.getString("name"); // 当前路径,如果basePath存在说明是根目录 if (kid.has("basePath")) { treePathList.Add(kid.getString("basePath")); } else { treePathList.Add(name); } string currentPath = GetTreePath(treePathList); string type = kid.getString("type"); // 如果文件夹中没有文件,则不添加此文件夹 if (type == "folder" && kid.getInt("fileCount") == 0) { treePathList.RemoveAt(treePathList.Count - 1); continue; } ExtAspNet.TreeNode node = new ExtAspNet.TreeNode(); nodes.Add(node); node.Text = name; node.Text = String.Format("<span qtip=\"{0}\">{1}</span>", currentPath, node.Text); if (type == "folder") { node.SingleClickExpand = true; ResolveMenuTree2(kid.getJSONArray("kids"), treePathList, showAllErrors, node.Nodes); } else { node.Leaf = true; } treePathList.RemoveAt(treePathList.Count - 1); } } 在这段代码中,我们通过treePathList来记录当前节点的路径,这也是一个关键点。
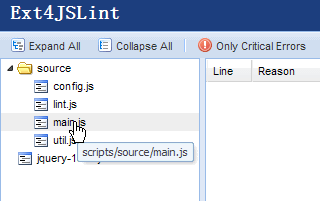
此时生成的页面截图:
完整的代码(根据错误设置节点颜色,同时为有错误的节点可回发):
private void ResolveMenuTree(JSONArray ja, List<string> treePathList, bool showAllErrors, ExtAspNet.TreeNodeCollection nodes) { for (int i = 0; i < ja.Count; i++) { JSONObject kid = ja[i] as JSONObject; string name = kid.getString("name"); // 当前路径,如果basePath存在说明是根目录 if (kid.has("basePath")) { treePathList.Add(kid.getString("basePath")); } else { treePathList.Add(name); } string currentPath = GetTreePath(treePathList); // 获取JSLint错误数 JSONArray errors = kid.getJSONArray("errors"); int errorCount = errors.getInt(0); int criticalErrorCount = errors.getInt(1); if (showAllErrors) { if (errorCount > 0) { name += String.Format(" ({0})", errorCount); } } else { if (criticalErrorCount > 0) { name += String.Format(" ({0})", criticalErrorCount); } } string type = kid.getString("type"); // 如果文件夹中没有文件,则不添加此文件夹 if (type == "folder" && kid.getInt("fileCount") == 0) { treePathList.RemoveAt(treePathList.Count - 1); continue; } ExtAspNet.TreeNode node = new ExtAspNet.TreeNode(); nodes.Add(node); node.Text = name; //node.ToolTip = currentPath; // 节点的显示颜色 string style = ""; if (showAllErrors) { if (errorCount == 0) { style = "color:green;"; } else { if (criticalErrorCount == 0) { style = "color:#FF9900;"; } else { style = "color:#FF0000;"; } } } else { if (criticalErrorCount != 0) { style = "color:#FF0000;"; } else { style = "color:green;"; } } node.Text = String.Format("<span qtip=\"{2}\" style=\"{0}\">{1}</span>", style, node.Text, currentPath); if (type == "folder") { node.SingleClickExpand = true; ResolveMenuTree(kid.getJSONArray("kids"), treePathList, showAllErrors, node.Nodes); } else { node.Leaf = true; if (showAllErrors) { if (errorCount != 0) { node.EnablePostBack = true; node.CommandName = currentPath; } } else { if (criticalErrorCount != 0) { node.EnablePostBack = true; node.CommandName = currentPath; } } } treePathList.RemoveAt(treePathList.Count - 1); } } 下一章将讲述如何点击左侧树节点时更新中间的Grid控件,并加载右侧的IFrame(即JavaScript文件的内容)。
下载全部源代码
- ExtAspNet应用技巧(二十二) - Ext4JSLint之JSON文件创建树控件
- ExtAspNet应用技巧(二十一) - Ext4JSLint之整体框架
- ExtAspNet应用技巧(二十三) - Ext4JSLint之Grid的使用
- ExtAspNet应用技巧(二十) - 如何创建ext:Timer控件
- ExtAspNet应用技巧(十二) - 系统登录
- ExtAspNet应用技巧(二)
- ExtAspNet应用技巧(六) - ViewState与动态创建控件
- ExtAspNet应用技巧(二十四) - AppBox之Grid数据库分页排序与批量删除
- ExtAspNet应用技巧(五) - 动态创建工具栏菜单
- ExtAspNet应用技巧(一)
- ExtAspNet应用技巧(九) - Grid导出为Excel文件
- ExtAspNet应用技巧(七) - ViewState优化
- ExtAspNet应用技巧(十四) - 系统设置
- ExtAspNet应用技巧(十六) - 菜单管理
- ExtAspNet应用技巧(十七) - 新增菜单
- ExtAspNet应用技巧(十八) - 编辑菜单
- ExtAspNet应用技巧(十九) - 日志管理
- ExtAspNet应用技巧(十) - Grid导出为Excel文件(续)
- 飞凌S5PV210开发板处理器简介
- ExtAspNet v2.1.1
- ExtAspNet应用技巧(二十) - 如何创建ext:Timer控件
- SqlServer和Oracle中一些常用的sql语句5 流程控制语句
- ExtAspNet应用技巧(二十一) - Ext4JSLint之整体框架
- ExtAspNet应用技巧(二十二) - Ext4JSLint之JSON文件创建树控件
- MySpace你居然报黄页?
- ExtAspNet应用技巧(二十三) - Ext4JSLint之Grid的使用
- ExtAspNet应用技巧(二十四) - AppBox之Grid数据库分页排序与批量删除
- ExtAspNet v2.1.2
- ExtAspNet v2.1.3
- ExtAspNet v2.1.4
- ExtAspNet v2.1.5
- ExtAspNet v2.1.6