视图编程指南View Programming Guide for iOS-1
来源:互联网 发布:中国linux公社 编辑:程序博客网 时间:2024/05/16 11:34
一、 View and Window Architecture
1,View Architecture Fundamentals(视图建筑基础):
一个view对象声明了一个矩形区域并且处理drawing and touch事件。一个view也可以是其他view的父对象并且coordinate(坐标) the placement and sizing of those views。 UIView class已经做了很多工作来管理views之间的关系,但是你仍然需要自定义行为。
Views与Core Animation layer协同工作来处理着色和动画view的内容。每个UIKit中的view is backed by a layer object(通常是一个CALayer类的实例),which manges the backing store for the view and handles view-related animations。很多操作应该通过UIView interface,然而,有时候你需要更多的控制在rendering(着色) or animation behavior of your view,你可以在其layer上做操作.
为了理解views and layers之间的关系,最好看一个例子。下图展示了view的结构--来自例子 ViewTransitions –连带着 the underlying Core Animation layers的关系。Views包含一个window(window也是view),一个普通的UIView对象—表演着Container View的角色,一个ImageView,一个 toolbar来表现控制,一个bar button item (它本身不是一个view但是管理其内部的view) 每个view都有一个相应的layer对象,通过view的layer属性访问。 (因为Bar Button项不是一个view,所以你不能直接访问他的layer) 在这些layer对象下面是Core Animation rendering objects and ultimately the hardware buffers used to manage the actual bits on the screen.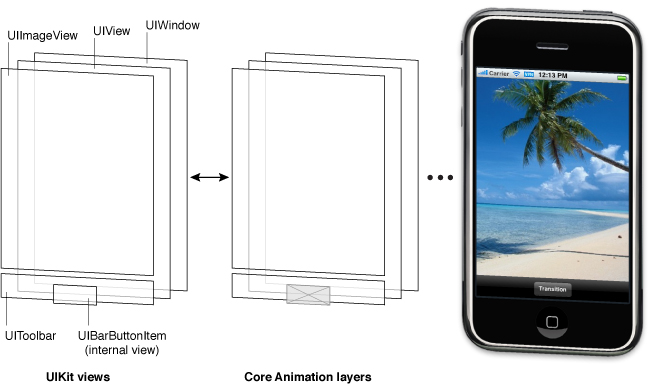
1)View Hierachies and subview management:
subview & superview。
视觉上,subview的内容obscure(遮掩)all or part of the content of its parent view。如果subview是全部不透明的,那么subview占据的区域会全部被遮掩。如果subview是部分透明的,the content from the two views is blended(混合) together prior to being displayed on the screen. 每个superview 存储他的subviews在一个ordered array里并且array中的order(顺序)也影响subview的可见性。如果两个兄弟subview重叠了,后添加的subview显示在上面。
更改superview的size,会影响subview的size和position。隐藏superview,更改superview的alpha值,or 对superview进行数学上的坐标转换都会对其subview起影响。
View间的结构决定了事件的响应方式。事件会从subview传递给superview,并一直传递给application object,他一般会丢弃事件。(注意viewController的view将事件传递给window之前会先将事件传递给viewController)
2)The View Drawing Cycle:
当一个view第一次出现在屏幕时,系统要求他draw自己的内容。系统会捕捉一个快照,并使用这个快照作为view的表现形式。如果你不更改view的内容,那么他的draw方法可能永远不会再被调用。快照image会重复使用。如果你更改了view的内容,你通知system the view has changed,则系统再次要求他绘制自身,并捕获快照。
当你的view的内容更改了,你不要直接redraw。取而代之的是,你invalidate the view using setNeedsDisplay 或 setNeedsDisplayInRect: 方法。这些方法高速系统view的content 已经发生变化并且需要重画在下一次机会。系统会等待,直到当前的run loop结束,然后initiating and drawing operations。这个延迟给你一个机会invalidate多个views,add or remove views from your hierarchy,hide views ,resize views,and reposition views all at once。你所作的所有更改会一次性体现出来。
注意:更改view的geometry(几何)不会自动使系统redraw the view’s content。The view’s conentMode属性决定如何更改view’s geometry are interpreted(被解释,被执行).很多content modes stretch(伸展) or reposition the existing snapshot within the view’s boundaries and do not create a new one.
自定义的UIView subclass,一般需要Override drawRect:方法来描绘view的内容。3)Content Modes:
当你的view做出更改使,系统快照不一定被重建,这取决于ContentMode属性。当你做下面的事情时,view的content Mode is applied:
a)更改view的frame or bounds属性的宽度或高度
b)指定一个转换,包括缩放因素,使用view的 transform属性.
默认地,大多数view的contentMode属性被设置为UIViewContentModeScaleToFill,这导致view’s content将被缩放至新的frame尺寸。下图展示了一些contentMode的结果。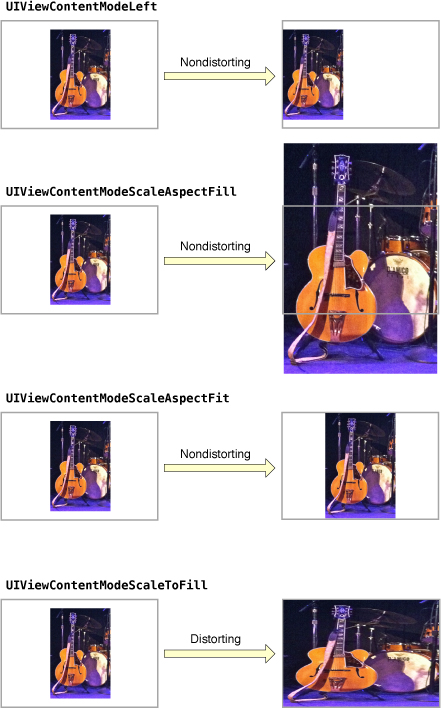
Content modes are good for recycling the contents of your view, but you can also set the content mode to theUIViewContentModeRedraw value when you specifically want your custom views to redraw themselves during scaling and resizing operations. Setting your view’s content mode to this value forces the system to call your view’s drawRect: method in response to geometry changes. In general, you should avoid using this value whenever possible, and you should certainly not use it with the standard system views.一般,你应该尽可能避免使用这个属性,而且不要对系统view使用这个属性。
4)Stretchable Views:
你可以设计一个view的部分区域为stretchable,当view的尺寸发生变化时,只有stretchable区域会受影响。一般你会使用stretchable areas for buttons or other views where part of the view defines a repeatable pattern。可以在两个轴上设定stretchable area.
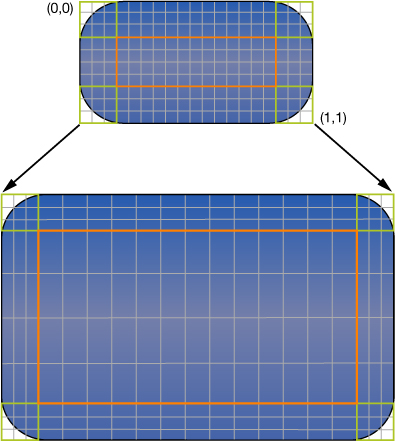
你使用contentStretch属性设置可拉伸区域. 这个属性接受一个rectangle,他的values are normalized to the range 0.0 to 1.0. 当拉伸view时,系统乘以这些normalized values by the view’s current bounds and scale factor to determine which pixel or pixels need to be stretched。
只有view的contentMode是填充类型时,contentStretch才有作用。即This means that stretchable views are supported only with the UIViewContentModeScaleToFill, UIViewContentModeScaleAspectFit, and UIViewContentModeScaleAspectFill content modes.
Note: 使用contentStretch属性被推荐 over 使用创建一个stretchable UIImage object when specifying the background for a view. Stretchable views are handled entirely in the Core Animation Layer,which typically offers better performance.
5)Built-In Animation Support:内建动画支持
UIView的很多属性都是animatable—就是说,半自动支持从一个值到另一个值时的动画。To perform an animation for one of these animatable properties, all you have to do is:
A)告诉UIKit,你想要动画
B)更改属性的值。
Amony the properties you can animate on a UIView object are the following:
frame – 使用这个来 animate position and size changes for the view
bounds – 使用这个来 animate changes to the size of view
center – animate position of view
transform – 旋转或缩放view
alpha -- 透明度
backgroundColor -- 背景颜色
contentStretch – 更改如何拉伸内容
2, View Geometry and Coordinate Systems(视图几何和坐标系统):
1)以左上角为原点。如图
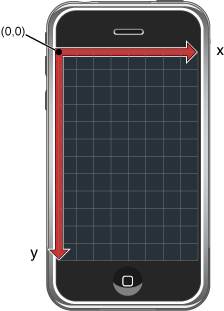
因为每个view和window声明他们自己的本地坐标系统,所以你需要知道在任何给定的time 是哪种坐标系统在起作用。例如OpenGL ES使用左下角为原点。
2)Frame、Bounds、Center属性之间的关系:
更改一个属性,影响其他的属性。
默认地,一个view’s frame不被其superview’s frame clipped,即anySubview can lie outside of the superview’s frame,你可以设置superview’s clipsToBounds属性为YES。
不管有没有clipped,触摸事件总是按superview’s frame来决定。换句话说,显示在superview’s frame之外的view的触摸事件不会被提交。
3)Coordinate System Transformations:坐标系统变换
a)要更改整个view,则修改view的transform属性
b)要在view的drawRect:方法中修改特定部分的content,则更改active graphics context的affine(仿射)transform。
如图
4)Points Versus Pixels: 点 VS 像素
iPhone and iPod touch 为 320*480 points
iPad为 768 * 1024 points
3,The Runtime Interaction Model for Views(运行时交互模型):
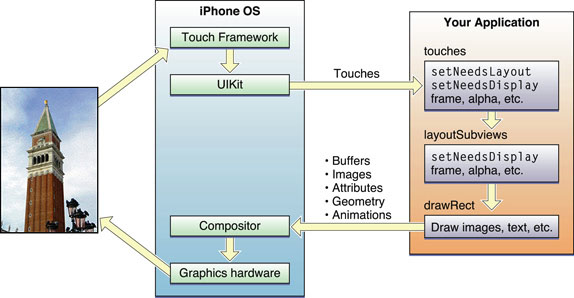
上图中事件顺序为:
a)用户触摸屏幕
b)硬件报告触摸事件给UIKit框架
c)UIKit框架打包触摸到一个UIEvent对象并分发给合适的view。
D)你的view的事件处理代码响应事件。例如,你的代码可能:
I)更改view或subview的属性(frame,bounds,alpha等等)
ii)调用setNeedsLayout方法来标识view需要更新
iii)调用setNeedsDisplay or setNeedsDisplayInRect:方法来标识view需要重绘。
Iv)通知controller 数据变化。
E)如果view的几何变化了,UIKit更新他的subview依照下面的规则:
I)如果你已经为你的view配置了autoresizing,UIKit按照每个view的规则调整他们。
Ii)如果view实现了layoutSubviews方法,UIKit将调用他
F)如果view的任何部分标志了需要被重绘,UIKit要求view重绘他们本身
G)任何更新的view与剩余的应用程序可见的内容混合在一起并发送给graphics hardware 显示
H)grahics hardware 把描绘的内容发给屏幕显示。
在前面的步骤中,主要的integration(集成,综合) points for your own custom view are:
a)事件处理方法:
i)touchesBegan:withEvent:
ii)touchesMoved:withEvent:
iii) touchesEnded:withEvent:
iv)touchesCancelled:withEvent:
b)layoutSubviews方法
c) drawRect:方法
4,Tips for Using Views Effectively:高效使用view的小技巧
1)Views Do Not Always Have a Corresponding View Controller:
2) Minimize Custom Drawing:
3)Take Advantage of Content Modes:
4)Declare Views as Opaque Whenever Possible: 节省资源
5)Adjust Your View’s Drawing Behavior When Scrolling:
6)Do Not Customize Controls by Embedding Subviews:
二、Windows
1,介绍:
每一个应用程序都需要一个UIWindow的实例,他有如下几个职责:
1)他包含你的应用程序的可见内容。
2)他充当一个关键角色在传送触摸事件到你的views和其他的application objects
3)他与你的application’s view controller工作 to facilitate(促进,帮助,使实现) orientation changes
在iOS中,window没有标题栏,关闭按钮和任何其他可见修饰。Window始终是一个空容器。
2,Tasks That Involve Windows(关于Windows的任务):
1)使用window对象来 convert points and rectangles to or from the window’s local coordinate system。
2)使用window notifications to track window-related changes。
3,Creating and Configuring a Window:
你可以使用代码或IB创建main Window,在任何一种情况,你都要在launch time创建window,并应该retain it and store a reference to it in your application delegate object。如果你的application创建额外的windows,have the application create them lazily when they are needed。例如,如果你的应用支持displaying content on an external display,it should wait until a display is connected before creating the corresponding window.
1)Creating Windows in Interface Builder:重要提示:当在IB中创建你的Window时,建议你enable the full screen at Launch option in the attributes inspector。如果不enable,你的触摸事件不能被接收。
在Info.plist中指定NSMainNibFile属性为你的nib file
2)Creating a Window Programmatically:在application:didFinishLaunchingWithOptions:方法中
self.window = [[[UIWindow alloc] initWithFrame:[[UIScreen mainScreen] bounds]] autorelease];
3)Adding Content to Your Window:
[window addSubview:viewController.view];
你还可以配置window的rootViewController属性在你的nib file中。
4)Changing the Window Level:
每个UIWindow对象都有一个可配置的windowLevel属性,这个属性决定window如何be positioned relative to other windows。一般你不用修改这个属性。新window自动被指定为normal window level在创建他时. The normal window level表明window显示app-related content。 Higher window levels are reserved for information that needs to float about the application content,such as the system status bar or alert messages.and although you can assign windows to these levels yourself,the system usually does this for automatically creates the needed windows to display those items.
4,Monitoring Window Changes:
如果你想在你的应用中跟踪window的显示或消失,你可以使用下面的通知:
1)UIWindowDidBecomeVisibleNotfication
2) UIWindowDidBecomeHiddenNotification
3) UIWindowDidBecomeKeyNotification
4) UIWindowDidResignKeyNitfication
这些通知被递交 来响应代码改变你的app’s window。因此,当你显示或隐藏一个window时,UIWindowDidBecomeVisibleNotification and UIWindowDidBecomeHiddenNotification通知被递交。但这些通知不被递交 当你的应用进入后台执行状态。甚至当你的应用在后台时你的window不显示在屏幕上,他仍然被认为可见with in the context of your application。
UIWindowDidBecomeKeyNotification and UIWindowDidResignKeyNotification通知帮助你的应用追踪 哪个window才是 key window—哪个window接受keyboard events和其他非触摸事件。Whereas(然而,反之) 触摸事件被递交到产生此事件的window,不含油坐标值的事件被递交到keywindow。在同一时刻只能有一个key window。
5,Displaying Content on an External Display:
To display content on an external display,你必须创建一个additional window。新window一般默认地与main screen相关联。更改与其相关联的screen导致window的内容重新导向相应的display。一旦window与正确的screen相关联,你就可以给她add views,就像操作main screen一样。
UIScreen class维持着一个screen对象的列表代表可用的hardware displays。一般,只有一个Screen object代表the main display,但是支持连接到一个eternal display的设备可以有一个额外的screen object available.支持an external display的设备包括拥有Retina displays的iPhone & iPod touch和iPad。更老的设备,像iPhone 3GS,不支持external Displays.
The process for displaying content on an external display is described in the following sections. However, the following steps summarize the basic process:
1)在应用启动时,注册screen connection and disconnection 通知。
2)当需要显示external display的内容时,创建并配置一个window。
A)使用UIScreen的screens属性获得external display的Screen对象
B)Assign the UIScreen object for the external display to the screen property of the window.
C)调整分辨率
D)增加适合的views到window
3)显示window并且正常的更新他。
Handling Screen Connection and DisConnection Notifications:
你应该使用这些通知来更新应用状态或创建或release external display window.
需要记住的是通知可能在任何时候来到,甚至在应用程序在后台挂起的时候。因此,最好observe 通知 from an object that is going to exist for the duration of you application’s runtime,例如your application delegate。如果你的应用被挂起,通知会被队列直到你的应用退出挂起状态并且开始在前台或后台运行。
下面是示例代码:
- (void)setupScreenConnectionNotificationHandlers
{
NSNotificationCenter* center = [NSNotificationCenter defaultCenter];
[center addObserver:self selector:@selector(handleScreenConnectNotification:)
name:UIScreenDidConnectNotification object:nil];
[center addObserver:self selector:@selector(handleScreenDisconnectNotification:)
name:UIScreenDidDisconnectNotification object:nil];
}
- (void)handleScreenConnectNotification:(NSNotification*)aNotification
{
UIScreen* newScreen = [aNotification object];
CGRect screenBounds = newScreen.bounds;
if (!_secondWindow)
{
_secondWindow = [[UIWindow alloc] initWithFrame:screenBounds];
_secondWindow.screen = newScreen;
// Set the initial UI for the window.
[viewController displaySelectionInSecondaryWindow:_secondWindow];
}
}
- (void)handleScreenDisconnectNotification:(NSNotification*)aNotification
{
if (_secondWindow)
{
// Hide and then delete the window.
_secondWindow.hidden = YES;
[_secondWindow release];
_secondWindow = nil;
// Update the main screen based on what is showing here.
[viewController displaySelectionOnMainScreen];
}
}
Configuring a Window for an External Display
- (void)checkForExistingScreenAndInitializeIfPresent
{
if ([[UIScreen screens] count] > 1)
{
// Associate the window with the second screen.
// The main screen is always at index 0.
UIScreen* secondScreen = [[UIScreen screens] objectAtIndex:1];
CGRect screenBounds = secondScreen.bounds;
_secondWindow = [[UIWindow alloc] initWithFrame:screenBounds];
_secondWindow.screen = secondScreen;
// Add a white background to the window
UIView* whiteField = [[UIView alloc] initWithFrame:screenBounds];
whiteField.backgroundColor = [UIColor whiteColor];
[_secondWindow addSubview:whiteField];
[whiteField release];
// Center a label in the view.
NSString* noContentString = [NSString stringWithFormat:@"<no content>"];
CGSize stringSize = [noContentString sizeWithFont:[UIFont systemFontOfSize:18]];
CGRect labelSize = CGRectMake((screenBounds.size.width - stringSize.width) / 2.0,
(screenBounds.size.height - stringSize.height) / 2.0,
stringSize.width, stringSize.height);
UILabel* noContentLabel = [[UILabel alloc] initWithFrame:labelSize];
noContentLabel.text = noContentString;
noContentLabel.font = [UIFont systemFontOfSize:18];
[whiteField addSubview:noContentLabel];
// Go ahead and show the window.
_secondWindow.hidden = NO;
}
}
Configuring the Screen Mode of an External Display:
如果你打算使用一个非默认的Screen Mode,你应该apply that mode to the UIScreen object在关联screen到window之前。The UIScreenMode类声明了the attributes of a single screen mode。你可以获得一个modes列表 supported by a screen from its availableModes属性并且iterate(迭代)这个列表获得一个你需要的mode。- 视图编程指南View Programming Guide for iOS-1
- View Programming Guide for iOS 视图编程指南 - iOS
- 视图编程指南View Programming Guide for iOS-2
- [译]iOS视图编程指南(View-Programming-Guide-for-iOS)之介绍
- 翻译_iOS视图编程指南(View Programming Guide for iOS)之介绍
- View Programming Guide for iOS
- view controller programming guide for iOS(1)
- View Programming Guide for iOS 摘要
- View Programming Guide for iOS读书笔记
- Scroll View Programming Guide for iOS 笔记
- 《View Controller Programming Guide for iOS》笔记
- 《View Programming Guide for iOS》笔记
- Scroll View Programming Guide for iOS 笔记
- 《View Controller Programming Guide for iOS》笔记
- View Controller Programming Guide for iOS--(一)
- View Controller Programming Guide for iOS--(二)
- 《View Controller Programming Guide for iOS》笔记
- 《View Programming Guide for iOS》笔记
- eclipse3.6配置tomcat6.0
- Java提高:你能正确使用String、StringBuffer、StringBuilder吗
- group by后使用rollup子句总结
- The Linux SG_IO ioctl in the 2.6 series
- 启动一个服务监控android系统的打印日志--实现卸载软件提示
- 视图编程指南View Programming Guide for iOS-1
- 正确地做事与做正确的事同样重要
- 总有一天你将破蛹而出
- php 数组常用操作 (合并,拆分,追加,查找,删除...)
- 海思海思 Hi264DecFrame 函数 求助
- tcp/ip协议详解第二章数据链路层读书笔记
- Android 实用工具Hierarchy Viewer实战
- 视图编程指南View Programming Guide for iOS-2
- 关于VCPROJ文件的说明