CoreGraphics简单绘图
来源:互联网 发布:淘宝购物车无法结算 ie 编辑:程序博客网 时间:2024/06/05 21:18
一、导入coreGraphics.framework
二、绘制图形
1、绘制矩形
01// 绘制矩形02- (void)drawRectangle {03 04 // 定义矩形的rect05 CGRect rectangle = CGRectMake(100, 290, 120, 25);06 07 // 获取当前图形,视图推入堆栈的图形,相当于你所要绘制图形的图纸08 CGContextRef ctx = UIGraphicsGetCurrentContext();09 10 // 在当前路径下添加一个矩形路径11 CGContextAddRect(ctx, rectangle);12 13 // 设置试图的当前填充色14 CGContextSetFillColorWithColor(ctx, [UIColor blackColor].CGColor);15 16 // 绘制当前路径区域17 CGContextFillPath(ctx);18}2、绘制椭圆
01// 绘制椭圆02- (void)drawEllipse {03 04 // 获取当前图形,视图推入堆栈的图形,相当于你所要绘制图形的图纸05 CGContextRef ctx = UIGraphicsGetCurrentContext();06 07 // 定义其rect08 CGRect rectangle = CGRectMake(10, 100, 300, 280);09 10 // 在当前路径下添加一个椭圆路径11 CGContextAddEllipseInRect(ctx, rectangle);12 13 // 设置当前视图填充色14 CGContextSetFillColorWithColor(ctx, [UIColor orangeColor].CGColor);15 16 // 绘制当前路径区域17 CGContextFillPath(ctx);18}3、绘制三角形
01// 绘制三角形02- (void)drawTriangle {03 04 // 获取当前图形,视图推入堆栈的图形,相当于你所要绘制图形的图纸05 CGContextRef ctx = UIGraphicsGetCurrentContext();06 07 // 创建一个新的空图形路径。08 CGContextBeginPath(ctx);09 10 /**11 * @brief 在指定点开始一个新的子路径 参数按顺序说明12 *13 * @param c 当前图形14 * @param x 指定点的x坐标值15 * @param y 指定点的y坐标值16 *17 */18 CGContextMoveToPoint(ctx, 160, 220);19 20 /**21 * @brief 在当前点追加直线段,参数说明与上面一样22 */23 CGContextAddLineToPoint(ctx, 190, 260);24 CGContextAddLineToPoint(ctx, 130, 260);25 26 // 关闭并终止当前路径的子路径,并在当前点和子路径的起点之间追加一条线27 CGContextClosePath(ctx);28 29 // 设置当前视图填充色30 CGContextSetFillColorWithColor(ctx, [UIColor blackColor].CGColor);31 32 // 绘制当前路径区域33 CGContextFillPath(ctx);34}4、绘制曲线
01// 绘制曲线02- (void)drawCurve {03 04 // 获取当前图形,视图推入堆栈的图形,相当于你所要绘制图形的图纸05 CGContextRef ctx = UIGraphicsGetCurrentContext();06 07 // 创建一个新的空图形路径。08 CGContextBeginPath(ctx);09 10 /**11 * @brief 在指定点开始一个新的子路径 参数按顺序说明12 *13 * @param c 当前图形14 * @param x 指定点的x坐标值15 * @param y 指定点的y坐标值16 *17 */ 18 CGContextMoveToPoint(ctx, 160, 100);19 20 /**21 * @brief 在指定点追加二次贝塞尔曲线,通过控制点和结束点指定曲线。22 * 关于曲线的点的控制见下图说明,图片来源苹果官方网站。参数按顺序说明23 * @param c 当前图形24 * @param cpx 曲线控制点的x坐标25 * @param cpy 曲线控制点的y坐标26 * @param x 指定点的x坐标值27 * @param y 指定点的y坐标值28 *29 */30 CGContextAddQuadCurveToPoint(ctx, 160, 50, 190, 50);31 32 // 设置图形的线宽33 CGContextSetLineWidth(ctx, 20);34 35 // 设置图形描边颜色36 CGContextSetStrokeColorWithColor(ctx, [UIColor brownColor].CGColor);37 38 // 根据当前路径,宽度及颜色绘制线39 CGContextStrokePath(ctx); 40}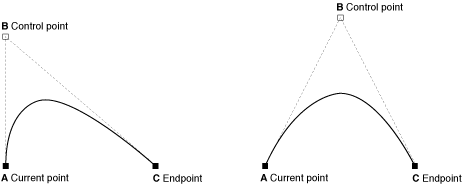
5、绘制圆形
01//以指定中心点绘制圆弧02- (void)drawCircleAtX:(float)x Y:(float)y {03 04 // 获取当前图形,视图推入堆栈的图形,相当于你所要绘制图形的图纸05 CGContextRef ctx = UIGraphicsGetCurrentContext();06 07 // 创建一个新的空图形路径。08 CGContextSetFillColorWithColor(ctx, [UIColor blackColor].CGColor);09 10 /**11 * @brief 在当前路径添加圆弧 参数按顺序说明12 * 13 * @param c 当前图形14 * @param x 圆弧的中心点坐标x15 * @param y 曲线控制点的y坐标16 * @param radius 指定点的x坐标值17 * @param startAngle 弧的起点与正X轴的夹角,18 * @param endAngle 弧的终点与正X轴的夹角19 * @param clockwise 指定1创建一个顺时针的圆弧,或是指定0创建一个逆时针圆弧20 *21 */22 CGContextAddArc(ctx, x, y, 20, 0, 2 * M_PI, 1);23 24 //绘制当前路径区域25 CGContextFillPath(ctx);26}三、在drawRect中调用
01- (void)drawRect:(CGRect)rect {02 03 // 绘制椭圆04 [self drawEllipse];05 06 // 绘制三角07 [self drawTriangle];08 09 // 绘制矩形10 [self drawRectangle];11 12 // 绘制曲线13 [self drawCurve];14 15 // 绘制圆形16 [self drawCircleAtX:120 Y:170];17 18 [self drawCircleAtX:200 Y:170];19 20}
0 0
- CoreGraphics简单绘图
- 【iOS】CoreGraphics简单绘图
- CoreGraphics简单绘图
- CoreGraphics简单绘图
- CoreGraphics简单绘图学习
- IOS开发:CoreGraphics简单绘图
- iOS学习6:CoreGraphics简单绘图
- iOS学习6:CoreGraphics简单绘图
- iOS学习——CoreGraphics简单绘图
- coreGraphics绘图
- 关于CoreGraphics绘图
- iOS绘图框架CoreGraphics分析
- iOS绘图框架CoreGraphics分析
- iOS绘图框架CoreGraphics分析
- CoreGraphics绘图: CGContextSetFillColor特定颜色无效问题
- CoreGraphics 2D绘图学习笔记
- CoreGraphics之CGContext绘图 - iOS开发
- iOS中 CoreGraphics快速绘图(详解)
- [java] 编译带有第三方库的程序
- How to search for COM and DCOM Knowledge Base articles
- 一直以来电脑只是在不断模拟人类的潜意识部分 - 思维部分就是电脑实现人工智能的目标
- codeforces 228(div1) B
- NGUI 叠加一个Sprite简单实现图标被选中状态
- CoreGraphics简单绘图
- 基于手机号码社区Truecaller获融资1800w美元
- 那拉德持股量仅为鲍尔默1/300
- 中移动4G资费¥48000/h
- 蓝桥杯-----世纪末的星期
- 微信7个非常有用的功能
- 学习Java07
- Android学习小Demo(7)SharedPreference的使用
- Java的SqlHelper 工具类