WPF教程(二十五)WrapPanel
来源:互联网 发布:华住集团 知乎 编辑:程序博客网 时间:2024/05/20 01:12
WrapPanel用于一个接一个的排列子控件,以水平或者垂直方向,当空间不足时就会自动切换到下一行。适合于需要水平或者垂直排列控件且能自动换行的情况。
水平方向排列时,每一行所有子控件的高度都被统一成固定的值,这个值由最高的那个决定;每一列垂直方向排列时,所有子控件的宽度都被统一成固定的值,这个值由最宽的那个决定。
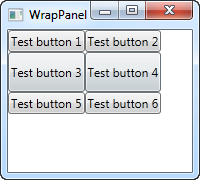
我们先来看默认情况下的WrapPanel:
<Window x:Class="WpfTutorialSamples.Panels.WrapPanel" xmlns="http://schemas.microsoft.com/winfx/2006/xaml/presentation" xmlns:x="http://schemas.microsoft.com/winfx/2006/xaml" Title="WrapPanel" Height="300" Width="300"> <WrapPanel> <Button>Test button 1</Button> <Button>Test button 2</Button> <Button>Test button 3</Button> <Button Height="40">Test button 4</Button> <Button>Test button 5</Button> <Button>Test button 6</Button> </WrapPanel></Window>

注意我为第二行中的一个按钮指定了一个高度,这就使得第二行所有按钮都被设置成了这个高度。另外,这个面板还做了一件事件:第一行放不下的时候,自动了切换到第二行。
如果你改变窗口大小,譬如缩小窗口,面板立马自动调整以适应新的尺寸:
这些规则在垂直方向排列时也是一样的。来看例子:
<Window x:Class="WpfTutorialSamples.Panels.WrapPanel" xmlns="http://schemas.microsoft.com/winfx/2006/xaml/presentation" xmlns:x="http://schemas.microsoft.com/winfx/2006/xaml" Title="WrapPanel" Height="120" Width="300"> <WrapPanel Orientation="Vertical"> <Button>Test button 1</Button> <Button>Test button 2</Button> <Button>Test button 3</Button> <Button Width="140">Test button 4</Button> <Button>Test button 5</Button> <Button>Test button 6</Button> </WrapPanel></Window>
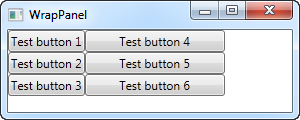
可以看到,垂直排列规则和水平方向的一模一样。按钮到达底部后就自动切换到第二列。我给第四个按钮设置了较宽的宽度,所以第二列都变成了这个宽度。
特别要注意,水平向的WrapPanel自动匹配同一行的高度,而不会匹配宽度;垂直向的WrapPanel自动匹配同一列的宽度,而不会匹配高度。看下面的例子,垂直向的WrapPanel在第四个按钮同时设置了宽和高:
<Button Width="140" Height="44">Test button 4</Button>
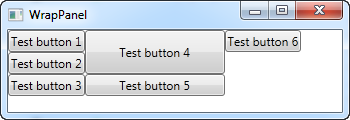
可以看出第五个按钮只使用了第四个按钮的宽,并没有使用高。于是第6个按钮被挤到了第三列。
0 0
- WPF教程(二十五)WrapPanel
- WPF-WrapPanel 学习
- WPF教程(二) WPF vs WinForms
- WPF教程(十五)文本框——内联格式
- WPF中的StackPanel、WrapPanel、DockPanel
- WPF 布局控件 之 WrapPanel
- NeHe OpenGL教程 (二十五)
- WPF and Silverlight 学习笔记(七):WPF布局管理之StackPanel、WrapPanel、DockPanel
- WPF学习记录-布局[摘抄自博客园(xiepeixing<WPF布局该如何选用panel>与(DotNet菜园<WPF入门教程系列七——布局之WrapPanel与StackPanel(二)>))]
- WPF教程(二十三)WPF面板简介
- WPF教程(二十)密码框
- WPF教程(二十一)工具提示
- WPF教程(二十二)文本呈现
- WPF教程(二十四)Canvas
- WPF教程(二十六)StackPanel
- WPF教程(二十七)DockPanel
- WPF教程(二十八)Grid
- 浮动的Div盒子。类wpf wrappanel
- 我的sublime配置
- c语言malloc()动态分配二维数组
- JAVAjdk目录结构简单介绍
- 算法导论第十五章15-2最长回文子序列
- 周易六十四卦——泽天夬卦
- WPF教程(二十五)WrapPanel
- xml
- Redis下分布式锁的实现
- 业务
- 安装Ubuntu Kylin 16.04 UKUI预览版后要做的事
- Codeforce 598E(递推)
- 正则表达式
- 语言模型-SRILM(1) 安装
- 指针